What Did You Do To Your 3rd Gen Today?

Status
Not open for further replies.
Instead of paying $2k for the local shop to swap out spark plug wires & spark plugs (plus some other things), I did it myself. I'm not good at this kinda stuff at all, so it took me a whole day (I know, go ahead and laugh). Afterwards, I realized I applied dielectric grease all wrong AND, I messed up my wire ordering, so I had to redo it. At least the second time only took like 1.5 hours. In the end, it runs great again, and it's super satisfying to unbreak something :)

That's exactly how you learn to do it right when it's your first time, the next time you will do it much quicker!
 
Well I found out the right rear lc80 caliper bleeder is leaking. So got another and slapped it on. Bleed the system and no more leak. After I was done with that I installed the perry parts bump stops on the rear. Fronts will be done later.
 
What settings are dead on your switch? There are a few causes for that.

On my Sequoia the connector to the fan was loose got to hit from the bag connection, and melted.

Could be the resistor (probably not as you just replaced it)

If you've got an early 3rd Gen, it could also be the switch itself not making good contact internally.
 
What settings are dead on your switch? There are a few causes for that.
Dead across the switch. A/C switch light also isn’t coming on, so maybe a fuse or wire?

If you've got an early 3rd Gen, it could also be the switch itself not making good contact internally.
I just bought this, is the 97 3rd gen?
 
Last edited:
97 is 3rd Gen (96-02).

If everything is dead, I'd check fuses and go from there. I'd also check where the electrical plugs into the fan under the passenger side of the dash
 
Dead across the switch. A/C switch light also isn’t coming on, so maybe a fuse or wire?


I just bought this, is the 97 3rd gen?

In my 96 if the fan is off the a/c switch light doesn't light up, should be similar in the 97.
My bad fan switch was simply worn contacts, only the slowest speed was out so in my case not the fuse or resistor.
I repaired the one I had, but could have found one in other similar year Toyotas instead if a junkyard 4Runner wasn't available, such as the easier to find at the junkyard Camry.

What made you replace the resistor, you only had high speed? What have you tested or checked so far? It sounds like the fan worked when you installed the new resistor, did all the speeds work?
 
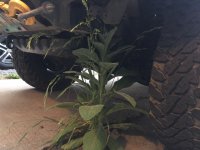
One down, one to go...
(No making fun of my urban garden!)
 

Attachments

  • IMG_3283.JPG
    IMG_3283.JPG
    107.2 KB · Views: 181
Weak! Got to step up your urban garden game!

Oh yeah and the eimkeith link guards (what ever they are called) looks good.

Fine!
Here's a better shot from the front :trophy:

The guards are extremely well formed and a fairly quick install.
I am replacing my super-dented tank, so the next one is a tad more involved...
 

Attachments

  • IMG_3289.JPG
    IMG_3289.JPG
    116.8 KB · Views: 164
Fine!
Here's a better shot from the front :trophy:

The guards are extremely well formed and a fairly quick install.
I am replacing my super-dented tank, so the next one is a tad more involved...

Impressive! ! :trophy:

Nice, I'll be looking into adding those at a later date.
 
Getting ready for our 18 day Colorado/Utah trip in a week and a half - checked the oil in the manual tran/NWF case doubler, and the transfer case.
Manual trans: full (pulled fill plug out, a tiny thread of oil came out)
NWF doubler case: exceedingly slightly low - put about 3 little pumps of oil into it. This case seems to weep a tiny bit of oil from the top, perhaps the shifter area? Not an issue or problem.
Transfer case: full, pulled the fill plug and a tiny bit of oil came out.

Good to go!
 
Last edited:
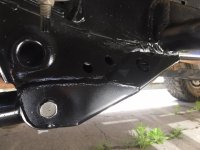
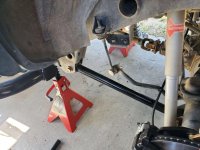
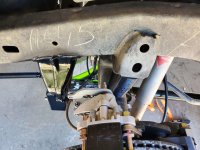
Well today I tackled the upper link bushings and panhard bushings. Since I was taking out the panhard, I also installed eimkeiths PCK. Cleaned up the paint and welded it all up. Cleaned the bar and gave it a new shot of paint. Fought with it to get it back in. Ok, figured a tiny shift but using straps I got it reinstalled.

Now for the upper links. Removal, super easy. Cleaned up and painted. New strongflex bushings installed with antiseize for lube. And for some strange reason, the link grew a half an inch! Ok maybe the oem bushings were really shot?! Really fought to get it installed. Leaving everything loose, did the next upper link. This time it shrunk! Ok wtf is going on. But got them all back together and torqued down.

Here is another crappy thing I found. My OME 891 rear springs have sagged badly. When I installed them I had to remove the shocks, and use a spring compressor to install them. Now today when I hit full droop both springs fell out! Damn things must have sagged 2.5 to 3 inches! Ugh! I don't quite want to install the dobinson lc80 front springs until I have the front radflos and rear shocks for the outboard kit.

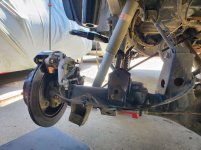
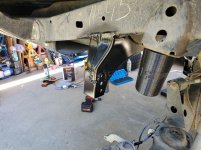
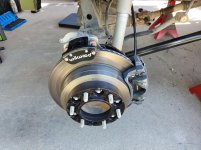
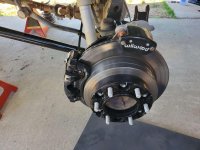
On to pics. Last few are of the perry parts bumps, the clerance of the e-brake caliper and yes, left rear caliper is black and the pass side is gray. Along with the spc lower links.
 

Attachments

  • 20240624_141058_ZSkcMM258K.jpg
    20240624_141058_ZSkcMM258K.jpg
    134.8 KB · Views: 337
  • 20240624_141117_XPF8wBBc0m.jpg
    20240624_141117_XPF8wBBc0m.jpg
    136.8 KB · Views: 337
  • 20240624_141146_0BsRmdiT38.jpg
    20240624_141146_0BsRmdiT38.jpg
    136.6 KB · Views: 336
  • 20240624_144107_M0ANV02x3w.jpg
    20240624_144107_M0ANV02x3w.jpg
    137.1 KB · Views: 338
  • 20240624_141123_zWpavjBH7I.jpg
    20240624_141123_zWpavjBH7I.jpg
    137.6 KB · Views: 339
  • 20240624_141137_Wb6FcqVK73.jpg
    20240624_141137_Wb6FcqVK73.jpg
    135 KB · Views: 337
Last edited:
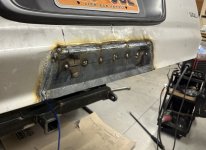
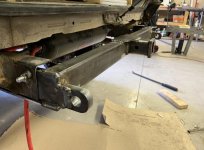
I picked up a bunch of steel on Wednesday for front and rear bumpers. Over the past couple days I made the base for the rear bumper, with the hitch receiver/recovery points.

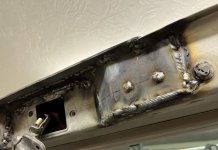
Today I cut into the bottom of the hatch and did some reinforcing with 1/8 plate. Just need to run two tubes from bottom to top and I can mount my spare tire on the hatch.
 

Attachments

  • IMG_6888.jpg
    IMG_6888.jpg
    132.7 KB · Views: 303
  • IMG_6889.jpg
    IMG_6889.jpg
    117 KB · Views: 300
  • IMG_6887.jpg
    IMG_6887.jpg
    53.7 KB · Views: 289
Looks good! Can't wait to see the finished product!

Today I bit the bullet and ordered the last of my suspension stuff (went on sale). Radflo coilovers with resiviours and extended travel, rears are 10" eyelet mount with resiviours as well to go with the arcworx outboard mounts. My wallet just cried.....sigh.
 
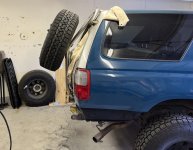
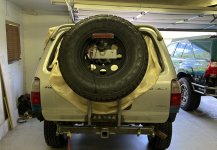
Almost finished with my hatch-mounted tire carrier! Got all the tubes and the mounting plate fitted up and partially welded on.

The tire is right where I want it height-wise, but I do think I could have gotten it tighter to the body if I had more patience with the round tubing. It sits a little over 6" away from the glass as it is.

Smooth sailing from here, just need to trim a couple tubes, finish weld, paint and then wrap the hatch. Probably my most stressful project yet. Glad that it turned out well.
 

Attachments

  • IMG_6893.jpg
    IMG_6893.jpg
    122.5 KB · Views: 283
  • IMG_6894.jpg
    IMG_6894.jpg
    131.4 KB · Views: 277
Status
Not open for further replies.

Members online

Forum statistics

Threads
278,316
Messages
3,554,120
Members
248,016
Latest member
Advally Service

Trending content

Back
Top