What Did You Do To Your 3rd Gen Today?

Status
Not open for further replies.
What did you do to your 3rd gen today?

After a week and a half of it being on jack stands in the garage, I did nothing to my 4runner today. It was nice. I didn't need to do anything.
 
Today I finally got around to installing my non motorized antenna. I did have it hooked up and sitting in the front seat (don't judge I've been busy lol). I also got my cb installed in place of the ashtray. I routed my cb cable to the back and got it ready to mount my firestick. All in all a productive day!
 
2upe5yte.jpg


Installed some new "factory" fog lights
 
New '99 clear headlights, bulbs, and aiming. You could barely even tell the old bulbs were turned on. Hanging onto the old housings in case the damn HID projector refit illegality thing changes.
 
Installed a bullbar/brush guard that I got off CL for $160. This one actually had mounts for auxiliary lights, the ones on eBay doesn't have it and costs over $100 more.

What do you guys think?

1395175_10151942211093567_49726596_n.jpg
 
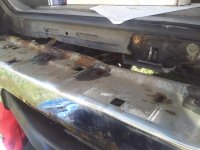
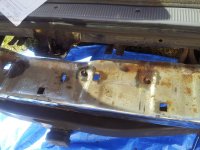
Finally bought some Chrome polish/rust remover to get the tiny dots of rust off my bumpers before winter. I will be spraying them down with WD40 once it starts snowing.

It made a huge difference, got rid of all the spots and it's nice and shiny now.

The picture doesn't do it justice. It looks like it has marks but that's the reflection from the ground.
 

Attachments

  • 20131110_162953[1].jpg
    20131110_162953[1].jpg
    134.7 KB · Views: 1,151
  • 20131110_163348[1].jpg
    20131110_163348[1].jpg
    134 KB · Views: 1,131
Well.............. Not exactly what I did "Today" but over the last "3 Weeks".

Re-Geared to 4.88
Re-Built the starter
Re-Built the lower links
PATCO built me new upper links (See images)
Built a new front skid (See images)
Installed new (old style) Toyo AT 285/25R16's

Toyota_Links_1.jpg


Toyota_Links_2.jpg


Toyota_Links_3.jpg


Toyota_Skid_1.jpg


Toyota_Skid_2.jpg


Toyota_Skid_3.jpg


Toyota_Skid_4.jpg
 
blue wire mod, weather tech mats, replaced instrument LEDs, mounted CB antenna, fixed fog lights. Starting small...

Also ordered items for the rear breather mod.

Soon to come will be stereo upgrades.
 
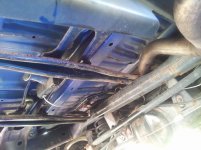
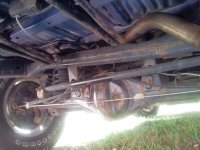
Replacing rear bumper on 2000 4Runner

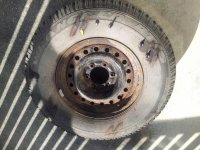
Today, I tried to replace rear bumper of my 2000 4runner, which I bought last month with 120k. Every nut and bolt was rusted but wd40 was there until I reached last 4 nuts. The location of nuts is hard to access and I am now unable to open them. I think, I have to visit some body shop to get them out.

Any suggestion to remove these nuts?

Also any suggestion to stop body and frame rust? It was first time, I was under the truck and got little surprised as this truck remained in VA for all his life.

 

Attachments

  • 20131110_125245.jpg
    20131110_125245.jpg
    136.1 KB · Views: 1,130
  • 20131110_125000.jpg
    20131110_125000.jpg
    136.8 KB · Views: 1,116
  • 20131110_125222.jpg
    20131110_125222.jpg
    127.9 KB · Views: 1,126
  • 20131110_125227.jpg
    20131110_125227.jpg
    133.7 KB · Views: 1,224
  • 20131110_125028.jpg
    20131110_125028.jpg
    135.3 KB · Views: 1,120
Today, I tried to replace rear bumper of my 2000 4runner, which I bought last month with 120k. Every nut and bolt was rusted but wd40 was there until I reached last 4 nuts. The location of nuts is hard to access and I am now unable to open them. I think, I have to visit some body shop to get them out.

Any suggestion to remove these nuts?

Also any suggestion to stop body and frame rust? It was first time, I was under the truck and got little surprised as this truck remained in VA for all his life.

soak from underneath if not done so yet and work them back and forth. take the correct size socket with an extension, put over bolt and give it a manly smack with a nice size beater. the impact will shock the rust and break them loose.
 
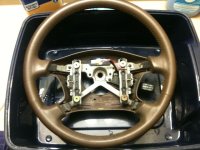
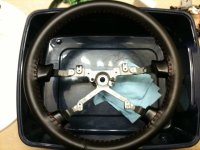
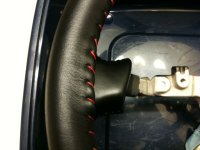
Finished the replacement for the chewed up steering wheel from the PO. Started with an oak wheel ($25 on ebay), dyed black using a VHT vinyl dye ($10), then wrapped it with a Wheelskin (red theads to go with my red dash lighting, baseball stitch, $50.)

Before:
IMG_0319.jpg

After:
IMG_0323.jpg
IMG_0324.jpg

Pretty happy with how this turned out. The vinyl dye worked out awesome. Throw it on the truck next weekend.
 

Attachments

  • IMG_0319.jpg
    IMG_0319.jpg
    53.3 KB · Views: 1,172
  • IMG_0323.jpg
    IMG_0323.jpg
    46.9 KB · Views: 1,168
  • IMG_0324.jpg
    IMG_0324.jpg
    41 KB · Views: 1,172
Also, tore out some shitty wiring from the PO, or the PPO. Going to have to do that properly once I put a new stereo and an inverter in.
 
Yeah, I need to get some parts before I can install it. The kit was missing the thread by slip 90's that connect the cooler to the hose.
 
patience, a hammer, and PB Blaster

Today, I tried to replace rear bumper of my 2000 4runner, which I bought last month with 120k. Every nut and bolt was rusted but wd40 was there until I reached last 4 nuts. The location of nuts is hard to access and I am now unable to open them. I think, I have to visit some body shop to get them out.

Any suggestion to remove these nuts?

Also any suggestion to stop body and frame rust? It was first time, I was under the truck and got little surprised as this truck remained in VA for all his life.
Eff WD40. Crap. Use PB Blaster. spray bolt, whack head with hammer 5-6 times. wait 5 minutes. spray, whack, wait. etc. Whack jars the bolt, moves it the tiniest slightest little bit. When it moves the PBB is able to breach the perimeter and start working its way into the threads. Patience is the key. May take 15 minutes, or 1 hour or 3 days. Leverage is your friend, use a cheater bar and pipe, but if you force a rusted bolt you will twist off the head and then need to drill it out.
I alternate between tightening and loosening, counter clockwise then clockwise. When you get the bolt to budge, stop. Soak with PBB. Whack, whack. tighten/loosen. You need to work it loose. Just bc you're getting some movement doesnt mean it is ready to come out. The rust may be several threads deep. After the PBB breaches the perimeter it is just a matter of time. Lots of lube and patience, an approach which greatly increases the odds of success in all screwing and unscrewing endeavors.
 
Last edited:
Status
Not open for further replies.

Members online

Forum statistics

Threads
278,316
Messages
3,554,124
Members
248,016
Latest member
Advally Service

Trending content

Back
Top