What Did You Do To Your 3rd Gen Today?

Status
Not open for further replies.
2001 SR5. Ordered OME 883/891 3" lift with diff. drop kit. Anybody have pics of OME lift? Spacers or not? Any extra needs like panhard bars, UCA's, CV' ect? What tire size? Just looking for ideas. Just bought it last week and plan to tow a boat and drive on the soft sand beaches of N.C. Not a daily driver.
 
Finally got my 4runner and my wife's car inspected today! Other than driving about 100 yards from my neighbor's field to my garage today is the first time i ever got to drive this thing, and now i know i love it!
 
2001 SR5. Ordered OME 883/891 3" lift with diff. drop kit. Anybody have pics of OME lift? Spacers or not? Any extra needs like panhard bars, UCA's, CV' ect? What tire size? Just looking for ideas. Just bought it last week and plan to tow a boat and drive on the soft sand beaches of N.C. Not a daily driver.

I've got pics in my build thread, 891 and spacers up front. Stock tires until I get myour new ones mounted this week but it'll give you an idea. General consensus was 265/76r16 and that's what I went with but I'll eventually go 285/75's.
 
Installed Tacoma struts on a Tacoma... Oh wait this is a 4runner site...

Installed my 906 rear springs, got 1.5 inch lift... Gonna set front bilstiens to the 2nd Perch for 1.3 lift. Can't wait to tackle on Monday.
 
Destroyed my 99 Woodgrain dash piece around my stereo trying to Install a new stereo. Any ideas for a good fix?


Sent from my iPhone using Tapatalk
 
Destroyed my 99 Woodgrain dash piece around my stereo trying to Install a new stereo. Any ideas for a good fix?


Sent from my iPhone using Tapatalk

Pics? Mine had the woodgrain kit in it when i got, but i guess age and abuse it was all delaminating and looked horrid, so i took it all off... it is double stick taped on, so if you are careful you can slowly pry/cut it off, then go back with goo be gone to get the rest of the tape residue off.

Walmart had the radio install kit for around $15 that gives you a small teay under a single DIN radio (I cut the bottom of the tray out and mounted a 12v outlet/ usb/ volt gauge)
 
Washed it. Waiting on the arrival of my AOR front plate bumper so that I can swap out my SW bumper. Also waiting for my insurance settlement after the lawyers have their say concerning my accident back in June of 2015 when I was rear ended. Then I might be looking to finally settle on a lift. But for now... it's the waiting game...
 
Lots of Tasks.. all right now

So... I haven't taken the time to speak here recently, but I've been doing a lot of work. Sadly still too early in membership for a build thread creation. So what' I've done and will be completing in the coming 2 weeks.

Interior: all plastics removed and recoated black for a complete black/red accent color change, installing my wet O covers, 99+ cupholder swap and 99+ center dash/vent combo swap, bedlined the floorpan + CB ashtray install + 6 switch mount in second radio DIN.

Maintenance: with the dash out- doing a new ac evaporator, expansion valve, heater flow valve, and heater core

Exterior: Added cb mount with firestick 2, removed stock antenna (using splitter through CB antenna) and used OEM hole plug, 99+ Sport hood swap (Sadly can't afford paint yet.. but it'll work for a while.

Motor- Installing supercharger :))) arrived today, and redoing valve cover gaskets. Elm327 bluetooth monitor (awesome)

Suspension: currently have OME 892's in the rear (RARE) however I sit low in the rear.. apprx. 1.5-2 inches from the front so I'm attempting to find a way to alleviate that issue as well.


My Rig - 98 T4R Limited with 280k. Yes, it's my daily driver, and all of this is current work i'm doing. There's a drivers seat , a rear seat for the kiddo seat and my gauges are sitting on rags... hope to have this all put back and complete by the finish of next weekend.

 
How much of a pain is the roll bar install?

Sent from my SM-G860P using Tapatalk

It takes some work. You need to cut 2 inches off the front legs at the right angle to fit the wheel well. Then weld on new feet. Paint of course. I went through the rear door to install, removing some interior paneling. Drill holes and bolt it down. Then customize or not.

For me I didn't have access to a welder so I took it to 4Wheel Parts Seattle for them to weld on new feet but got screwed (long story). That was my hardest part.

Overall I love mine. I've used it in multiple ways many times.
 
Washed it. Waiting on the arrival of my AOR front plate bumper so that I can swap out my SW bumper. Also waiting for my insurance settlement after the lawyers have their say concerning my accident back in June of 2015 when I was rear ended. Then I might be looking to finally settle on a lift. But for now... it's the waiting game...

When did you order the AOR plate? I ordered mine 5 weeks ago and I'm still waiting patiently (not really. I wishfully check my email multiple times a day) :frog:
 
May sound a bit rediculous, but in my 04 GTO race car, when i built my full 12 point cage ( i already had the whole floor out of the car). I had the body shell sitting with the bottom of the rocker panel about 1 1/2 foot off the ground with 4x4 and 6x6 blocks cut to length to mock as the floor. Started with the main hoop cut to length so it was just against the headliner. I'd tack a bar in place to the main hoop, knock the blocks out and drop the cage down on the garage floor so i had that 1 1/2 foot to weld all the way around, then I'd let the weld cool and put it back up on the blocks to tack weld the next peice in.

We've used a hole saw on another car (older full frame chevy) so the cage legs could go right through the floor pan and sit on the garage floor, then at the end we welded the cage feet on, raised the finished cage in place then welded the feet to the chassis.

A little more work to cut the floor, but makes the whole job a LOT easier, just have to patch and seal the floor afterward

It takes some work. You need to cut 2 inches off the front legs at the right angle to fit the wheel well. Then weld on new feet. Paint of course. I went through the rear door to install, removing some interior paneling. Drill holes and bolt it down. Then customize or not.

For me I didn't have access to a welder so I took it to 4Wheel Parts Seattle for them to weld on new feet but got screwed (long story). That was my hardest part.

Overall I love mine. I've used it in multiple ways many times.
 
For me it was a 2 day job. I've never welded before, besides maybe my initials on a piece of steel. Day one was cutting and grinding. I sectioned out 2 inches of the pipe rather than just cutting off the plates, taking 2 inches out and welding the pipe back on. So it took some times because I didn't want to weld the pipe on crooked, but once the pipe was back on I ground down the welds, figured out the angle for the feet, checked the angle a bunch of times before committing to it, weld and paint. For my first DIY it was a lot of fun. Just took my time and couldn't be happier. For $40 to learn how to weld and build some confidence with some easy "fabrication" it was well worth it.


How much of a pain is the roll bar install?

Sent from my SM-G860P using Tapatalk
 
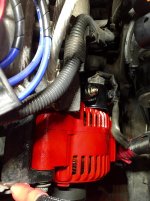
Friday installed my new 200amp Alternator from (Marion Bumper2Bumper).
Powder coat Red beauty. :)
 

Attachments

  • image.jpg
    image.jpg
    131.1 KB · Views: 454
Status
Not open for further replies.

Members online

Forum statistics

Threads
278,316
Messages
3,554,120
Members
248,016
Latest member
Advally Service

Trending content

Back
Top