What did you do with your 4runner today?

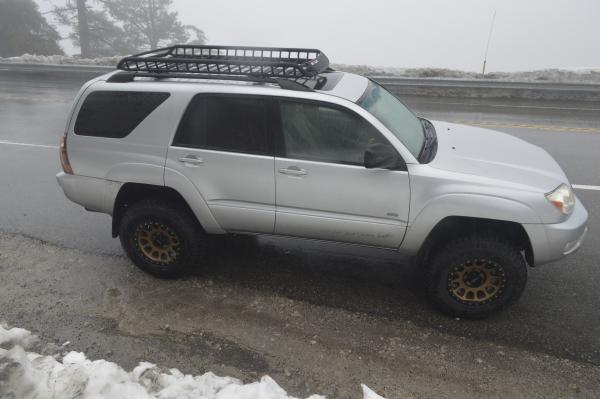
Took my daughter to play in the snow on Saturday.
primetime4370-albums-photos-picture54644-dsc1102.jpg

Nice man! Where did you go I live in Oc too
 
Did a Zero Calibration Reset today on my 2004 Limited 4x4 V8 using a fantastic tool from Montego Murph. My VSC lights were still on after replacing my gas cap and clearing the error for that.

Still debating my next improvements on my 4Runner.

I was looking at pulling off my side steps. Does anyone know what they weight? They are not the best looking.

I also already have some off road lights but not sure of the best way to hang them. At two as ditch lights or just hang them from the bumper/grill area.
The steps are pretty light since they're just plastic, so if weight reduction is your goal they don't help much.

However...if you're aiming for clearance, take em off! Also looks much better without em, imo. Makes the truck look a decent bit taller.
 
Had my front windows tinted to match the rears
Before:
74eae067adbeab3155e8076db8306db5.jpg

After:
5249257296deb5d79d85c01e07a665d8.jpg


Swapped out remote case:
20e881763ac0b31a876659c40de3dd52.jpg


Sent from my iPhone using Tapatalk

how much did the window tinting cost you? been meaning to have this done on mine and just looking for a ballpark figure from someone. just the fronts to have them match the rears.
 
Having the fronts tinted was one of the first things I did when I bought my '07 in 2014. I had it done previously on the Xterra I owned and it makes a tremendous difference, especially if you live somewhere hot like Georgia.
 
how much did the window tinting cost you? been meaning to have this done on mine and just looking for a ballpark figure from someone. just the fronts to have them match the rears.


I got the best tint the shop offered which is supposed to reject some heat etc.
It was $95 for both from window and I had the windshield done for $200


Sent from my iPhone using Tapatalk
 
Noticed my headliner was soaking wet and dripping by the A pillars on both sides. It's the freeze/thaw time here.

Attempted to clean out the front sun roof drains with wire, weed whacker line and compressed air. No luck.

Vacuumed out the water in the line by McGivering the pneumatic brake bleeder and some 1/4" line. Poured in -55* RV antifreeze back into the drain lines. 30 mins later, I got the drips.

Now to go clean up my headliner.
 
Painted the Spidertrax I recently bought (thanks, [MENTION=102822]JONBOY345[/MENTION]) with Rustoleum High Heat paint as I like the black look better behind the wheels. I'm planning to install them tomorrow and will post before/after pics.

Prep included:
- brush washing with Simple Green & Dawn
- scuffing with a sanding pad
- taping off the lugs
- wipedown with DupliColor Grease & Wax remover
- cloth dry
- blast of high pressure air to take care of any remaining dust.

Note - didn't prime since the high heat paint specifically recommended no primer.

I've read online that the paint sometimes flakes off the mounting surfaces, but I'm not worried about that as the edge is the only thing that will be visible. And if the whole thing goes south somehow, I'll pull them off and get them powdercoated.

BTW, this was a perfect day for spray painting, which is usually a PITA here in north Georgia because of the consistently high humidity (usually 99% in the morning and 80+ later). The paint was drying so quickly that I thought something was wrong. Checked the humidity and it was 14%, almost unheard of around here.

Before
diuMm03l.jpg


Back sides after painting
uByrfSql.jpg


Finished
T5AKA9hl.jpg
 
Last edited:
Got the Spidertrax installed and made a before/after comparison collage.

For a basis to compare how this might work for your truck, mine is close to leveled, otherwise lift is very mild (the small amount afforded by my new-to-me TRD Offroad setup). Tires are SE stock size Michelin Defenders and obviously it’s on stock SE wheels. The tires do rub on the front of the fender liners. Unfortunately I didn't find J.A.'s great writeup before installation or I would have addressed the issue then. I'll do it today.

You wouldn’t think 2.5” of additional width would be that big a deal, but I really like both the look (this stance is how 4Rs should come from the factory) and the driving characteristics.

More to come on the install, which is very simple but can be made even more so through a few tips.

1RwtO48l.jpg
 
Last edited:
Having installed the smokers kit, but hated looking at the cig lighter, I started looking for a lighter with a Toyota logo on it, but couldn't find one I liked.

Ended up getting a twin USB charger with a trick display (matches our interior lighting).

nkyISGXl.jpg


looks cool at night.
 
Toytec 3” ultimate coilovers and Icon delta joint UCA’s went on
 

Attachments

  • ABC18F61-3748-410F-9CF5-450853C0A0C0.jpg
    ABC18F61-3748-410F-9CF5-450853C0A0C0.jpg
    137.5 KB · Views: 386
  • 39C018DC-B001-47D1-8661-A4A968BA7A90.jpg
    39C018DC-B001-47D1-8661-A4A968BA7A90.jpg
    71.1 KB · Views: 382
Installed and filmed a video of said installation of my Prinsu rack for the 4th Gen, since there isn't one out there.

<iframe width="560" height="315" src="https://www.youtube.com/embed/fbU7uLERu0g" frameborder="0" allow="accelerometer; autoplay; encrypted-media; gyroscope; picture-in-picture" allowfullscreen></iframe>

Tested my 110 shipped amazon awning as well.

t4r-jpg.504816


Ready for it to stop snowing already so I can get my camp on.
 
Having installed the smokers kit, but hated looking at the cig lighter, I started looking for a lighter with a Toyota logo on it, but couldn't find one I liked.

Ended up getting a twin USB charger with a trick display (matches our interior lighting).

nkyISGXl.jpg


looks cool at night.

Haha, I just installed my smoker’s kit this past Saturday, and since I don’t smoke, I also bought a small, dual USB insert for the lighter spot. I didn’t see one like your though, with the volt meter, and amber! Mine has blue backlighting. It looks fine, but I would’ve preferred the matching amber. I plan to eventually replace the whole socket, and wire it for full time 12v. so this will do for now.
 

Members online

No members online now.

Forum statistics

Threads
278,316
Messages
3,554,111
Members
248,016
Latest member
Advally Service

Trending content

Back
Top