Writeup: HVAC Damper Servos Diagnostic/Repair/Replace Options

Joex481

New member
Hello all,

I've had to repair two of my three air damper servos in my 2004 4Runner (single climate zone). The first one was bad when I bought the car, and that repair has lasted two years so far. I just got done fixing the second one, which had a different issue.
For reference, the first servo had a disengaged motor shaft, and the second servo had dirty contacts. The writeup has photos from the second repair, but I will include some tips and info for the first one as well.

Warning, please note, this project is not for the faint-hearted. While both repairs took about 4 hours each, there are a lot of difficult steps. You also do risk breaking plastic parts -- I was able to avoid breaking anything too important.

Let me know if there's any improvements I can make (aside from ripping it apart again, sorry if any of the pictures are difficult, I can try to explain if needed)

Tools you need:
Phillips screwdriver
10mm socket & wrench
8mm socket & wrench
Short (~3 in) Phillips screw driver
Knife or razor blade
Large flat screwdriver (I used a 12" long one)

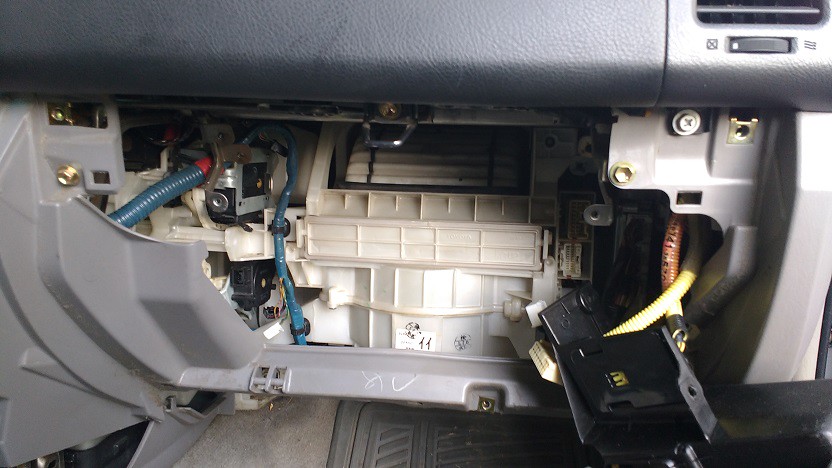
Step 1: Remove the glovebox. Squeeze the side walls so the stops can come past the dash frame, then unclip the box at the base.


If you're not sure which servo you plan to remove, at this point, turn on your HVAC system and adjust the controls. The top servo is the air mode servo, which changes where the air blows (floor, windshield, torso, combo, etc.). The bottom servo is the air mixer servo, which adjusts for temperature. Turn the air temp to LO and HI to trigger movement. The servo will move when the setting has crossed the cabin temperature threshold, but will be guaranteed movement either way on the LO and HI settings, disregarding the cabin temperature. If either of these servos is not moving properly, you will be able to ID what servo needs to be removed. If both are working properly but you are still hearing noise, it's possible the outside air servo is bad, which is mounted on the right side of the blower assembly. Press the cycle air button on and off and check if the large flap opens and closes on top of the blower assembly.

Step 2: For safety, turn the key to lock, and disconnect the negative terminal for your battery. Wait 90 seconds before proceeding. I read this on autozone's guide for removing the blower assembly. I did not disconnect my airbag sensor just to be sure, you can work around it.

I went through steps 1-19 on the set of instructions linked below. Detailed images following.
Autozone Repair Guide

I did skip a few items that I didn't think were necessary.

Step 3: Not pictured, you will need to remove all of the console trim necessary to remove the stereo. Follow the linked guide below through step 5.
How to Remove the Navigation Head Unit from a 2003 Toyota 4Runner

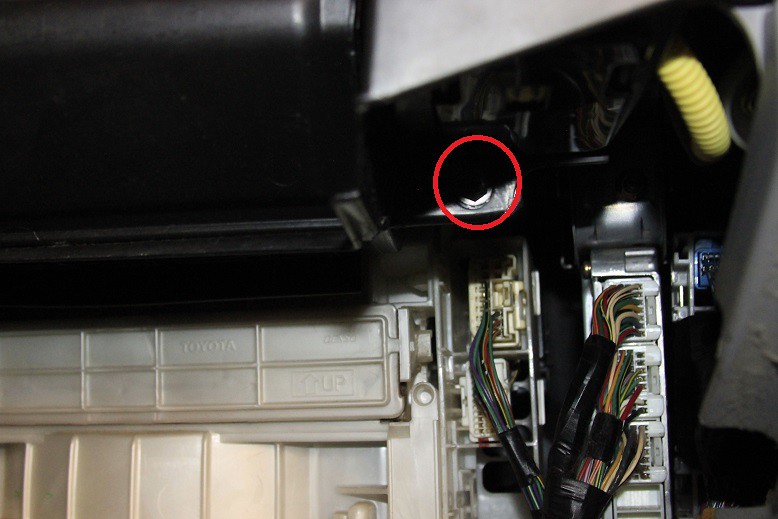
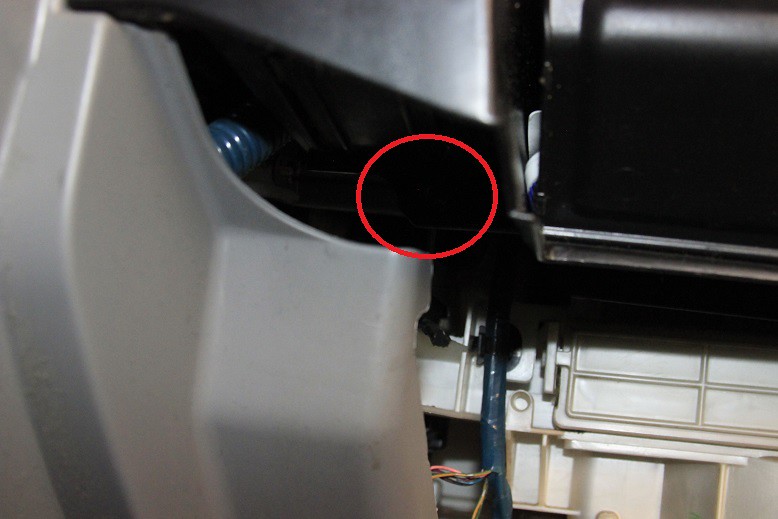
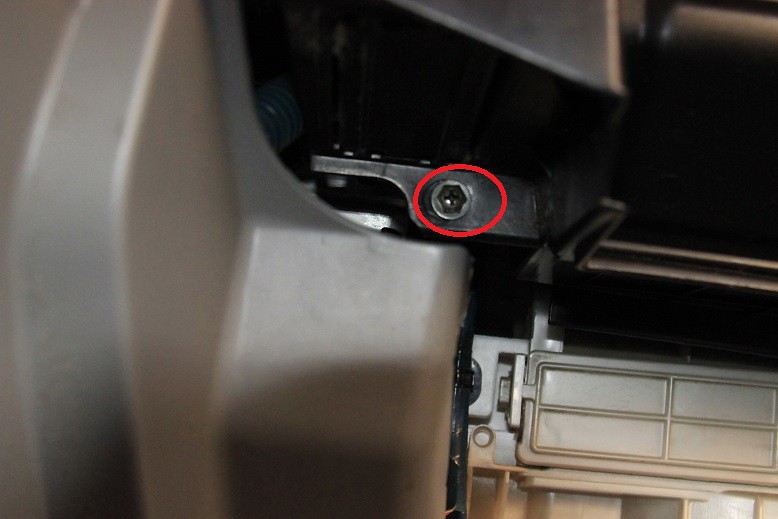
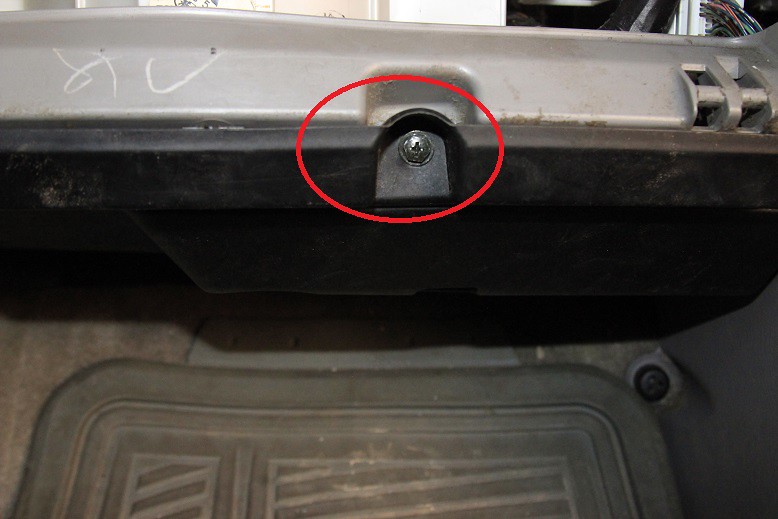
Step 4: Remove the secret compartment. There are four screws pictured. The airbag sensor (if I'm not mistaken) is attached to this panel, so you'll have to set it aside if you don't want to remove it. Remove the lower kick panel. There is one bolt holding it in. Disconnect TPMS computer.
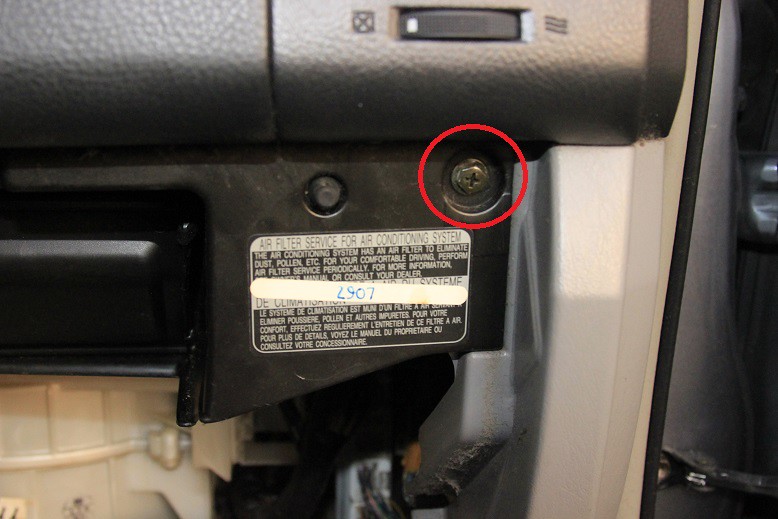
Secret compartment screw 1
Secret compartment screw 2
Secret compartment screw 3
Secret compartment screw 4

Kick panel bolt
Kick panel clip (red)
TPMS Computer connector

Step 5: Remove the air duct from the left side pointing towards the passenger side floor. I used a screwdriver through the center console to pry the latch loose.
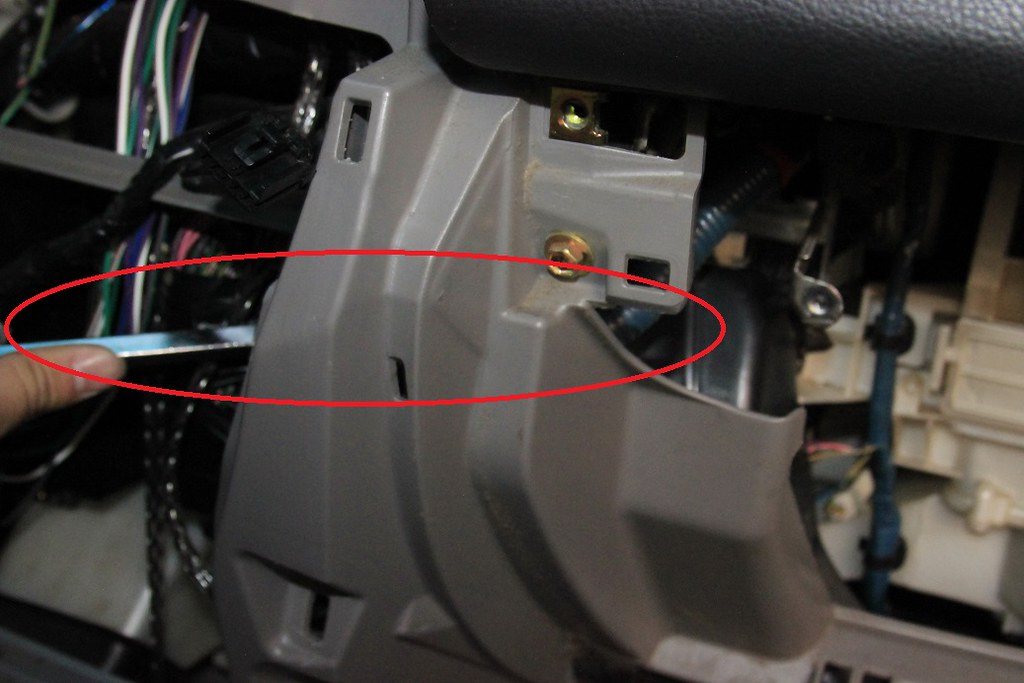
Screwdriver location
Screwdriver tip location
Removed air duct

Panels Removed (note airbag sensor cable (yellow wires) and secret compartment hanging to right)

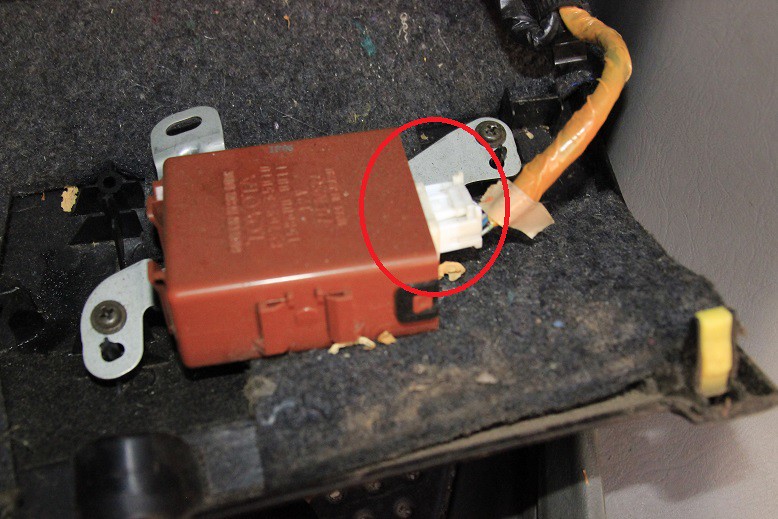
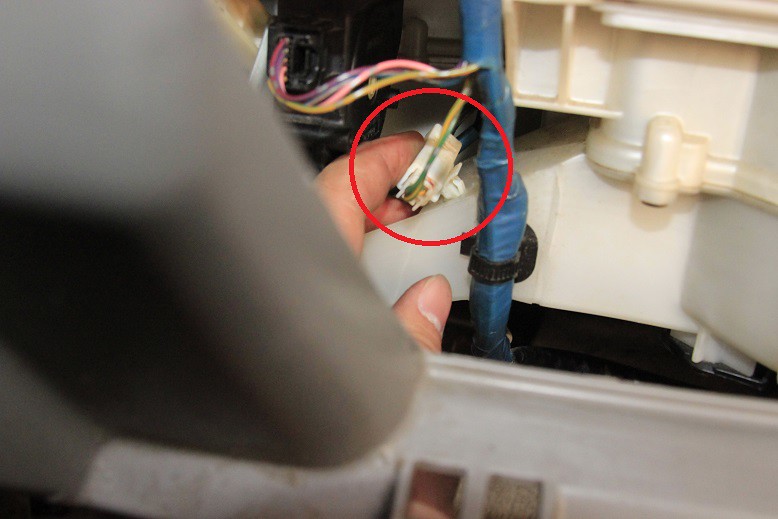
Step 6: Disconnect the cables for the two servos on the left, and the small 2 wire cable attached to the blower assembly.
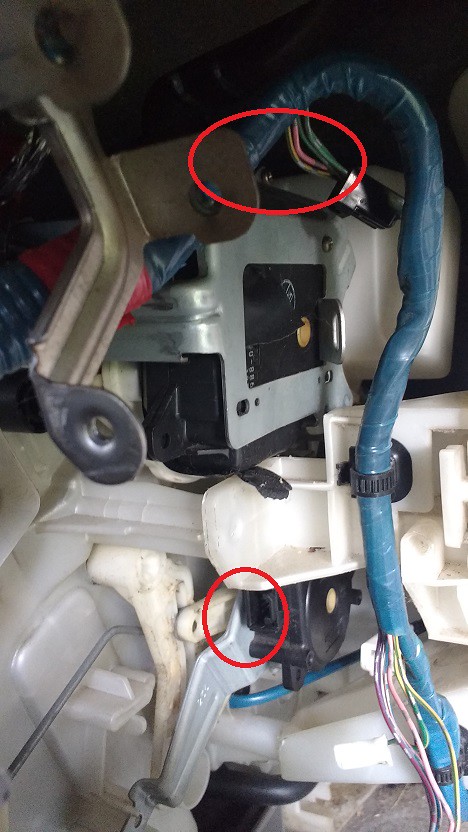
Air mode and air mixer servo cable locations
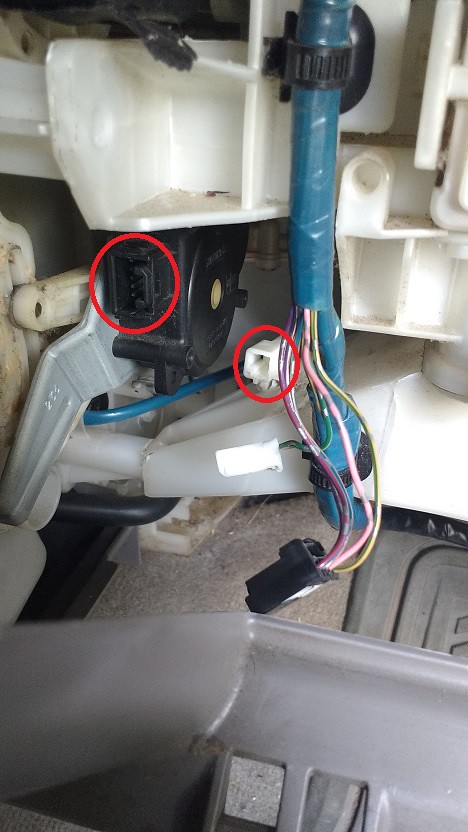
Air mixer and two wire cable locations (note air mixer is pictured a second time)
 
Last edited:
Register to hide this ad
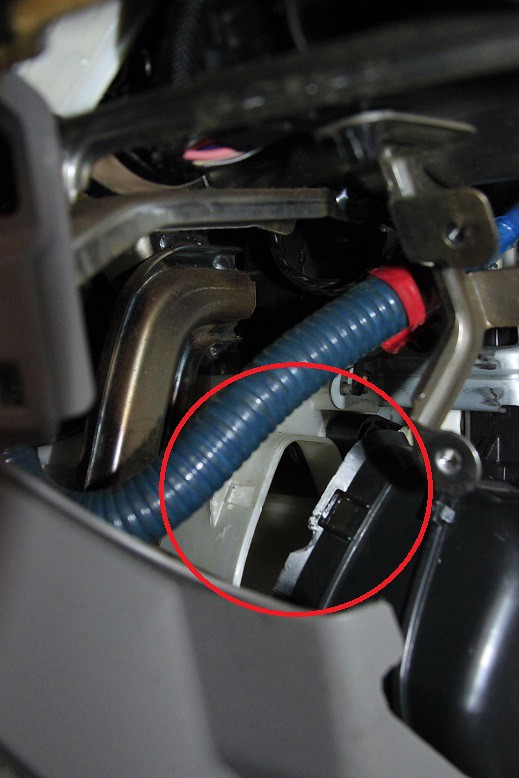
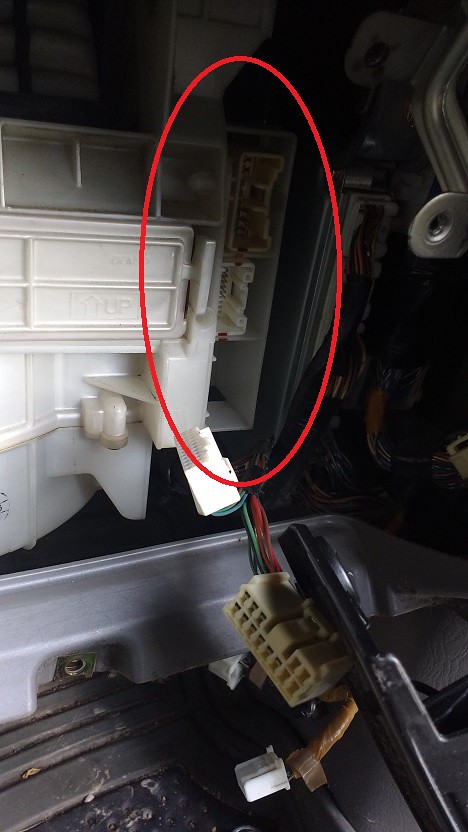
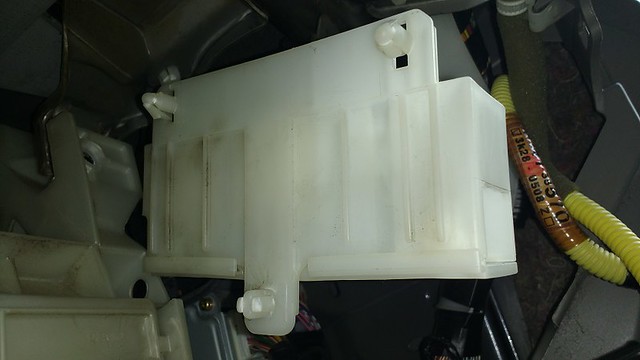
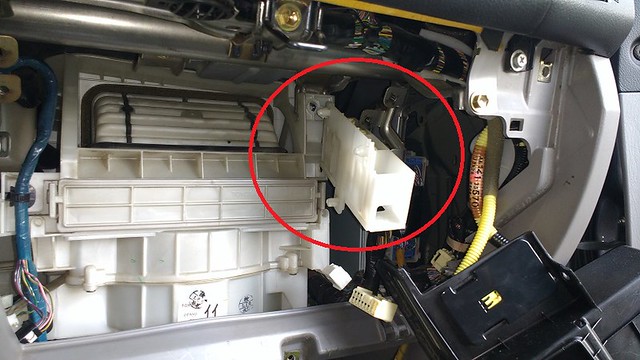
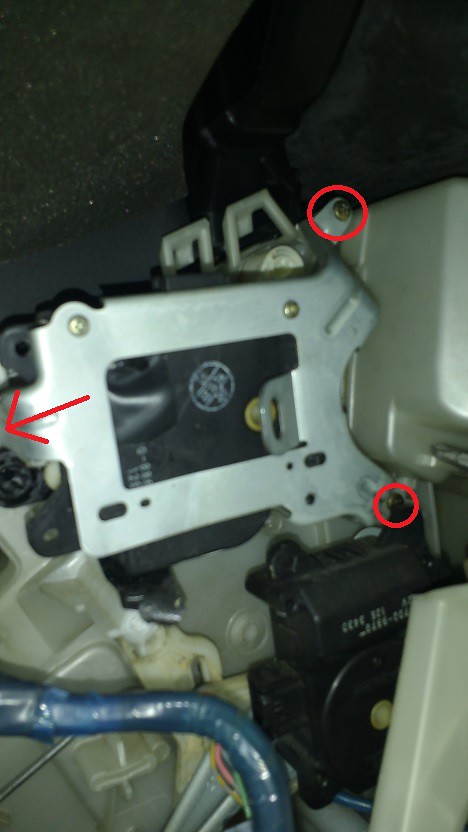
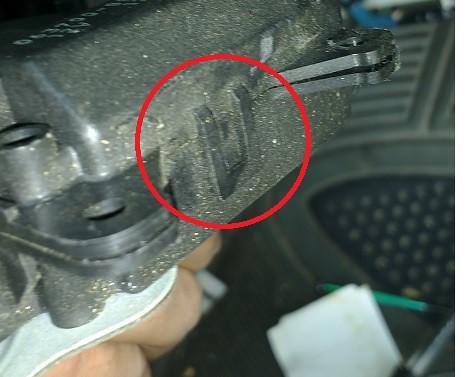
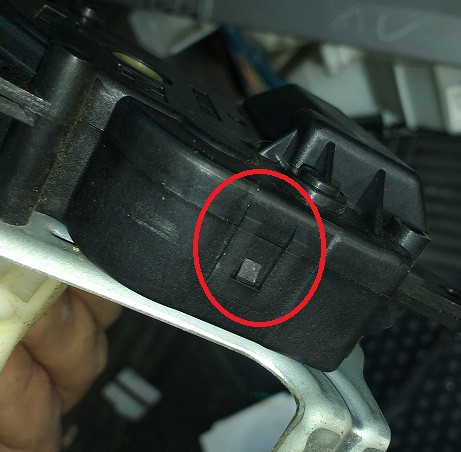
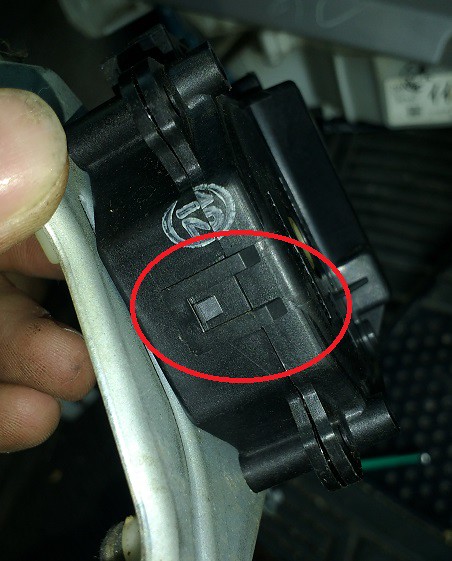
Step 7: This step relates to step 13 on the autozone instructions. Detach the small 2 wire cable from the blower assembly. Detach the large wire harness from the lower right of the blower assembly. Disconnect the connectors and detach the connector box from the right side of the blower assembly. There are 3 clips holding this box to the blower assembly.

Detached 2-wire cable

Large Wire Harness View 1
Large Wire Harness View 2

Connector box, connectors removed
Connector box back clip view from underneath
Connector box front bottom clip view from underneath
Connector box front top clip
Loose connector box
Loose connector box 2

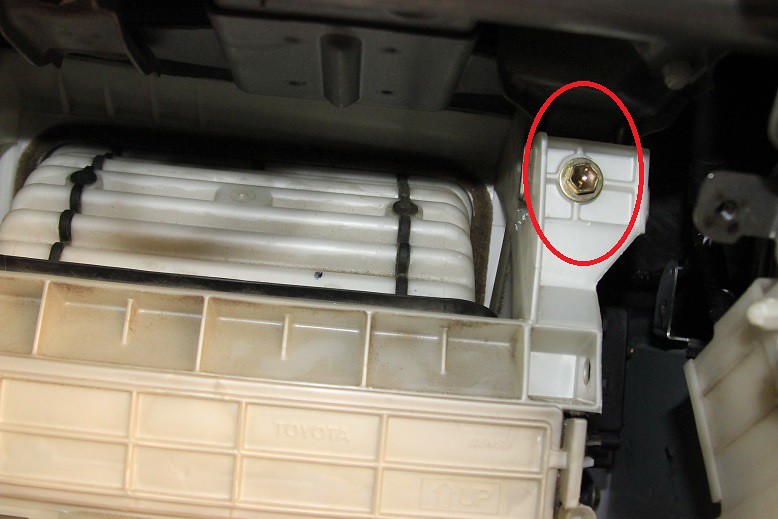
Step 8: Remove the three bolts and one nut holding the blower assembly. The assembly should now be slightly loose and have about 1/2" of play. (Autozone step 14)
Front left blower assy bolt
Back left blower assy bolt
Back right blower assy nut (blue)
blowerassybolt3Top right blower assy bolt


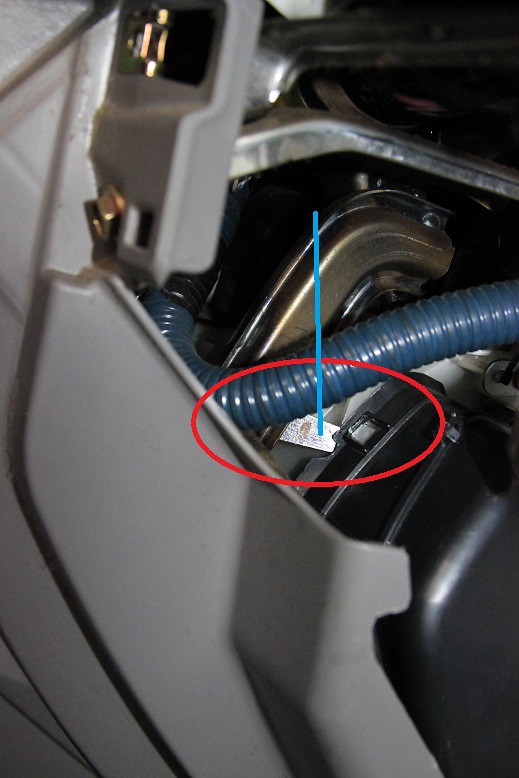
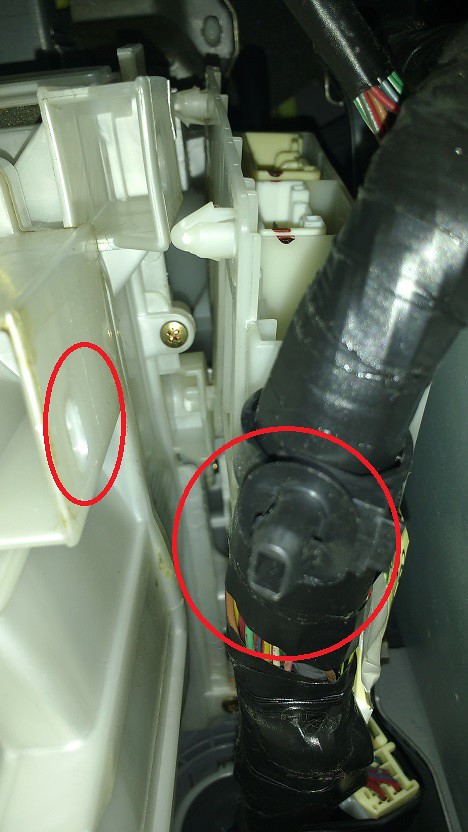
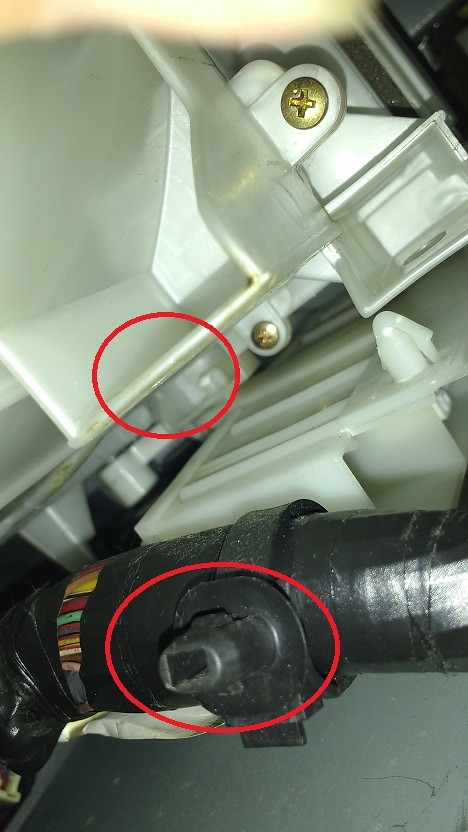
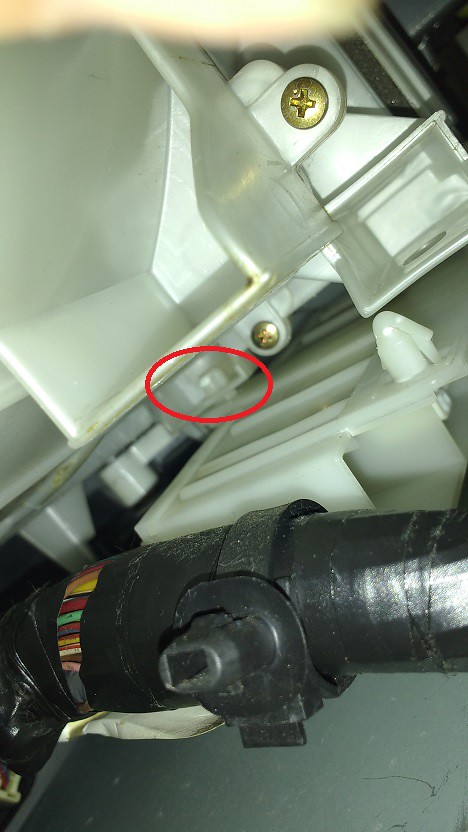
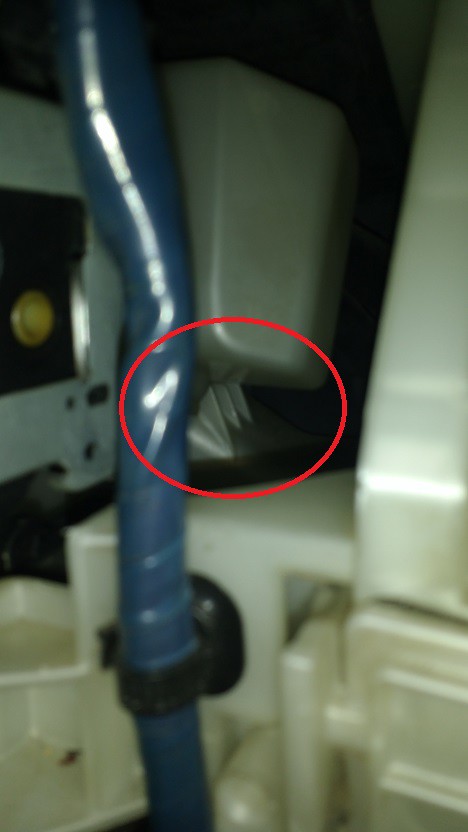
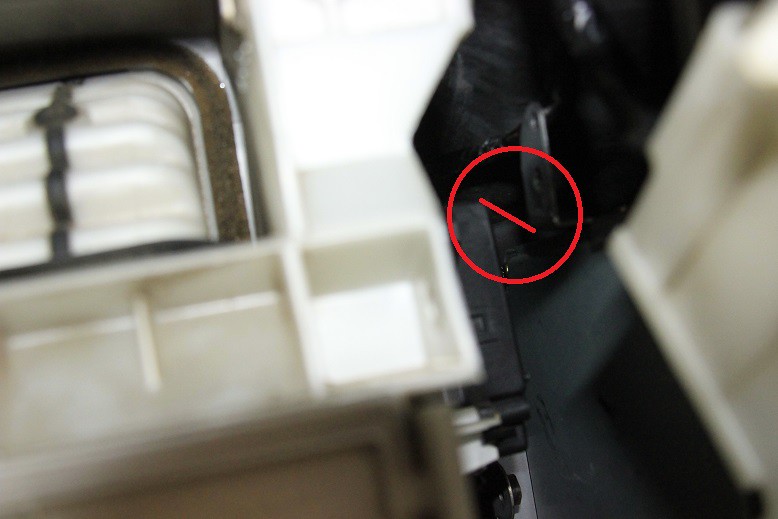
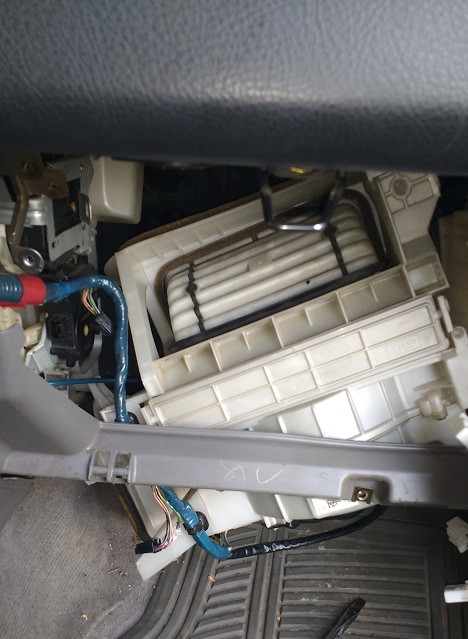
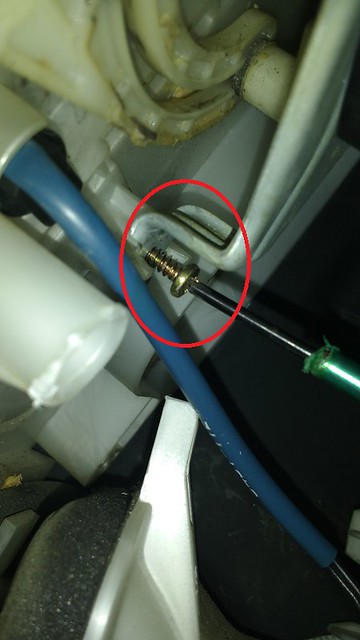
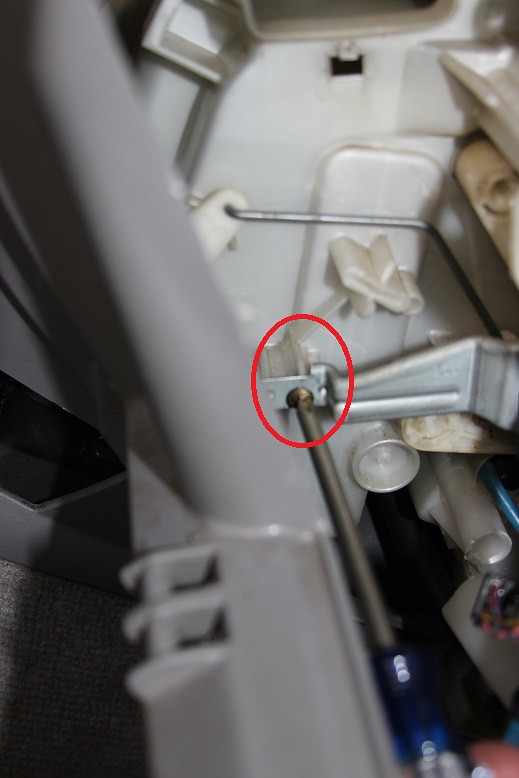
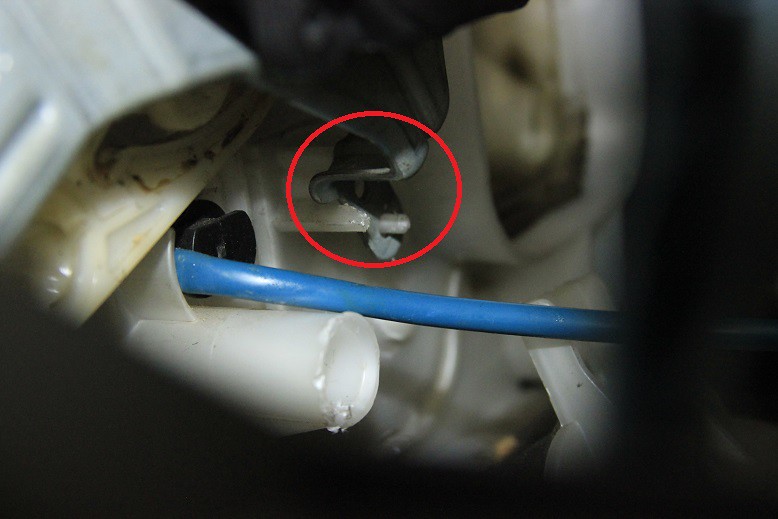
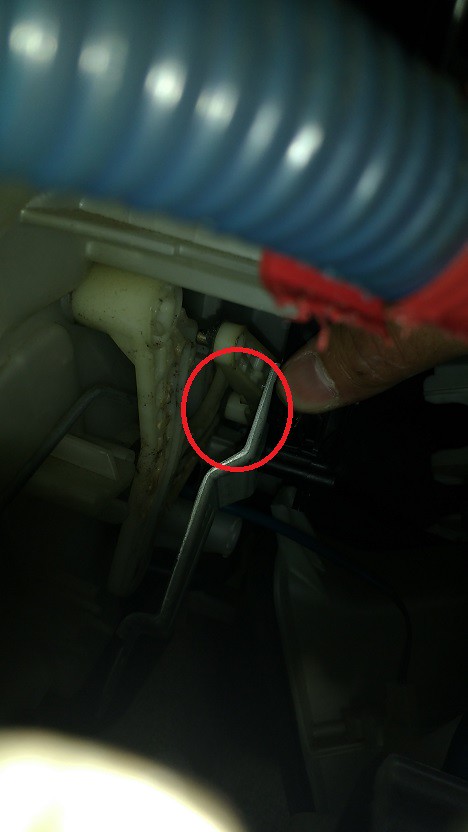
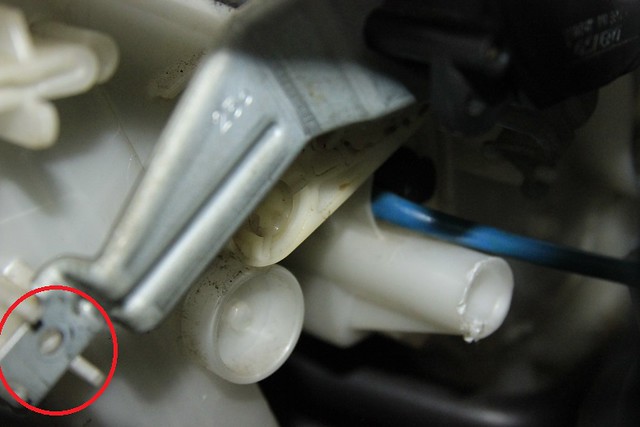
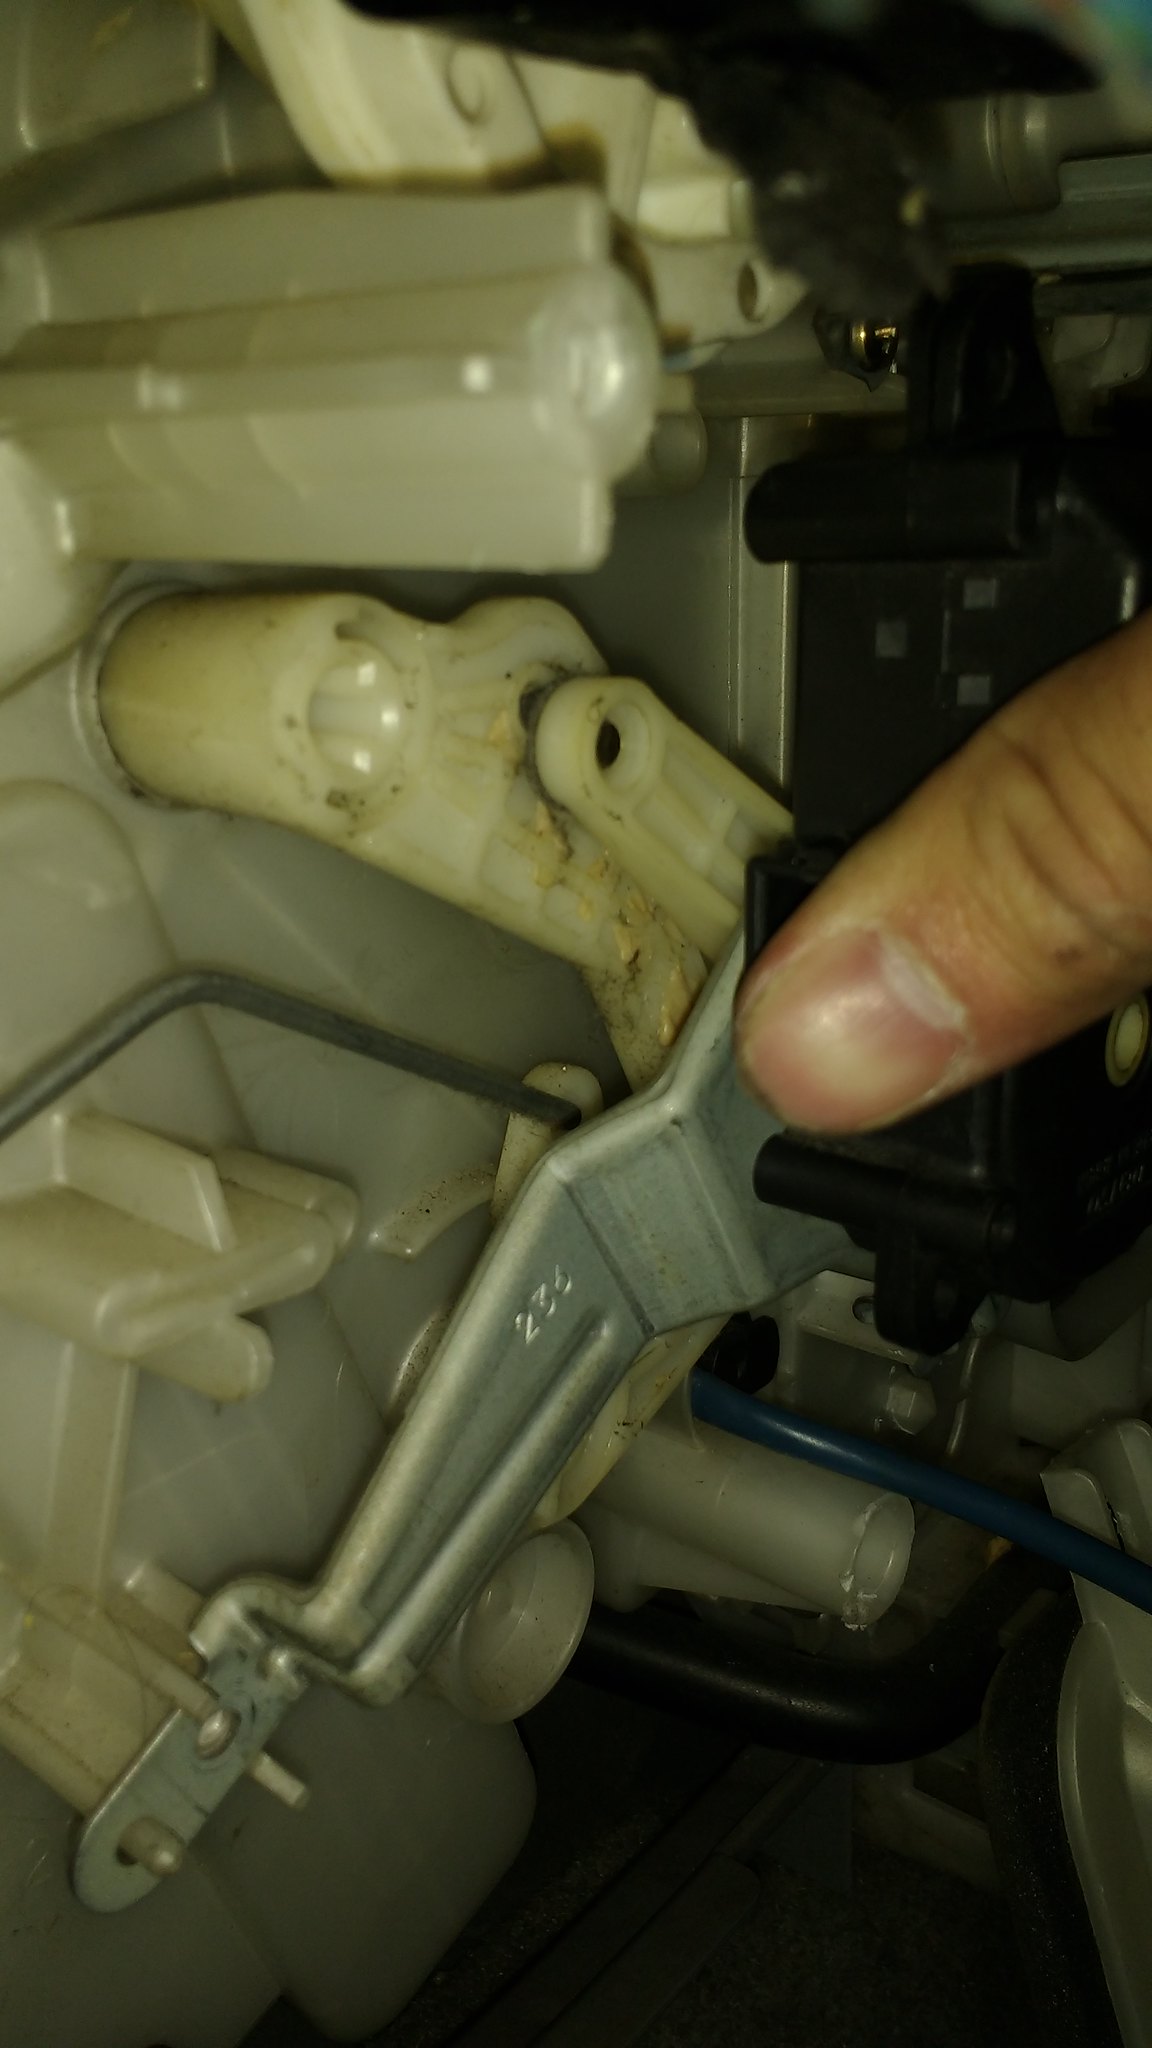
Step 9: This is where it gets hard. Autozone refers to a claw fitting (Step 15) that is impossible to see. I've done my best to point out where this fitting is. You have to heave the entire assembly up and to the right to get it off this claw fitting, but there's not a lot of play, so it may take a while. I suggest using your cellphone camera to watch what's going on. There are two main catch points for the assembly that prevent it from moving freely. These two are the bolt on the bottom right (back) and the top of the outside air servo on the top right side of the blower assembly. Both are pictured.

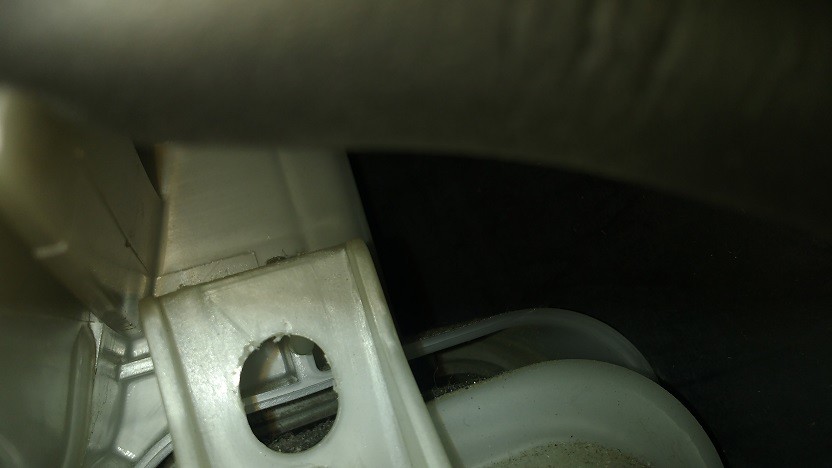
Claw fitting location
Claw fitting engaged (view from below to left)
Claw fitting disengaged

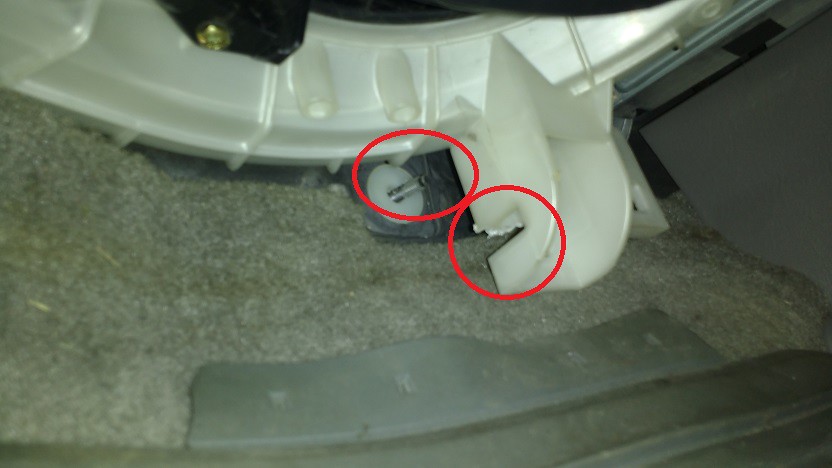
Step 10. Once you get the claw fitting off, the blower assembly is likely to still be jammed. You have to pry the assembly off the bolt at the bottom back right, while making sure the outside air servo isn't jamming against the metal bracket on the side. Once you get these two off you should be able to get the blower assembly loose enough that you can tip it down.

Bolt disengaged from blower assembly (difficult to do). Same bolt as pictured in blue.
Servo top and metal bracket that hang up on each other. This is shown unjammed/disengaged.

Loose blower assembly
 
Step 11. Remove the three screws holding the mixer servo in. If you are removing the air damper servo, remove those three screws. Remove the mixer servo. If you decided to replace the servo instead of trying to repair it, reinstall your new servo following the later steps.

Top right screw
Bottom right screw
Bottom left screw

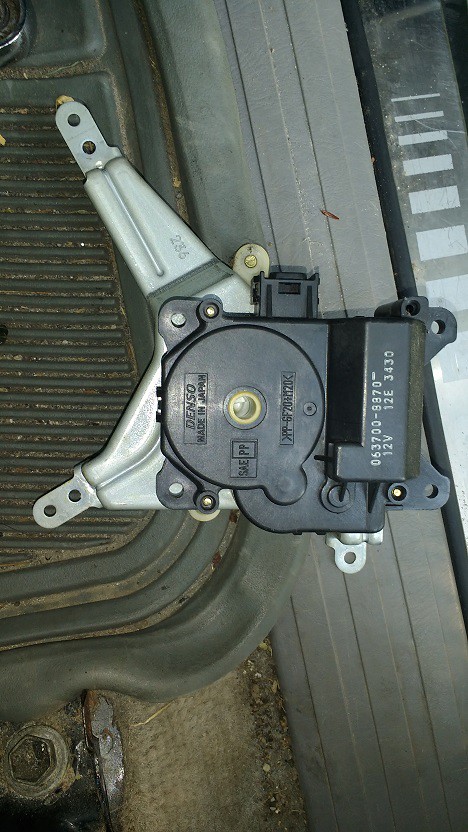
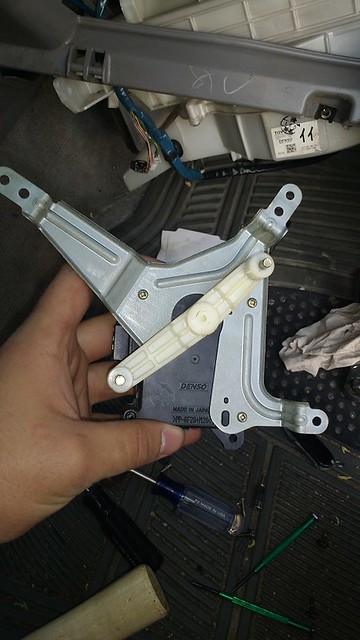
Removed mixer servo

Air damper servo screw locations
Step 12. Remove the three screws holding the bracket to the mixer servo. These screws also hold the servo together.

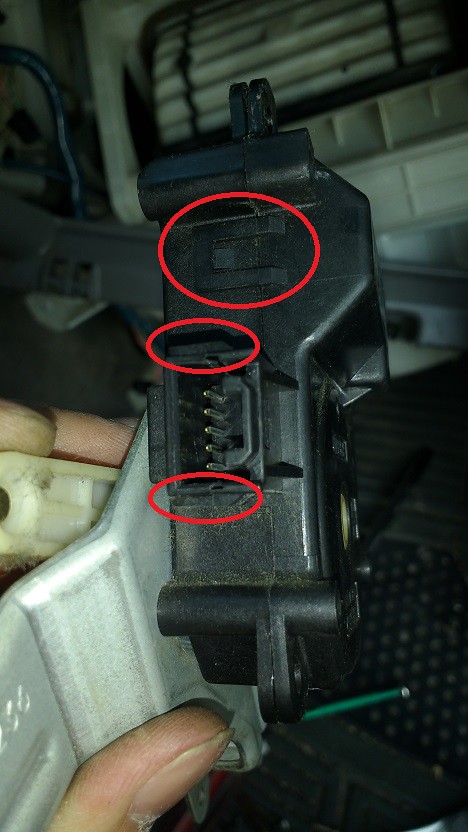
Step 13. With a thin knife or razor blade, gently open the 6 clips around the servo. BE CAREFUL. These clips are extremely fragile and you're almost guaranteed to break some. Open up the servo compartment.

Servo clips
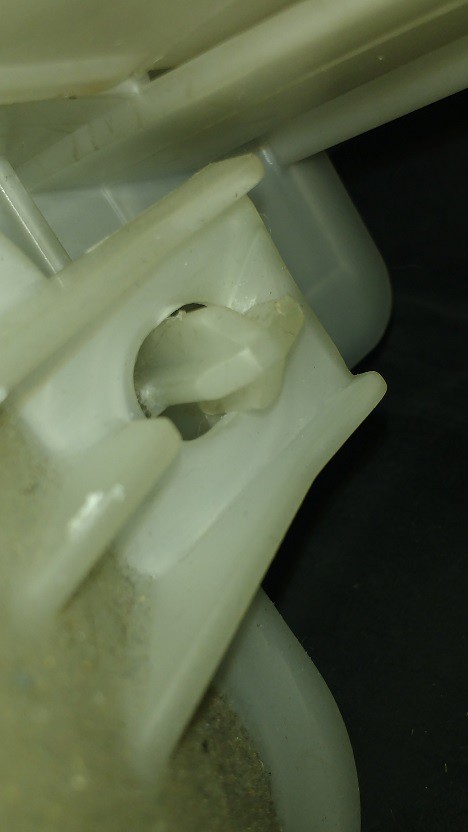
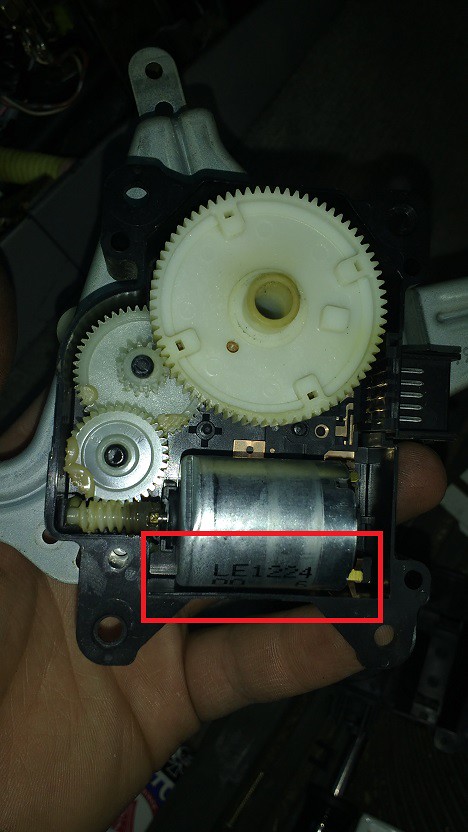
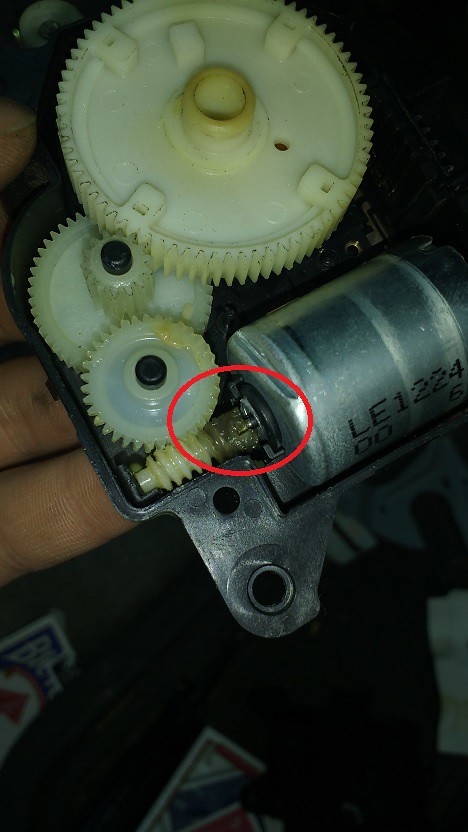
Step 14. Note the orientation of the motor. You will need to remove the motor in order to perform both repairs. At this point, you should be able to diagnose whether the shaft has disengaged or not. Sometimes, the metal coupling gets pushed back on the shaft (circled) and disengages from the worm gear. Follow this great video I found on youtube in order to repair this. If the youtube link ever stops working, let me know, I did save it.
https://www.youtube.com/watch?v=s9S5B1Dn3j4
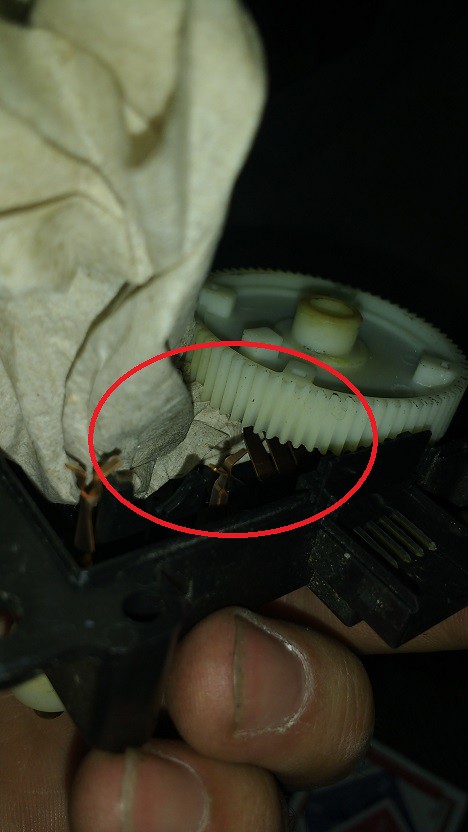
If the coupling looks fine, but the servo was hunting for a position when you tested it, it's possible the contacts are dirty. Gently pack a napkin or kleenex underneath the main gear, being careful to avoid bending the contacts. Once the napkin is underneath, spin the gear assembly to wipe the grease and dirt off the gear contacts. If you want, you could re-grease the gears -- I did not do this.

Open servo motor
Coupling location
Contact location

Cleaning contacts

Step 15. Orient the gear assembly so the shaft looks like this on the outside (IMPORTANT!), then replace the motor as it was before, and replace the cover.
Servo orientation

Step 16. Screw the bracket back on to the servo (show in image above.)

Step 17. Reassemble everything in backwards order. For the mixer servo, attach the top right screw loosely first, then make sure the lower pin slides into the lower damper slider, and the bracket slips into its standoff and pin. Then push the upper slider up until the upper pin engages that slide, and slip the last leg of the bracket onto its pin and standoff.

Top right screw first, letting servo hang freely
Engaged bottom right pin on standoff
Bottom servo pin engaged on damper slider
Alternative view
Engaged bottom left pin on standoff
Top servo pin engaged on upper damper slider

Notes: when replacing the blower assembly, start with the lower right bolt in the back. You will have to pry the plastic bracket back up and to the left over the bolt. The blower assembly's servo will hang up on the metal bracket towards the top right side (shown in step 10), so make sure to pry that loose as well.
Then make sure the claw fitting re-engages before replacing all of the bolts and nuts.
Reconnect the wires for the two servos and the two wire cable on the left side.
Reattach the two wire cable.
On the right side, reattach the connector box to the side of the blower assembly.
Reconnect the two connectors attached to that connector box.
Reattach the main wire harness on the left side to the blower assembly.
Reattach the passenger floor air duct.
Reattach the TPMS computer and replace the lower kick panel.
Reattach the secret compartment.
Replace all console trim.
Replace the glovebox.
At some point you will want to test to see that everything works. It's up to you to decide when to do this. In my opinion, the hard work has to be done before you can test anything.
 
Last edited:
This is IMPRESSIVE! I thought the dash replacement looked challenging!

I avoided removing the dash -- did you replace yours? I think some of these steps would be much easier if you did have the dash removed. I wasn't interested in investing the time to remove the dash just to get rid of the noise from the servo, haha

It was nice to discover it's possible to replace these things without pulling the dash, albeit difficult. I believe the dual zone climate control has an additional servo on the driver side but I'm not sure where and how easy that one is to remove.
 
Wow....Nice Writeup. Probably Stick-worthy.

My mode damper has been "hunting" for a while and is now bad enough that the only way to sort of quiet it is to set it to "mix" (feet/dash). I thought about just setting it to dash and disconnecting the wires. I'm not sure what kind of error that might throw the HVAC system into. I think this would also loose me the ability to use the defroster, correct?

Some of the pics are a bit hard to follow but I get the general idea (it's a pain no matter what). Any idea how long all this took start to finish? I've had the center console and glovebox panels out a few times (TPMS disable, carpet removal, etc). but haven't torn into the blower assembly yet. It sure doesn't look like fun....

Update:
I got inspired and decided to tear into this project this evening while the wife was out (better not to hear me swearing at my truck). Overall....I spent a little over 3 hours tearing it apart, cleaning/greasing the servos, and getting it all back together. Here are a few "reflections" after doing the job myself. I used this writeup, some YouTube videos, and even the AutoZone diagram for help and needed every bit.

1. You don't really need to pull the radio trim area for this job. This was just to get the floor vent pipe out of the way. There are two tabs you'll be able to see from the top and another on the bottom. That one has a kind of molded "trigger" on it. Once you pull that back and apply a little firm pressure toward the passenger side and kind of tilt up it pops right loose. I've got skinny hands though.

2. I didn't want to break the blower housing but you could see from the fasteners that everything is made for it to slide toward the passenger side. I was able to get the "claw" to release by propping a small prybar against the side of the glove box opening (shimmed with some wood scraps) and attempting to pry it toward the passenger side. At the same time I banged on the bottom (not the motor itself) with the palm of my hand. I had to smack it pretty good while prying at the same time. This up and to the right motion was enough to dislodge it. I never got it to drop down into place. Moving it about 3/4" to the right was just barely enough for me to get a 1/4" socket wrench with 1/4" deep socket containing a screwdriver tip (taped in place so it wouldn't fall out) in there to remove all 6 screws.

3. The mode damper servo (foot, face, defrost) is on top and has a kind of big oblong disc on it that connects to 3 different pins (flapper valves?) in the unit. It also has 3 slots so it would make sense that each pin goes in each slot. I fought with this for maybe 20 minutes until I realized that one of the slots was really clean when I removed it while the other two had grease residue and grime in them. Unfortunately, I didn't get any pics (too busy sweating and smacking mosquitoes). Be sure to take some pics or look very carefully before you remove the servo so you know how to reinstall it. I broke a couple of the little tabs when trying to take the servo apart but it has a metal bracket and 3 screws that also hold the two halves together so I don't believe those tabs matter too much.

4. The air mix damper (one on the bottom) has a single straight arm with two pins that engages two kind of banana shaped arms. It was pretty straightforward putting that back in. Where that one gave me trouble was getting it apart. When I shut the truck down I had the temperature set a about 74. This temperature put the servo at just the right position to where the arm was blocking one of the screws that mounts the bracket to the servo body. I would recommend if your servo still works that you put the temperature at one extreme (Hi or Lo) before shutting the system down. Hopefully this puts the arm in a better position. I tried to simply remove the arm but it seemed to be very firmly attached to the gear (glue??). As it was I grabbed the head of the screw with some pliers and was able to loosen it enough to get the servo apart.

Everything is back together with the exception of putting the glove box back in. I also dumped a handful of leaves and crap out of the filter at the same time so I should have a bit better airflow after this repair too.

I didn't hear the "hunting" after taking the mode servo apart, cleaning the disc well, and applying a thin film of dielectric grease. I also greased up the gears in both units pretty well with some silicone grease (the kind for brake guide pins and such). I also gave all the electrical connectors a good film of dielectric grease before putting them back together. I was surprised to see a lot of rust on the dash bracketry so I figured the anti-corrosion grease couldn't hurt.
 
Last edited:
Wow....Nice Writeup. Probably Stick-worthy.

My mode damper has been "hunting" for a while and is now bad enough that the only way to sort of quiet it is to set it to "mix" (feet/dash). I thought about just setting it to dash and disconnecting the wires. I'm not sure what kind of error that might throw the HVAC system into. I think this would also loose me the ability to use the defroster, correct?

Some of the pics are a bit hard to follow but I get the general idea (it's a pain no matter what). Any idea how long all this took start to finish? I've had the center console and glovebox panels out a few times (TPMS disable, carpet removal, etc). but haven't torn into the blower assembly yet. It sure doesn't look like fun....

Update:
I got inspired and decided to tear into this project this evening while the wife was out (better not to hear me swearing at my truck). Overall....I spent a little over 3 hours tearing it apart, cleaning/greasing the servos, and getting it all back together. Here are a few "reflections" after doing the job myself. I used this writeup, some YouTube videos, and even the AutoZone diagram for help and needed every bit.

1. You don't really need to pull the radio trim area for this job. This was just to get the floor vent pipe out of the way. There are two tabs you'll be able to see from the top and another on the bottom. That one has a kind of molded "trigger" on it. Once you pull that back and apply a little firm pressure toward the passenger side and kind of tilt up it pops right loose. I've got skinny hands though.

2. I didn't want to break the blower housing but you could see from the fasteners that everything is made for it to slide toward the passenger side. I was able to get the "claw" to release by propping a small prybar against the side of the glove box opening (shimmed with some wood scraps) and attempting to pry it toward the passenger side. At the same time I banged on the bottom (not the motor itself) with the palm of my hand. I had to smack it pretty good while prying at the same time. This up and to the right motion was enough to dislodge it. I never got it to drop down into place. Moving it about 3/4" to the right was just barely enough for me to get a 1/4" socket wrench with 1/4" deep socket containing a screwdriver tip (taped in place so it wouldn't fall out) in there to remove all 6 screws.

3. The mode damper servo (foot, face, defrost) is on top and has a kind of big oblong disc on it that connects to 3 different pins (flapper valves?) in the unit. It also has 3 slots so it would make sense that each pin goes in each slot. I fought with this for maybe 20 minutes until I realized that one of the slots was really clean when I removed it while the other two had grease residue and grime in them. Unfortunately, I didn't get any pics (too busy sweating and smacking mosquitoes). Be sure to take some pics or look very carefully before you remove the servo so you know how to reinstall it. I broke a couple of the little tabs when trying to take the servo apart but it has a metal bracket and 3 screws that also hold the two halves together so I don't believe those tabs matter too much.

4. The air mix damper (one on the bottom) has a single straight arm with two pins that engages two kind of banana shaped arms. It was pretty straightforward putting that back in. Where that one gave me trouble was getting it apart. When I shut the truck down I had the temperature set a about 74. This temperature put the servo at just the right position to where the arm was blocking one of the screws that mounts the bracket to the servo body. I would recommend if your servo still works that you put the temperature at one extreme (Hi or Lo) before shutting the system down. Hopefully this puts the arm in a better position. I tried to simply remove the arm but it seemed to be very firmly attached to the gear (glue??). As it was I grabbed the head of the screw with some pliers and was able to loosen it enough to get the servo apart.

Everything is back together with the exception of putting the glove box back in. I also dumped a handful of leaves and crap out of the filter at the same time so I should have a bit better airflow after this repair too.

I didn't hear the "hunting" after taking the mode servo apart, cleaning the disc well, and applying a thin film of dielectric grease. I also greased up the gears in both units pretty well with some silicone grease (the kind for brake guide pins and such). I also gave all the electrical connectors a good film of dielectric grease before putting them back together. I was surprised to see a lot of rust on the dash bracketry so I figured the anti-corrosion grease couldn't hurt.

You are correct about the radio trim. I found it useful to pull the floor vent.

The blower was a challenge to drop, so if you were able to pull the servos without dropping it that's great news. I didn't have the right kind of screw driver to get at the mixer servo screws without moving the blower.

If you take the servo apart you can move the gear linkage by removing the worm gear and motor part from the case, rotate the arm into the position you need, and replace the motor (in the same orientation!!!) after you've adjusted the arm's position. The worm gear is what prevents anything from turning freely.

I managed the whole thing in about 4-5 hours. Seems like it may have been the same for you.

The rust seems quite surprising to me. Could it be indicative of a bad seal somewhere, or maybe just too much humidity/condensation? I had no rust on my dash bracketry.
 
Thank you Joex481. Excellent instructions & pictures. I tackled this on my 2004 this weekend & I'm back in business. Servos working as they should. I struggled getting the blower back in place but I finally did it. Saved me some $$. Thanks.
 
Thank you Joex481. Excellent instructions & pictures. I tackled this on my 2004 this weekend & I'm back in business. Servos working as they should. I struggled getting the blower back in place but I finally did it. Saved me some $$. Thanks.

Glad it worked out for you!
 
This is a great write up! I am replacing the air-mix servo (and possibly the fresh air/recirc air servo). I need a little guidance. What is the orientation of the claw that is referenced in the instructions? It's not the same one that resides on the left side of the blower housing is it (near the blue 2-wire)? I got to this point and had a little play in the housing but now it doesn't seem to want to move at all. I've checked the recirc air servo on the right and it appears to be clear of everything on that side. I appreciate the help!
 
This is a great write up! I am replacing the air-mix servo (and possibly the fresh air/recirc air servo). I need a little guidance. What is the orientation of the claw that is referenced in the instructions? It's not the same one that resides on the left side of the blower housing is it (near the blue 2-wire)? I got to this point and had a little play in the housing but now it doesn't seem to want to move at all. I've checked the recirc air servo on the right and it appears to be clear of everything on that side. I appreciate the help!

It's in the top left back corner. It's nearly impossible to see but you can stick a phone back there to take a picture. The whole housing has to be lifted up then to the right. Left and right are assuming you are facing the dash. It is not the one by the two wire connector.
 
Last edited:
It's in the top left back corner. It's nearly impossible to see but you can stick a phone back there to take a picture. The whole housing has to be lifted up then to the right. Left and right are assuming you are facing the dash. It is not the one by the two wire connector.

So I never was able to pull the blower assembly. As you wrote in your instructions, it has to be either the claw or its getting hung up on the screw located at the lower right. I was able to move the assembly over just far enough to get my hand up in there to that one screw and replace the servo. I used a stubby Phillips head. I tried a ratchet but just didn't have enough room for the ratcheting motion or enough room to put horizontal pressure on the screw to get a bite.

I was able to get the hard to reach screw back in only about 1/3 of the way. I must not have gotten it started correctly. I barely had enough room for the stubby + screw in this position. I'm sure this contributed to the issue.

I'm not able to get the assembly back into position. However, it does not move. My current thoughts are to just leave it since it's not moving. I ran the system through it's courses and did not see any movement of the assembly or of the new servo. The assembly must be jammed pretty good. Before I button everything back up, I'm going to watch it for a few days to make sure it's all secure as-is.

Doing this project, I noticed the servo for fresh/recirc air on the right does not move. I've never noticed this because I've left it on recirc since I've been driving the car full time for about 2 years now. I opted to move that damper to the fresh air mode just because of the season and the need for defogging. If anybody has any tips on replacing that servo without removing the blower assembly, I'm all ears.

Joex481, your instructions are well written and were a big help. Hopefully, my little add-on about what I encountered adds help/tips.
 
So I never was able to pull the blower assembly. As you wrote in your instructions, it has to be either the claw or its getting hung up on the screw located at the lower right. I was able to move the assembly over just far enough to get my hand up in there to that one screw and replace the servo. I used a stubby Phillips head. I tried a ratchet but just didn't have enough room for the ratcheting motion or enough room to put horizontal pressure on the screw to get a bite.

I was able to get the hard to reach screw back in only about 1/3 of the way. I must not have gotten it started correctly. I barely had enough room for the stubby + screw in this position. I'm sure this contributed to the issue.

I'm not able to get the assembly back into position. However, it does not move. My current thoughts are to just leave it since it's not moving. I ran the system through it's courses and did not see any movement of the assembly or of the new servo. The assembly must be jammed pretty good. Before I button everything back up, I'm going to watch it for a few days to make sure it's all secure as-is.

Doing this project, I noticed the servo for fresh/recirc air on the right does not move. I've never noticed this because I've left it on recirc since I've been driving the car full time for about 2 years now. I opted to move that damper to the fresh air mode just because of the season and the need for defogging. If anybody has any tips on replacing that servo without removing the blower assembly, I'm all ears.

Joex481, your instructions are well written and were a big help. Hopefully, my little add-on about what I encountered adds help/tips.

So your assembly is stuck partially out? Is it still sealed to the damper assembly?

The recirc servo hangs up on a metal bracket next to it. I didn't notice for the longest time but I don't have a picture when it was hung up, just disengaged. I did have to stretch things around to get the assembly to completely disengage, which is probably not something everyone might want to do or risk trying. Glad the instructions helped!
 
So your assembly is stuck partially out? Is it still sealed to the damper assembly?

The recirc servo hangs up on a metal bracket next to it. I didn't notice for the longest time but I don't have a picture when it was hung up, just disengaged. I did have to stretch things around to get the assembly to completely disengage, which is probably not something everyone might want to do or risk trying. Glad the instructions helped!

No, it never did pull out away from the dash. I was able to only move it towards the passenger side about 1/8 to 1/4 inch. It is still sealed. After a few days of use now, everything seems to be working as it should with the exception of the recirc servo. I was able to remove the forward screw (towards the engine) of that servo with a tool similar to a drive palm ratchet. The proper tool name escapes me at the moment. Anyway, the recirc servo is on order and I should have time to install it this weekend.

I just didn't want to risk tearing up anything with too much pressure. If I have time this upcoming weekend I may get in there and play with it a little more.
 
Oh man, I know I'm late to the party but I am struggling so hard getting the box back in. Does anyone have any specific tips for me besides the ones mentioned in the above(absolutely amazing) write up. I've been at it for days and don't know if I'm missing something or I'm crazy. Any tips would be immensely appreciated. Thx!!

Sent from my moto g(6) (XT1925DL) using Tapatalk
 
I can try to help...

Can you post some photos or find the specific problem area?

It's not meant to be re-installed this way; pretty sure the fsm goes through dash removal to get at it, so it might require a little coaxing. I don't recall having much trouble getting it back together.
 
I need to try this again - I got the blend door out and couldn't get it to work again - I might try cleaning it again - don't remember what exactly I did. Honestly I just moved it so air blows out all the vents and left it, but it should would be nice to get it working again.

Worst comes to worst I buy a new blend door motor I guess.
 
I actually overhauled the little motor. I found that the grease had worked its way in between the gear and the electrical contacts and I just cleaned it and reset the position and got it working again. Really easy to fix that guy up.

As for getting the box back in tho.... I've spent over an hour messing with it and am at my wits end. Any tips would be greatly appreciated. I've attached pictures. Wasn't nearly as hard to get out for me as it is to get back in. Any pry points or insight would be amazing. Thanks!
43a4bc4f59746bf3fe71bedfa52629e9.jpg
cf6bcc4130c6aa25cb0c8f0f91aaf6f2.jpg
601cd100e479706c54362b96c5c508a7.jpg
18cec2af796d73be886161950e5d46d9.jpg


Sent from my moto g(6) (XT1925DL) using Tapatalk
 
I need to try this again - I got the blend door out and couldn't get it to work again - I might try cleaning it again - don't remember what exactly I did. Honestly I just moved it so air blows out all the vents and left it, but it should would be nice to get it working again.


Worst comes to worst I buy a new blend door motor I guess.
Let me know if you need any tips once you pull the motor. There are 2 places it looks like it fails most often. Both are repairable. I think the motor runs 80 bucks the last time I checked.

Sent from my moto g(6) (XT1925DL) using Tapatalk
 

Members online

Forum statistics

Threads
278,310
Messages
3,554,077
Members
248,016
Latest member
Advally Service

Trending content

Back
Top