
Yakima Loadwarrior "Build"

4ever4running

New member
A while back I pieced together a Yakima Loadwarrior cargo rack and a bunch of accessories for it. I have gotten a lot of positive feedback and questions about how I installed the lights so I wanted to share some pics and some more info for anyone out there looking to do something similar.

First off, here are all the parts/accessories I have installed:
Thule 43050 Complete Tracker II rack system - $50 (BRAND NEW!!) on Craigslist
Yakima LoadWarrior basket, Hi-lift mount, and Shovel/Axe mount - $125 on Craigslist
Yakima LoadWarrior Extenstion - $120 from a local store
Yakima Light Mounts - $80 (~$40 per pair) from ORS Racks Direct
PIAA 520 ATP's - $400 (~$200 per pair) on eBay
48" Hi-Lift jack - $40 on Craigslist
Shovel - $20 at Lowes

Here are some pics of the initial setup:
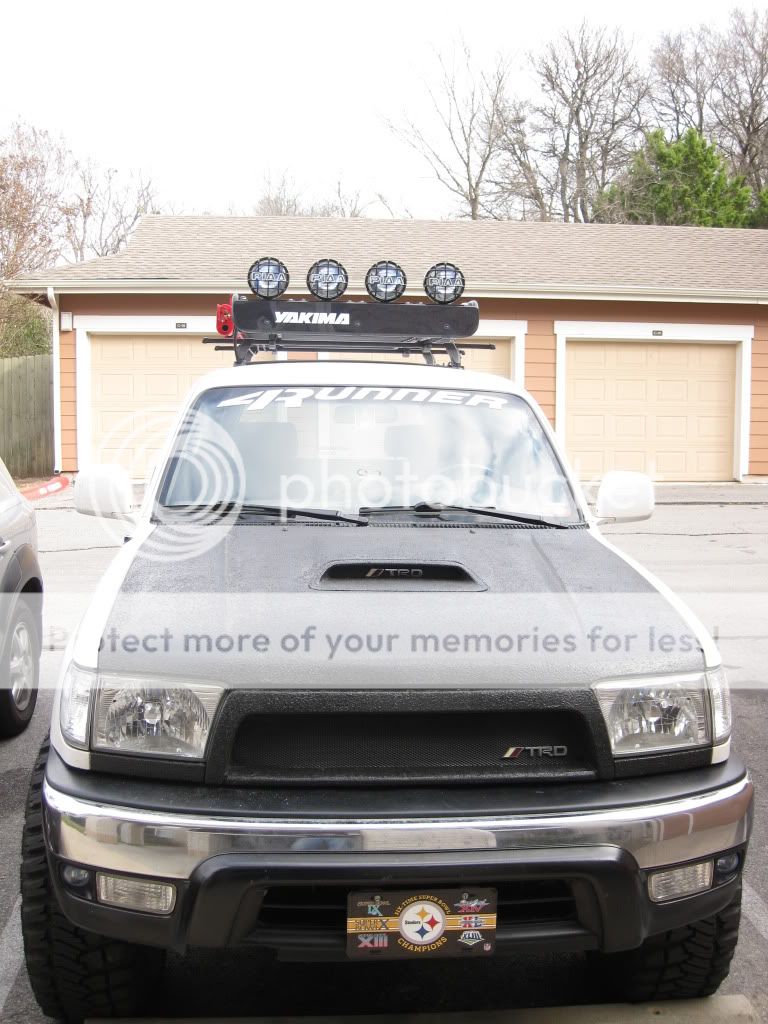
IMG_0020.jpg~original

IMG_0021.jpg~original

IMG_0022.jpg~original

IMG_0019.jpg~original

IMG_0017.jpg~original

IMG_0016.jpg~original

IMG_0014.jpg~original

IMG_0015.jpg~original
 
Register to hide this ad
Light Wiring Information

Here is a wiring diagram that I put together for how I wired up the lights.
WiringDiagram.jpg~original


Fist I mounted the lights and modified the wiring harnesses for the PIAA's. I ended up cutting off the white male/female connectors for each light and soldered some 16 gauge wires to the ground and power wires for each light (red=power, black=ground). Then I wrapped the wires in some conduit to keep them organized and make the install look cleaner. I used zip ties to hold the wires/conduit to the rack.
IMG_0004.jpg~original


Before running the wires down the roof and into the engine bay I did 2 things:
1) I soldered the 4 ground wires (1 from each light) together into one common 16 gauge ground wire.
IMG_0005.jpg~original


2) I installed a Sure Seal Connector which allows me to quickly disconnect the lights so I can easily remove the rack if I want/need to. The Sure Seal Connector is great but keep in mind that you have to make the connector yourself. I purchased the connector and required pins from this website: Connectors - Power Supplies - Amphenol - ITT Cannon - Emerson - Glenair - Deutsch - Lemo - Military - Aviation - Medical - Industrial I went with a 5 pin connector (4 power wires, 1 common ground wire) and 10 pins and 10 sockets. I didn't need all the pins and sockets but I wanted to make sure that I had extras just in case I messed up when assempling the plug and pins. Also, you will need a pair of "open barrel crimping pliars" in order to properly attach the pins and receptacles to your wires. I couldn't find them at any local store so I ended up ordering mine from here: HT-225D Full Cycle Ratchet Crimping Tool with interchangeable die set HT-225D

The specific model numbers of Sure Seal materials I used are as follows:
Plug: 120-1841-000
Receptacle: 120-1839-000
Pins: 030-2196-000 (or 001)
Sockets: 031-1267-000 (or 001)
IMG_0018.jpg~original


Then I ran some wires from the roof into the engine bay. I chose to run the wires down the passanger side A pillar because I already have a gauge pod on the driver side A pillar and I didn't want to have to run more wires down that way. I removed the end cap on the facory roof rails and pulled out the yellow plug. This is a perfect sized hole to run my 5-16 gauge wires. NOTE: Be sure to use some silicone sealant on the wires and the hole when you are done or you will have water seep through the headliner and into the cab!
IMG_0007.jpg~original


In order to access the hole from the inside I just had to remove the 3 "oh s***" bars and some of the to trim pieces. Once the trim pieces were out of the way, it was pretty easy to run the wires down the A pillar.
IMG_0011.jpg~original

IMG_0012.jpg~original

IMG_0013.jpg~original


Then I drilled a hole in the firewall to run the wires into the engine bay. Be sure to use a rubber gromet to prevent any water from coming into the cab from the engine bay.
IMG_0034.jpg~original


Then I mounted the relays where I wanted them and attached the ground wires to the body using self-tapping screws.
IMG_0028.jpg~original

IMG_0029.jpg~original

IMG_0032.jpg~original


Then I soldered 2 of the power wires coming from the lights to each relay. I soldered the 2-12 gauge power relay wires together and ran 1 common 12 gauge wire to the battery. I soldered the 2 light switch ground wires together and ran a single 16 gauge ground wire to the switch. I soldered the 2 light switch power wires together and ran a single 16 gauge power wire to the switch. I kept the common 12 gauge power wire, switch power wire, and ground wire all together and put them in some black conduit.
IMG_0030.jpg~original

IMG_0031.jpg~original


I soldered a new 16 gauge "light switch power wire" to the common 12 gauge power wire and ran the single 12 gauge power wire to the battery. I did it this way so I would only have one power wire connected to the battery, because I already have a couple of other wires connected to the battery and I wanted to keep it as clean as possible.
IMG_0035.jpg~original


Finally, I ran the 3 light switch wires through an existing hole in the firewall and attached them to the switch
 
Very nice work. Is there a disconnect by the rack for the lights if you had to or wanted to remove the rack for any reason? I guess adding a connector shouldn't be a big deal if you don't have one.
 
Very nice work. Is there a disconnect by the rack for the lights if you had to or wanted to remove the rack for any reason? I guess adding a connector shouldn't be a big deal if you don't have one.

Thanks! Yes, the SureSeal connector allows me to unplug the lights so I can remove the rack when I want to.
 
Updates...

After driving around with the initial setup for about a year, I made a couple of changes:

1) I really didn't like how high the lights sat on the rack so I looked for a way to try to lower them...after some research I decided on these: Amazon.com: PIAA 74000 7/8"-1.25" L-Bracket, (Twin Pack): Automotive
They are PIAA universal tube mounts that will fit round tubes from 7/8" to 1.25" so they fit on the lower support bar of the Yakima.

Before:
IMG_0022.jpg~original

IMG_0019.jpg~original


The total height of the rack with the old mounts: 12"
IMG_0403.jpg~original

IMG_0404.jpg~original


New mounts:
IMG_0406.jpg~original

IMG_0405-1.jpg~original


In progress:
IMG_0407.jpg~original


After:
IMG_0416.jpg~original

IMG_0417.jpg~original


Total height of the rack with the new mounts: 7" for a total reduction of 5", much better!
IMG_0411.jpg~original

IMG_0412.jpg~original


2) I saw a thread where a guy had a much better SureSeal weatherproof plug and receptacle that is mounted flush to the roof and secured with a rubber gasket and screws, so I replaced mine with the same setup. I love the new setup, it is a much cleaner install and provides a much more reliable waterproof seal.

IMG_0414.jpg~original

IMG_0415.jpg~original


For anyone interested here is the website for SureSeal: Sure Seal Connectors Are Sealed Connectors but you can't order parts from them directly, so I orgered all of the Sure Seal pieces from here: Connectors - Power Supplies - Amphenol - ITT Cannon - Emerson - Glenair - Deutsch - Lemo - Military - Aviation - Medical - Industrial.

Here are the part numbers for everything that I used:
- 8 circuit flanged plug: 120-8552-305 (I had to get an 8 circuit plug because I have a total of 5 circuits (4 power + 1 ground) and the 8 circuit plug is the smallest one that will fit everything.
- 8 circuit receptacle: 120-1866-000 (I ended up ordering 2 and filled one with blanks to keep the connection waterproof when I don't have the Yakima rack on)
- Boot: 317-8657-002 (boot for the receptacle)
- Mounting plate: 066-8516-002 (top plate to secure the flange)
- Nut plate: M85528/2-18A (bottom plate to secure the flange)
- 6X Mounting plate screws: R440-1/2 (You only need 4, but I ordered 2 extras, and they definitely came in handy because I stripped one during install)
- 20X Wire hole fillers: 225-0093-000 (used to fill in the blank circuits that are not used to ensure that the plug remains weatherproof, again I ordered extras)
- 10X loose pins: 030-2196-001 (I ordered extras)
- 10X loose sockets: 031-1267-001 (Again, I ordered extras)

3) When I replaced the SureSeal, I had to completely re-do the wiring from the lights to the plug. So, while I was at it, I added some quick disconnects right after the lights in case I need to replace a bulb or remove one for any reason.
IMG_0408.jpg~original

IMG_0410.jpg~original


I am much happier with the new position of the lights and the new SureSeal! It looks much better and the install is cleaner.
 
great write-up, thanks!

which silicone sealant did you use for those wires through the hole, and how well has it held up to the elements so far?
 
great write-up, thanks!

which silicone sealant did you use for those wires through the hole, and how well has it held up to the elements so far?

Glad I could help!

I used Seal-All, a general sealant and adhesive that you can buy at pretty much any home improvement store. I only had it on for about a year because I ended up switching to the better plug/receptacle, but it help up great during the time I had it on there. Never leaked and held the wires in place without an issues.
 

Members online

Forum statistics

Threads
278,306
Messages
3,554,046
Members
248,016
Latest member
Advally Service

Trending content

Back
Top