Home Menu

Site Navigation


View Single Post
Old 08-10-2019, 11:20 PM
Bluesky 07's Avatar
Bluesky 07 Bluesky 07 is offline
Senior Member
 
Join Date: Sep 2014
Location: Cherokee Co., GA
Posts: 2,799
Real Name: Russell (OB #9908)
Bluesky 07 has a brilliant future Bluesky 07 has a brilliant future Bluesky 07 has a brilliant future Bluesky 07 has a brilliant future Bluesky 07 has a brilliant future Bluesky 07 has a brilliant future Bluesky 07 has a brilliant future Bluesky 07 has a brilliant future Bluesky 07 has a brilliant future Bluesky 07 has a brilliant future Bluesky 07 has a brilliant future
Bluesky 07 Bluesky 07 is offline
Senior Member
Bluesky 07's Avatar
 
Join Date: Sep 2014
Location: Cherokee Co., GA
Posts: 2,799
Real Name: Russell (OB #9908)
Bluesky 07 has a brilliant future Bluesky 07 has a brilliant future Bluesky 07 has a brilliant future Bluesky 07 has a brilliant future Bluesky 07 has a brilliant future Bluesky 07 has a brilliant future Bluesky 07 has a brilliant future Bluesky 07 has a brilliant future Bluesky 07 has a brilliant future Bluesky 07 has a brilliant future Bluesky 07 has a brilliant future
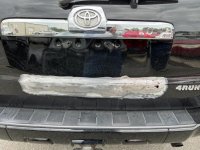
Finished up the tailgate & feel confident I met the goal of preventing further rust damage for the foreseeable future (fingers crossed). Notes & pics:

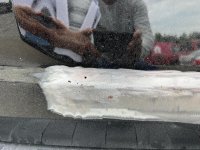
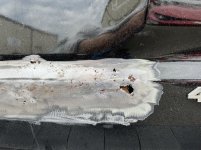
The factory material is very difficult to remove unless there’s rust under it, in which case mine flaked right off. So that’s a good test. I used a metal putty knife to remove it and tapped the bottom of the scraper handle with a hammer to get the tougher spots. As noted in my previous post, be sure you get all the pieces, flakes, & dust out of the bottom of the tailgate lest it block the drain holes. I used my hands to get the large pieces like the one below, then a ShopVac followed up by compressed air.

Front (visible when looking into the tailgate)


Underside


Dust & particles collect at the bottom. This is after most had been removed. Get as much of it as you can.


I scraped, grinded, & wire brushed the rust until nothing else was coming off then painted with rust reformer.


I wanted secondary corrosion protection besides the Rust Reformer paint. Considered undercoating & PlastiDip but ultimately chose Fluid Film:


Decided to do my sound deadening while the hatch was disassembled. I reinstalled the plastic factory vapor barrier and covered it with a foam board piece that I waterproofed with Flex Seal.


Attached it with metal HVAC tape but forgot to get a pic of it installed.

Final step was adding Noico Green to the inside of the hatch trim. Haven’t gone anywhere yet so no report on whether it’s quieter now.

Last edited by Bluesky 07; 11-12-2019 at 10:34 PM.
Bluesky 07 is offline   Reply With QuoteReply With Quote
 
Powered by vBadvanced CMPS v3.2.2

All times are GMT -4. The time now is 07:10 AM.

Powered by vBulletin® Version 3.8.11
Copyright ©2000 - 2026, vBulletin Solutions Inc.
Search Engine Optimisation provided by DragonByte SEO (Pro) - vBulletin Mods & Addons Copyright © 2026 DragonByte Technologies Ltd.
User Alert System provided by Advanced User Tagging (Lite) - vBulletin Mods & Addons Copyright © 2026 DragonByte Technologies Ltd.
***This site is an unofficial Toyota site, and is not officially endorsed, supported, authorized by or affiliated with Toyota. All company, product, or service names references in this web site are used for identification purposes only and may be trademarks of their respective owners. The Toyota name, marks, designs and logos, as well as Toyota model names, are registered trademarks of Toyota Motor Corporation***Ad Management plugin by RedTyger
 
Copyright © 2020