Apohl17's AventuRunner Build Thread - V8 4th Gen

Think I have narrowed down my choice of skids - as non-beefy as they are, I think I am set on aluminum for the mere respect of corrosion resistance... Definitely trying to keep rust off this rig as much as possible!
RCI Offroad, let's get 'er done.

Just FYI, I'm absolutely using this thread as my "get stuff done" list. Everything you're doing is what needs to be done to mine and I feel like we have a similar end goal. So thank you for posting what you do and documenting it. If you're ever in the Cities let me know and we can grab a beverage!
 
Just FYI, I'm absolutely using this thread as my "get stuff done" list. Everything you're doing is what needs to be done to mine and I feel like we have a similar end goal. So thank you for posting what you do and documenting it. If you're ever in the Cities let me know and we can grab a beverage!
Right On. :thumb3: That's my mentality too. Get 'er done. We all know how capable and reliable these rigs are, but it takes some time and love to tweak, upgrade, refresh, personalize, modify, whatever you want to call it!

I have family up in the southern TC area, Apple Valley to be exact - when I go up there next I'll hit you up!
 
Ordered some beefy extended rear sway bar end links from the one and only [MENTION=98153]MStudt[/MENTION] ! Thanks man.
 
Also have a blacked out [MENTION=413201]SherpaEquipmentCo[/MENTION] Princeton on order as we speak! Pumped to work with them and look forward to the install! Now I just have to wait a few long weeks... :llama:

Sent from my VS988 using Tapatalk
 
So ever since the purchase, I have had a bit of howl/vibration from what I thought was the front passenger side, worst when driving between 30 and 45 mph, load sensitive to bumps in the road. In the past vehicle history that side CV was replaced, so that shouldn't be the issue. My next thought, wheel bearing...

I kept driving it and analyzed how the sound changed while turning, with more load on the bearing, or less, and was really close to writing it off to tire howl as there are 40k on these Wildpeaks (and they look great, which is awesome). Another thing that pushed me off was the fact that on the lift, the wheel has no vertical or horizontal play.

But, I had an epiphany! Bearings get hot when they are worn/bad, duh. So, after my 20 mile commute the other night I parked the rig, went down to feel the bearing assembly, and wowza, she was toasty! Checked the other side to make sure that I wasn't dreaming, and the driver side was cool as a cucumber.

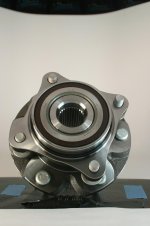
So, off to the 'Bay for one of those highly recommended 8maggie Dorman/Koyo units for $150 :zoom:

Should be here by Monday... (this is a seller pic fyi)
 

Attachments

  • s-l1600 (6).jpg
    s-l1600 (6).jpg
    125.8 KB · Views: 1,031
Mmmhm, yup, i'e got my work cut out for me tomorrow! Gibson exhaust took a fairly long time, but I give them a point back because it was supposed to ship out mid next week and got it today...

Planning on knocking out the following tomorrow: (since the treestand is calling my name tonight)

-Passenger wheelbearing
-Gibson exhaust (yay, I'll finally have a tailpipe)
-Mstudt rear end link set install
-Radio/backup cam implementation
-IVD DJ grease/possible replacement
-Dash work for phone mounting
-Sunroof rattle fix

:rockon: :rockon: :rockon:
e6ded0737fbfc2bfbc7806e4199494c7.jpg
bfb941ae6a031655d0e2ace22298a94d.jpg


Sent from my VS988 using Tapatalk
 
Mmmhm, yup, i'e got my work cut out for me tomorrow! Gibson exhaust took a fairly long time, but I give them a point back because it was supposed to ship out mid next week and got it today...

Planning on knocking out the following tomorrow: (since the treestand is calling my name tonight)

-Passenger wheelbearing
-Gibson exhaust (yay, I'll finally have a tailpipe)
-Mstudt rear end link set install
-Radio/backup cam implementation
-IVD DJ grease/possible replacement
-Dash work for phone mounting
-Sunroof rattle fix


Sent from my VS988 using Tapatalk

It's always nice to have a list of mods lined up and time set aside to knock them all out at once.
 
Got my list of mods pretty much all done yesterday, and I'm a happy camper :dance:

First pic progression: Operation wheel bearing.
Really quite easy!
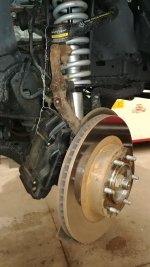
1. Step one- Remove the wheel
2. Disconnect the hose bracket, abs wire clip, and lastly, the caliper with the two 19mm bolts and tie it up with wire, strap, the likes. (*Optional - use your freshly removal caliper as a quad piston vice for all your shop needs, while off the rotor)
 

Attachments

  • 0929191100.jpg
    0929191100.jpg
    134.1 KB · Views: 1,109
3. Next up, the rotor. A 4lb sledge and a bit o' vibrational caressing and it'll shimmy right off the hub.
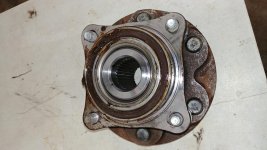
4. Remove the cotter pin, CV axle nut, and the captured 4 bolts for the bearing assembly to slide off the CV shaft.
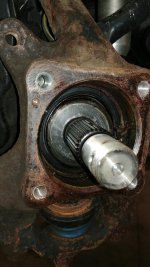
4. Inspect your old (non-OEM, hmmmm) bearing and deem it unworthy for further use - (on a side note, where the ** is all that grease from???) (*Optional, press out the old studs from the bearing assembly for safekeeping, then send it directly to the metal scrap bin)
 

Attachments

  • 0929191102.jpg
    0929191102.jpg
    135.2 KB · Views: 971
  • 0929191112.jpg
    0929191112.jpg
    138.6 KB · Views: 1,011
Last edited:
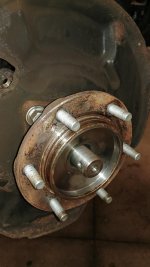
6. Clean out the bits of metal, garbage grease, and whatever the :bump: is caked in the recess. BE CAREFUL with the ABS sensor...
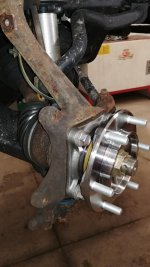
7. Install the new wheelbearing unit! (*Optional, forget to slide on the inner dust shield and do this step twice :clap2: )
 

Attachments

  • 0929191112a.jpg
    0929191112a.jpg
    139.5 KB · Views: 970
  • 0929191130.jpg
    0929191130.jpg
    135.8 KB · Views: 1,059
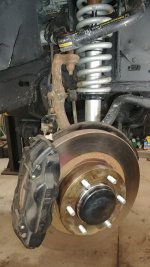
8. Reinstall the rotor, caliper, and bracketry in the reverse order of removal. Donezo!
 

Attachments

  • 0929191154.jpg
    0929191154.jpg
    138.8 KB · Views: 1,070
Next up, servicing these two year old delta joints that are on the edge of going out. Removed the conical zerks and installed standard full profile ones- yeah these haven't had grease in a loooong time. The zerks on both sides were rusted solid... ICON stood behind their product and sent me replacements, but their 5 year, pre-greased ordeal isn't quote up to the conditions in the rust belt. Planning on using these to get me through the winter and then going with the new ones in spring!
dc72386f974fe3c0069a06d1de6f1cc5.jpg
4dfe9449b13756794c119b25e3a0987b.jpg
52caca99034b96467c8a944fe413bbbf.jpg


Sent from my VS988 using Tapatalk
 
Next, the [MENTION=98153]MStudt[/MENTION] rear links. Out with the old:
710b6ce3dcdef4d1aa8eb5b738071711.jpg

And in with the new!
a2c92a28580ee75f842f835bdc7c4708.jpg
f91c1cd859eafabf680ee293818a6d61.jpg

I set them to where they made the sway bar tips level at ride height and had at least an inch of clearance below until control arm interference. Nice thing is, they are adjustable on the fly if I ever need to change them a bit. I'll also be picking up some Triflow Uniball Lube for periodic lubrication...

Sent from my VS988 using Tapatalk
 
Next, the Gibson Catback install.
dd9b45c1981b86a3bd240c2f9837f55d.jpg

Went super smoothly, but if I had to say one thing to anyone doing it in the future, is don't be afraid to crank those clamps down tight with a good 1/2" drive socket wrench or even an impact on low. Once routed, I could easily twist the tailpipe to get it to touch the frame crossmember, and only once tight did it float i between the frame and body. The black top section, although scratched up from shopping, looks solid and I'm happy I did it.
b2d067058acbcb0a2216bdf8b8919476.jpg
44f1b17e59474ed1fc99ea92fb014e75.jpg
333c352f0c219d4062c3576b1823a2dd.jpg
54d39405e458325ca5e0656cfe3b8441.jpg
4f2179cb3312dca9a3c5223587f44417.jpg

Oh, and don't worry, the pictures were all mid-install before I tightened any flange or clamp bolts down!
Sent from my VS988 using Tapatalk
 
Last edited:
My "After one day" impressions on this exhaust are super positive. Quieter and more "growl-esque" compared to the Flowmaster 40 series on the Iceberg, and the tone is AWESOME. Definitely nice to have an exhaust system vs. driving around the rig with this exhaust and no tailpipe:
b5a227e245c3cb6a1485bfaa8ad17abc.jpg


Also lowered and lubed my spare:
4d89bedf5d7c378f6634f1afb4d95ddf.jpg

This is very important to clean and de-rustify the mechanism for us midwesterners...

Sent from my VS988 using Tapatalk
 
Last edited:
Getting a feel for if I want to run ditch lights. Never have- I just want to have my eyes on deer before they decide to get frisky on the road on front of me. Any issues with running them in winter states? I feel like in ice storms they would be subject to being frozen onto the hood, lots of stress on the mounts...
 
Installed and did the hard routing for the backup cam in prep for the stereo install.
1. Take off the spoiler - 2 plastic bolt covers, 2 10mm bolts, and one wiring harness - it's outta here.
e927b9492ae74013c508480b790ed06a.jpg

2. Mark the location for drilling... This backup cam was on a post (scroll down a few pictures) so one hole install is all it needed.
7d5db2d02e625c7e0a29f975f7c4c18d.jpg

3. Drill da hole
731be5dc2398b4d563e2bbf29e44d05c.jpg

4. Get creative with double sided tape for sealing purposes, then bolt it on.
a194aaf63285540268d6ca3bb38524ac.jpg

9414de57bfb485397498e0c9de35fd1a.jpg

5. Route the wire through the top of the hatch and through the rubber channel - lube and stiff wire is your friend!
67b8a7e5256c09ada7150dfba3007bb2.jpg

6. Reinstall the spoiler with the wires run down to the taillight and button up for a later day. Hard part's done :cheers:
acb49be6d992175a64d9e5e07935d7d8.jpg


Sent from my VS988 using Tapatalk
 

Members online

No members online now.

Forum statistics

Threads
278,306
Messages
3,554,045
Members
248,016
Latest member
Advally Service

Trending content

Back
Top