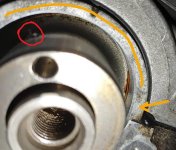
Cam shaft seal driving difficulties

PrinceValorum

New member
EDIT: Success!! The resolution is in post 16


I'm in the process of doing my timing belt and have been following [MENTION=120071]mtbtim[/MENTION]'s video. It had been going relatively smoothly until I got to the cam seals. I've done a timing belt and replaced cam and crank seals on my Miata, so it's not my first time, and normally I don't have issues with this sort of thing because I work at a snail pace and am pretty meticulous. I'm at a loss for what's going on here.

I got all of the recommended tools for the job, and used the Lisle 58430 seal puller. Despite taking care to not gouge it into the cam shaft, it left a mark when pulling the seal. I can't really feel it with my finger, and just get a hint of something running a nail over it. I'm not sure how much is too much, as far as wearing the seal prematurely.

7upVtIdh.jpg


Ran some scotchbrite pad over the new mark, and it didn't do much other than clean up the shaft. I thoroughly wiped out the pocket for the seal, cleaned it with a qtip with brake cleaner on it, made sure there was no lint in it, etc. I lubed the new seal with clean motor oil and selected the correct size cups from the PBT seal driver/puller kit and ran it in with an electric ratchet. Aaaand this was the result.

kjfBnk3h.jpg


Ok, now I'm kinda pissed. I take care to insert the Lisle seal puller into the face of the seal itself above the shaft, specifically so I don't make contact with the shaft and leave a new mark. And it leaves a new mark.

I don't know what to make of the perimeter of the botched seal. I'm not sure how it has so much "gray" on it, especially after swabbing with brake cleaner. I assume it's aluminum from the cam cap, since that's the side that got all pooched out.

DUTDcPCh.jpg


bTLMmsch.jpg


Using an inspection mirror, I found that the cam cap has some corrosion inside that I missed the first time. Ah, this must be the source of the problem. I slowly polish it out with a nylon trim pry tool wrapped in scotchbrite. I clean everything out again with a microfiber towel.

This time I lube the seal and the inside of the seal pocket and shaft with 75w-90, just for some added help. I have noticed by this point that the cam cap side has no chamfer, unlike the side of the pocket cut into the head. I cheat the cap side a little, trying to help it slip in first, and get the seal driver stack on, and run it in. And it did it again.

aU24APl.jpg


Top view of pooched area
KnryGaK.jpg


Weird angle, but this is the bottom, with the chamfer, and it went in without issue.
InS73mWh.jpg


Since the stackup of drivers won't bottom the seal I drove it the rest of the way with a deadblow, and it ended up slightly better than the first seal with the muffin top, but certainly not what I would call "correct". I know it's not right, but would this leak? I'm more just curious, I don't think I could sleep leaving it like this.

Any idea wtf is going on? In the videos I've seen they just jam the Lisle puller in and yank it out, and don't seem to (or don't mention) mar the shaft. And they just drive the seal in without issue. I'm not looking forward to asking my parts guy if they offer a volume discount on cam seals.
 
Last edited:
Register to hide this ad
Just realized I forgot to put the seals in the freezer. I'm sure that didn't help things, but any other suggestions on top of that? I really don't want to have to pull the valve covers again. I just did the gaskets last summer.
 
The grey you see on the seal is the metal inside the seal (rubber ripped off of it).

No, a freezer won't help. Just *just* ran into this issue on my 3s-gte. Head had a chamfer, cam cap didn't. I ruined 3 seals before I got 2 in successufully.

I actually pulled out my deburring tool and added a chamfer to get it to go in.

Something like this, the cutter spins around to always keep the right angle as you pull it around the hole:

82-329-4-noga-workhorse-deburring-tools__09483.1536694484.jpg


Good luck! (at least you have better access with a RWD platform - try doing this with a strut tower in the way!)

-Charlie
 
I know this isn't any consolation, since you already started changing the seals. But I've never seen a camshaft seal leak. Ever. Crankshaft yes, camshaft no.

I think at this point you need to take off the valve covers and the #1 camshaft bracket on the intake camshaft on both heads. I THINK you can get away with just the one on the end since it's the first one removed in the sequence but please consult the FSM and make sure you don't risk warping the camshaft. Then the seal slides right in perfectly each time and the bracket will tighten down as much as needed. It sounds very similar to my rear axle seal fiasco, too many wasted seals.
 
That is a good point for others reading this - don't replace those seals unless they are leaking. Mine are still good at 300k miles.

My 3s-gte needed them at ~200k miles and ~25 years though, so they aren't totally perfect... (they had just started weeping)

-Charlie
 
I know this isn't any consolation, since you already started changing the seals. But I've never seen a camshaft seal leak. Ever. Crankshaft yes, camshaft no.

I think at this point you need to take off the valve covers and the #1 camshaft bracket on the intake camshaft on both heads. I THINK you can get away with just the one on the end since it's the first one removed in the sequence but please consult the FSM and make sure you don't risk warping the camshaft. Then the seal slides right in perfectly each time and the bracket will tighten down as much as needed. It sounds very similar to my rear axle seal fiasco, too many wasted seals.

Hindsight is 20/20, but this is good to know for the future, and others. I figured at 226k it was worth the risk to change them, prior to knowing this.


I got the deburring tool, I couldn't believe they are only $8 on McMaster Carr. I was also amazed how it just carved through the aluminum.

Got the upper half chamfered and smoothed out afterwards with red scotchbrite.

Sorry for the terrible pic, it's really tough to get a picture of the relevant stuff with the camshaft protruding. For anyone following along, I only chamfered the upper half, outlined in orange, and blended it in to the bottom half in the head.

z8nlbrm.jpg


I'll try again when the new seals come in.
 
That is a good point for others reading this - don't replace those seals unless they are leaking. Mine are still good at 300k miles.

My 3s-gte needed them at ~200k miles and ~25 years though, so they aren't totally perfect... (they had just started weeping)

-Charlie

Is the 3s-gte the one that's hard on oil? Do it and the 5VZ share the same cam seals?
 
The grey you see on the seal is the metal inside the seal (rubber ripped off of it).

No, a freezer won't help. Just *just* ran into this issue on my 3s-gte. Head had a chamfer, cam cap didn't. I ruined 3 seals before I got 2 in successufully.

I actually pulled out my deburring tool and added a chamfer to get it to go in.

Something like this, the cutter spins around to always keep the right angle as you pull it around the hole:

82-329-4-noga-workhorse-deburring-tools__09483.1536694484.jpg


Good luck! (at least you have better access with a RWD platform - try doing this with a strut tower in the way!)

-Charlie


thanks, never thought of using one of those for that ...the last time I had an issue with seals was on my last axle bearing job, and I could not get the toyota seals to drive nice.....should of thought of that , but lots of seals have a chamfer
will have to order one of those tools, glad they arent spendy
 
Is the 3s-gte the one that's hard on oil? Do it and the 5VZ share the same cam seals?
Haven't heard of it being particularly hard on oil, but it does make close to 300hp out of 2L and 4 cylinders in factory form (later JDM revisions). More horsepower and torque than the 5VZ with much less displacement and fewer cylinders. I actually run the same Rotella T6 and Toyota OEM oil filter on the 5VZ and 3s-gte these days...

-Charlie
 
Haven't heard of it being particularly hard on oil, but it does make close to 300hp out of 2L and 4 cylinders in factory form (later JDM revisions). More horsepower and torque than the 5VZ with much less displacement and fewer cylinders. I actually run the same Rotella T6 and Toyota OEM oil filter on the 5VZ and 3s-gte these days...

-Charlie

Oh, whoops, I was thinking of the 1MZ-FE in the Camry. I ran the Rotella T6 in a Mazdaspeed6 I had before I got the 4Runner. It was fun, but it was difficult to enjoy while being worried about it breaking the whole time, lol
 
Oh, whoops, I was thinking of the 1MZ-FE in the Camry. I ran the Rotella T6 in a Mazdaspeed6 I had before I got the 4Runner. It was fun, but it was difficult to enjoy while being worried about it breaking the whole time, lol
Haha, yeah. My Camry is motor swapped, thus the confusion. :nod:

-Charlie
 
It is way out of focus, but is there a chance that this metal burr is what is blocking the seal from going in correctly?
Potential problem.jpg

You could try using the cam gear + bolt to drive the seal in perfectly straight as well. I would either remove the cam cap or freeze the seal to try putting it in the second time.

Good luck!
 

Attachments

  • Potential problem.jpg
    Potential problem.jpg
    130.3 KB · Views: 1,109
Were you using OEM seals or seals from a reputable timing belt kit like the aircabinman kit we recommend using in our video? I've now done this job twice, once on Sean's rig when we shot the video and once very recently on my 2000 rig. Both times I had no issues installing the new cam seals. They went in with very little effort. It seems like the sizing of the seal is a bit off for the outer rubber coating to be smooshed off from the insertion. That is not normal.

I've had the lisle seal puller tool make a detectable mark visually, but when I rub my finger over it, I couldn't detect any actual marring of the surface that would compromise the seal. It's like the seal puller arm just left a smudge on the surface of the cam but didn't create a gouge or scratch if that makes sense.

I know some people use the technique of drilling a screw into the seal to remove it but I would worry about leaving the slightest metal burr in there that would damage the seal from using that technique. The Lisle tool does a pretty good job for the seal removal. That specialty cam and crankshaft seal remover and installer kit we show in the video is good for the seal insertion but not so great for the seal removal. I don't like the fact that the seal removal arms in that kit are made thicker so it's hard to get them inserted between the shaft and the sealing lip of the seal. The Lisle arm is thin and fits between the shaft and seal very easily. I used that specialty kit to remove one seal and that was when I was doing a clutch job and we replaced the rear main seal. The Lisle tool wasn't strong enough to get the seal out. Once there were two opposing spots on the seal that were bent out a bit from the Lisle attempts, getting the specialty kit arms was possible and we were able to get the seal out.
 
Success! I finally got all the seals in!

I'm not sure what the difference was, but this is everything I did:

-Chamfered the cam caps (top half) with the deburring tool and blended with the head chamfer
-Used compressed air to blow out all the shavings from the deburring tool
-Smoothed all of that out with red scotchbrite pad
-Scrubbed out any corrosion that had started on the walls and where the OD of the seal would sit with the scotchbrite
-Smoothed out slight marks in the camshaft from the seal puller tool
-Blow out scotchbrite dust
-Cleaned the heck out of everything like prepping for surgery
-Used brake clean on a qtip and went around the perimeter of the seal pocket, and also around the OD of the camshaft (all sealing surfaces), I continued doing this with fresh qtips until they came back clean (took 3-4)
-Final wipe with a clean microfiber towel, check for debris
-Dipped a qtip in 75W-90 and lubed all sealing surfaces on the seal itself, and on the receiving surfaces, and also the chamfered surfaces (idk if 75W-90 helps over regular motor oil, but like Eric from South Main Auto says about penetrating oil "It probably doesn't do anything, but we do it anyway because it makes us feel better")
-Slipped seal over camshaft and squared it up to the head
-Used the press sleeves from the PBT kit, taped them together with electrical tape
-This time I used a 2 and finally 3lb deadblow to gently drive the cam seals in until they were flush with the head, which seemed to be all the further they would go. They sit slightly proud on the cam cap half
-Breathe a giant sigh of relief

Driver's side
1b8jpalh.jpg


Passenger's side
SdG1IhVh.jpg


Sleeve stackup held together with tape for easy use with a hammer
JqbEsWnh.jpg


Fwiw I did use the seal driving kit as intended with the crankshaft seal, and it went in flawlessly. It had waaay less resistance than the cam seals for whatever reason.
kHHAqLYh.jpg


Crank seal in
O4XOlYJh.jpg


Three new seals! Good for another 1/4 million miles!
ddLg09sh.jpg
 
It is way out of focus, but is there a chance that this metal burr is what is blocking the seal from going in correctly?

You could try using the cam gear + bolt to drive the seal in perfectly straight as well. I would either remove the cam cap or freeze the seal to try putting it in the second time.

Good luck!

Fortunately there was no burr on the cam, I think that was just a weird reflection in the picture. That would have been a big problem if so!

Good idea on using the cam gear to drive it in. I tried nearly the same thing (I think the cam gear may actually work better at keeping the force directed down the axis of the cam due to having the alignment pin in the end of the cam) with the PBT seal driver kit, but maybe I didn't have it lined up perfectly. I'll chalk it up to inexperience with the kit, but I'd be hesitant to try it if I just had two seals to work with, lol
 
Were you using OEM seals or seals from a reputable timing belt kit like the aircabinman kit we recommend using in our video? I've now done this job twice, once on Sean's rig when we shot the video and once very recently on my 2000 rig. Both times I had no issues installing the new cam seals. They went in with very little effort. It seems like the sizing of the seal is a bit off for the outer rubber coating to be smooshed off from the insertion. That is not normal.

I got the aircabinman kit from ebay, those were the seals I was using initially. Imo there's no sense to do a project this labor intensive and use anything less than OEM parts.


I've had the lisle seal puller tool make a detectable mark visually, but when I rub my finger over it, I couldn't detect any actual marring of the surface that would compromise the seal. It's like the seal puller arm just left a smudge on the surface of the cam but didn't create a gouge or scratch if that makes sense.

Yeah, I am a bit of a perfectionist (if that's not painfully obvious by this thread, lol), and the mark that the Lisle puller left was detectable, but I wouldn't consider it a scratch or gouge. In my mind both of those words conjure images of a defect with ragged edges. Something with a burr that would really cause an issue. This was just a slight indent in the cam, where the puller blade was clearly harder than the cam, and slid against the cam with some pretty decent force while pulling the seal. I don't think I could feel it with my finger pad (had to close my eyes to concentrate on it), but I could feel it slightly with my fingernail. Using a relatively harder implement like the qtip stick with the swab end cut off, or a nylon pry tool, I could definitely feel the indent. If I had to guess, I'd wager a mildly-experienced guess that it's on the order of 0.5-1 thousandth of an inch (0.0005-0.001") deep. I would not expect to measure it without specialized precision equipment.

What I did to improve the Lisle tool was hit the back of the hook with a blue roloc disk (amazon brand, advertised 320-400 grit), and smoothed it out a bit. From the manufacturing process it left the back of the hook in a slightly U shaped form, where the edges were raised from the stamping process. I also wrapped the entire J portion of the hook with a layer of Scotch 33+ electrical tape (the good stuff) to provide a little cushion without making the hook too thick to be useful. I'm not sure how much good it did, as it still left a noticeable indent in the passenger side cam despite all of this. The electrical tape was punctured from the prying force jamming the hook against the cam. Maybe Scotch 88 would work better, but it might also be too thick to be useful at that point.

OTtcnhwh.jpg


I know some people use the technique of drilling a screw into the seal to remove it but I would worry about leaving the slightest metal burr in there that would damage the seal from using that technique. The Lisle tool does a pretty good job for the seal removal. That specialty cam and crankshaft seal remover and installer kit we show in the video is good for the seal insertion but not so great for the seal removal. I don't like the fact that the seal removal arms in that kit are made thicker so it's hard to get them inserted between the shaft and the sealing lip of the seal. The Lisle arm is thin and fits between the shaft and seal very easily. I used that specialty kit to remove one seal and that was when I was doing a clutch job and we replaced the rear main seal. The Lisle tool wasn't strong enough to get the seal out. Once there were two opposing spots on the seal that were bent out a bit from the Lisle attempts, getting the specialty kit arms was possible and we were able to get the seal out.

I haven't tried the screw technique personally, but it seems like as long as you got it centered in the face of the seal (not sure how feasible this actually is, since there are metal pieces inside), you would have a bit of a buffer on either side of the screw to keep it from contacting the cam or the wall of the seal pocket. I don't think I'd even worry about going too deep with the screw, since if it did contact the bottom of the pocket, it's not a big deal since it's not a sealing surface.

I got that specialty PBT seal puller/installer kit, and was excited to use it. The sleeves are nicely machined and it seemed well thought out. I also noticed that the puller hooks were too thick to insert into the seal without some "prep". I bet it would work much better if you fashioned your own pullers using the Lisle blades, as you can buy replacements. The part number is 58500.

From one of the reviews on amazon, a guy adapted his to use in a slide hammer. He also mentioned smoothing out the edges.

raCFkaI.jpg
 
I know this isn't any consolation, since you already started changing the seals. But I've never seen a camshaft seal leak. Ever. Crankshaft yes, camshaft no.

That is a good point for others reading this - don't replace those seals unless they are leaking. Mine are still good at 300k miles.

My 3s-gte needed them at ~200k miles and ~25 years though, so they aren't totally perfect... (they had just started weeping)

-Charlie

After further consideration I assume these cam seals were replaced when the first timing belt job was done by the PO 10 years ago, as I was able to dig my fingernail into the face of the seal; it was still pliable. The crank seal was pretty rock hard by comparison. Fwiw, these seals did not show any signs of leaking.

Here is a detail picture of the inside lip of the old seal (top) vs one of the new OEM seals that I ruined (bottom). I was surprised at the condition, given how new the face looked and felt. But again, these were not leaking, even with the wear and cracks starting.

Big pic for detail
9aiRTvT.jpg
 

Members online

No members online now.

Forum statistics

Threads
278,315
Messages
3,554,102
Members
248,016
Latest member
Advally Service

Trending content

Back
Top