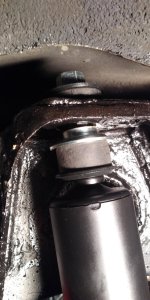
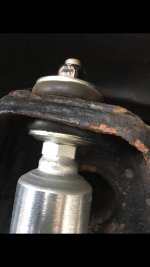
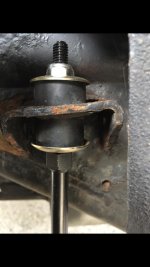
Assembly of bushings moog and kyb shocks

keithyota

New member
The instructions for KYB Excel G and Moog rear stabilizer links are...useless or non existent. These assemblies don't look right to me. Any idea what is right?

For the moog stabilizer link connection lower, there is a thick washer. Does the washer go next to the nut or the other side?

One other thing...I got moog front stabilizer links. Apparently there is a left and right...how does one know which is left or right? I saw no indication on the box.

Terrible packaging and documentation.
 

Attachments

  • 20201002_234201_HDR.jpg
    20201002_234201_HDR.jpg
    148 KB · Views: 1,439
  • 20201002_234227.jpg
    20201002_234227.jpg
    142.7 KB · Views: 1,740
Register to hide this ad
In the past month, I have installed rear shocks and rear links for the first time.

The links are the same. There are not right and left links.

I believe the installation order for both the links and the shocks, from bottom to top, is: washer, bushing, mount, bushing, washer, top nut. I think you have an extra washer in both installs. There should be no washer touching the mounts. You do not re-use the factory washers.

In your link photo, the thick washer touching the mount should be next to the top nut. I think you toss the thin washer.

On youtube, there are videos by user “TRQ” with detailed installation instructions for the links and the shocks. Search for:

“How to replace rear sway bar link 03-09 Toyota 4Runner” and “How to replace rear shock 03-09 Toyota 4Runner”.

Both videos answer your questions visually better than I can explain them in writing.

I am not affiliated with TRQ in any way.
 
Last edited:
the shock and the moog stabilizer came with the 3rd piece which is what is throwing me. The 3rd plate fits with the bushing, the other two are just flat. This install isn't shown in that video as it's a different link.

here's the rear shock absorber parts. what order? KYB Excel-G 344410 Rear Shock Absorber LH or RH for 4Runner FJ Cruiser Truck New | eBay

here's the moog. except it has a thick metal washer for the "ball joint". But what side does it go on, ball joint or nut?
https://i.ebayimg.com/images/g/UxEAAOSwA7det~ls/s-l640.jpg

I'm baffled there are no instructions nor videos or pics that show this clearly.
 
Last edited:
Look for some photos of the stock setup if you don't remember what you took apart (and next time, take photos so you can refer to them). There's some times extra parts you don't need (e.g. extra washers) are included. Poster above guided you on order.
 
I think you can throw away the middle link washer, as well as the silver colored shock washer.

My OEM shocks had the middle washers below the mount for some reason, but I didn’t re-use them with my new shocks. The Bilsteins came with only two washers each.

As little-joe said, sometimes you get extra washers for different installs. For example, Bilstein 4600’s (stock length and direct OEM swap) work with 3 washers, but the 5100’s (can be up to 2” longer) only work with 2 washers. There isn’t room for the third washer (I tried). I couldn’t get the top nut on the 5100 with 3 washers. I had to remove the middle washer that was corroded and stuck to the bottom of the mount.

The correct order is what I posted above, and what little-joe confirmed.
 
I took a gamble put it all together using all the parts, will post video and confirm with manufacturers. I'd bet people are installing this stuff wrong...possible my.
 
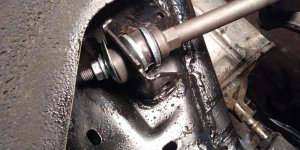
Here are pics of my rear shock and link mounts after my installations:
 

Attachments

  • 20273EDC-A5B5-49EC-A4BC-5061BBBDA920.jpg
    20273EDC-A5B5-49EC-A4BC-5061BBBDA920.jpg
    55 KB · Views: 1,559
  • D0F95DB3-DBB8-4D9B-9BDE-870B1C1E16E1.jpg
    D0F95DB3-DBB8-4D9B-9BDE-870B1C1E16E1.jpg
    60.1 KB · Views: 1,445

Members online

Forum statistics

Threads
278,316
Messages
3,554,120
Members
248,016
Latest member
Advally Service

Trending content

Back
Top