

RysiuM
New member
In order to make my 4Runner legal in Poland I had to drop orange front markers as we have to have white front markers here. Some shop offered me reconnecting markers to blinkers and adding new white markers, but I said “thank you but no”. All these shops use splicers, 2 dollars china made lamps and not water proof connectors.
O had spare set of Toyota headlights so I decided to open lamps, remove the orange inserts and use it without any changes to electrical connections. Unfortunately I do not have oven big enough to heat up the lamp, but I found a shop which did it for me for 50 bucks (25 dollars per lamp).
Today was nice weather to swap my lamps. FSM is showing general info, but the devil is in details. I found three posts very helpful, with hints, pictures and good advises.
http://www.toyota-4runner.org/5th-g...or-retrofit-installation-pics.html#post650654
http://www.toyota-4runner.org/5th-g...headlight-fog-bezel-write-up.html#post1288029
http://www.toyota-4runner.org/5th-gen-t4rs/73612-headlight-assembly-removal.html#post628327
I used them as a bible for my headlight swap. There is no need to repeat what these guys did, as all the info is good and it works. I just wanted to add few details which were not clear for me. So here is how I did it – single person simple tools took me about 2 hours to do the full swap (I work very slow, and do checking and rechecking many times – this is a car so my live depends on it).
1. Tools I used: flat screwdriver to remove clips, 10mm socket on drill/driver to remove bolts and screws, Phillips screwdriver to swap some plastic piece from one lamp to another, long nose pliers to remove weather seal clips, and 4mm hex key wrench to remove my light bar.
2. First take out the radiator cover – whole bunch of clips as described in other posts. You push the center part till it clicks and the clip can be pulled up.
3. In each front wheel well remove three screws (in each) as described in other posts
4. Under the bumper screws (and two bolts) mounting bumper cover to the bottom plastic pieces as described in other posts.
5. Like philsey wrote in his post you do not need to detach the upper grill from the bumper cover. The whole thing will come out together all you need is to remove the center bolt mounting the upper grill to radiator support (1) and 4 clips mounting the bumper cover to crossbar (2). Pry and pull the center part of each clip till clicks, and then pull the whole clip up. I have my LED bar mounted to the crossbar, so in order to get to these four clips I had to unbolt my light bar.

6. Now you are ready to “peel off” the bumper cover. Actually you don’t need to take it out, just “peal it off” the truck and let it hang in front resting on blinkers and fog lights. It is actually quite easy as long as you do it in the following order:
7. Unhook the bumper cover from where the top screw in wheel well was. You have to pry it down and towards the back of the car just to unhook it. If you are curious what is holding it here here is the picture of this thing (1) with bumper cover off. I used flat head screwdriver to loosen the bumper a bit.

8. When the side is unhooked, slide the bumper of the clips, where the remaining two screws in wheel well were and then start pulling the bumper cover towards the front of the car working from the side to center. Do the same on the other side. There will be some cracking sound but there is no need to use big force, if you can’t peal it off, there must be some screw or clip you forgot.
9. This is how much space you need to remove the headlight. Almost “just a crack”

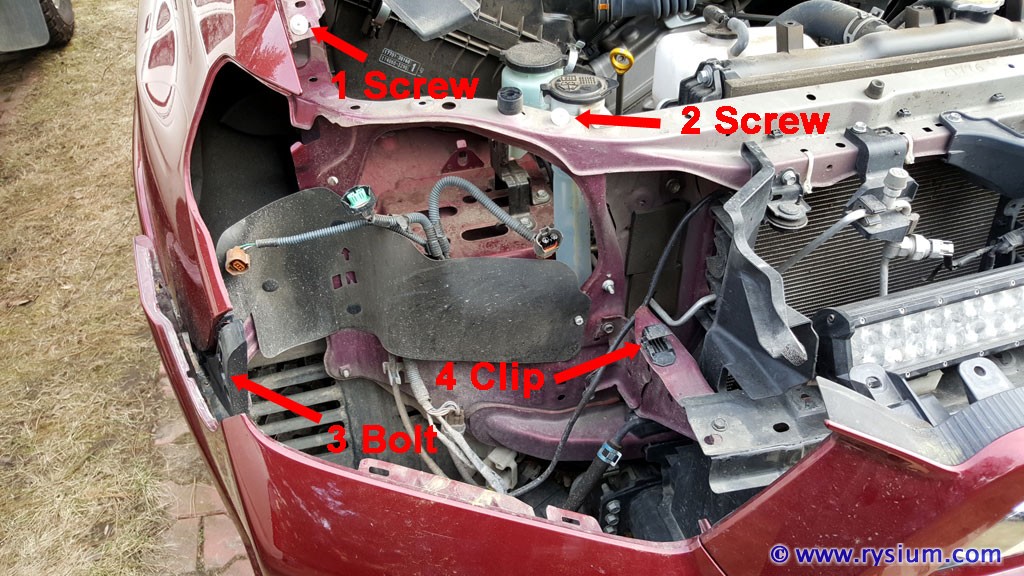
10. There are two screws one bolt and one hook holding the lamp. It is easier to show all of them after the lamp was removed. Screw (1) is hidden under the weather seal and plastic trim on the fender. To get access to it you can lift the trim but I decided to just remove it (see the next step). Screw (2) is easy accessible. Bolt (3) is on the side and was covered by the bumper cover. This is one of the reason you need to peal the bumper cover off, to get access to that bolt. And finally the “hook” (4), it was quite mystery. How to undo it, is in next step.
11. Remove the weather seal and trim from the top of the fender to get access to the first screw. First pull up all four clips (1) holding the weather seal to plastic trim. Just squeeze the clip under the seal with long nose pliers and pull each clip up. The back of the weather seal is hooked to plastic trim. Next slide the trim towards the back to unhook all three clips (2).

12. Unscrew both screws and bolt holding the lamp, but do not try to loosen the lamp yet. It can be removed only by swinging it using the clip under the screw (1) as a hinge. The thing that is holding the light is the hook”.
13. Once you see the “hook” it is easy to understand how it clips and how to undo it. Here is the close up picture of the “hook” from the side after the lamp is removed. Notice two tabs (1) that are the responsible for holding the lamp.

14. There are two ways to undo the hook. The incorrect way (with loud cracking sound) is to push up the part of the lamp between the tabs (1). By doing that some part of the lamp on each side of the screwdriver is lifted up helping unhooking it from tabs while you are pulling the lamp. The correct way (2) is to push down both tabs at the same time with some king of flat screwdriver (the wide one). Then pull the lamp towards the front by swinging it using the clip on the fender as a hinge.

15. Now when lamp is free it is easy to disconnect all three wires going to all three bulbs and remove the light of the truck
Once I had lamps replaced I also replaced the marker bulb with white LED bulb. It looks almost impossible to replace the marker bulb without removing the lamp – so tight spot in there. LED bulb will last forever so I will not need to replace that bulb ever. The unexpected benefit of that is that the LED bulb has 5 light points so the marker has some kind of texture even without the orange cover.

The final result is quite pleasing. 4Runner lost its ugly “scared frog” face and all white headlight looks good.


At night white front markers work actually better than I thought they would. They are even maybe too bright (or not???), but for sure they meet all regulation requirements. And they are pretty too


As you may noticed my behind the grill light bar became quite dirty. This is after 6 months of driving total about 10k miles through all kind of weather and terrain (desert, must, snow, salty winter roads etc.). I found that one problem with behind the grill light bar is next to impossible washing it. It can be pressure washed, but will never “shiny clean” look. I use the occasion of having my light bar out to clean it with Plexus Plexiglass Cleaner (stuff we used to clean Cessna windscreen), and now it's like new. For next 6 months.

O had spare set of Toyota headlights so I decided to open lamps, remove the orange inserts and use it without any changes to electrical connections. Unfortunately I do not have oven big enough to heat up the lamp, but I found a shop which did it for me for 50 bucks (25 dollars per lamp).
Today was nice weather to swap my lamps. FSM is showing general info, but the devil is in details. I found three posts very helpful, with hints, pictures and good advises.
http://www.toyota-4runner.org/5th-g...or-retrofit-installation-pics.html#post650654
http://www.toyota-4runner.org/5th-g...headlight-fog-bezel-write-up.html#post1288029
http://www.toyota-4runner.org/5th-gen-t4rs/73612-headlight-assembly-removal.html#post628327
I used them as a bible for my headlight swap. There is no need to repeat what these guys did, as all the info is good and it works. I just wanted to add few details which were not clear for me. So here is how I did it – single person simple tools took me about 2 hours to do the full swap (I work very slow, and do checking and rechecking many times – this is a car so my live depends on it).
1. Tools I used: flat screwdriver to remove clips, 10mm socket on drill/driver to remove bolts and screws, Phillips screwdriver to swap some plastic piece from one lamp to another, long nose pliers to remove weather seal clips, and 4mm hex key wrench to remove my light bar.
2. First take out the radiator cover – whole bunch of clips as described in other posts. You push the center part till it clicks and the clip can be pulled up.
3. In each front wheel well remove three screws (in each) as described in other posts
4. Under the bumper screws (and two bolts) mounting bumper cover to the bottom plastic pieces as described in other posts.
5. Like philsey wrote in his post you do not need to detach the upper grill from the bumper cover. The whole thing will come out together all you need is to remove the center bolt mounting the upper grill to radiator support (1) and 4 clips mounting the bumper cover to crossbar (2). Pry and pull the center part of each clip till clicks, and then pull the whole clip up. I have my LED bar mounted to the crossbar, so in order to get to these four clips I had to unbolt my light bar.
6. Now you are ready to “peel off” the bumper cover. Actually you don’t need to take it out, just “peal it off” the truck and let it hang in front resting on blinkers and fog lights. It is actually quite easy as long as you do it in the following order:
7. Unhook the bumper cover from where the top screw in wheel well was. You have to pry it down and towards the back of the car just to unhook it. If you are curious what is holding it here here is the picture of this thing (1) with bumper cover off. I used flat head screwdriver to loosen the bumper a bit.
8. When the side is unhooked, slide the bumper of the clips, where the remaining two screws in wheel well were and then start pulling the bumper cover towards the front of the car working from the side to center. Do the same on the other side. There will be some cracking sound but there is no need to use big force, if you can’t peal it off, there must be some screw or clip you forgot.
9. This is how much space you need to remove the headlight. Almost “just a crack”
10. There are two screws one bolt and one hook holding the lamp. It is easier to show all of them after the lamp was removed. Screw (1) is hidden under the weather seal and plastic trim on the fender. To get access to it you can lift the trim but I decided to just remove it (see the next step). Screw (2) is easy accessible. Bolt (3) is on the side and was covered by the bumper cover. This is one of the reason you need to peal the bumper cover off, to get access to that bolt. And finally the “hook” (4), it was quite mystery. How to undo it, is in next step.
11. Remove the weather seal and trim from the top of the fender to get access to the first screw. First pull up all four clips (1) holding the weather seal to plastic trim. Just squeeze the clip under the seal with long nose pliers and pull each clip up. The back of the weather seal is hooked to plastic trim. Next slide the trim towards the back to unhook all three clips (2).
12. Unscrew both screws and bolt holding the lamp, but do not try to loosen the lamp yet. It can be removed only by swinging it using the clip under the screw (1) as a hinge. The thing that is holding the light is the hook”.
13. Once you see the “hook” it is easy to understand how it clips and how to undo it. Here is the close up picture of the “hook” from the side after the lamp is removed. Notice two tabs (1) that are the responsible for holding the lamp.
14. There are two ways to undo the hook. The incorrect way (with loud cracking sound) is to push up the part of the lamp between the tabs (1). By doing that some part of the lamp on each side of the screwdriver is lifted up helping unhooking it from tabs while you are pulling the lamp. The correct way (2) is to push down both tabs at the same time with some king of flat screwdriver (the wide one). Then pull the lamp towards the front by swinging it using the clip on the fender as a hinge.
15. Now when lamp is free it is easy to disconnect all three wires going to all three bulbs and remove the light of the truck
Once I had lamps replaced I also replaced the marker bulb with white LED bulb. It looks almost impossible to replace the marker bulb without removing the lamp – so tight spot in there. LED bulb will last forever so I will not need to replace that bulb ever. The unexpected benefit of that is that the LED bulb has 5 light points so the marker has some kind of texture even without the orange cover.
The final result is quite pleasing. 4Runner lost its ugly “scared frog” face and all white headlight looks good.
At night white front markers work actually better than I thought they would. They are even maybe too bright (or not???), but for sure they meet all regulation requirements. And they are pretty too
As you may noticed my behind the grill light bar became quite dirty. This is after 6 months of driving total about 10k miles through all kind of weather and terrain (desert, must, snow, salty winter roads etc.). I found that one problem with behind the grill light bar is next to impossible washing it. It can be pressure washed, but will never “shiny clean” look. I use the occasion of having my light bar out to clean it with Plexus Plexiglass Cleaner (stuff we used to clean Cessna windscreen), and now it's like new. For next 6 months.
Last edited:


