Written 4/28/22
Edits: 0
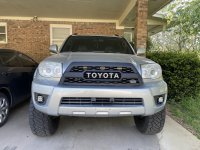
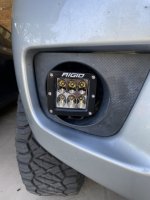
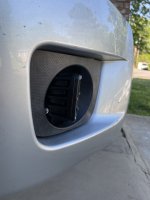
Last night, I installed Rigid D2 Driving Lights (model 502313) in my fog light housing location. Here's how I did it.
My rig is out of commission getting long tubes put on, so I will take more pictures and upload them once it's back. Also, this is my first time doing a writeup; the first three steps are written with extra tips and tricks, and the rest are just the next part of the procedure. If you think the extra tips are helpful information, please let me know and I will update the writeup to include them on every step.
This guide focuses on the light mounting location rather than every possible way to wire them. It is written under the assumption that you have basic wrenching knowledge. For example, I will not give you a step-by-step procedure for mounting the bracket to the pod; I will just say "mount bracket to pod". But, I will provide insight on tricky procedures or explain what I did for some steps!
PSA
The lights I bought are advertised as "off-road use only." They do not have a cutoff, so if you drive with these on at night on busy public roads, you are blinding other drivers and are not a nice person... unless you're road raging:flame:, in that case I won't stop you.
Stuff I Had On Hand
- Rigid LEDs and all included equipment
- phillips and flathead screwdriver
- drill with small (no more than 1/8") bit and 3/8" bit
- cutters/snips/dikes (whatever you want to call them)
- wide nose pliers
- baby flathead screwdriver (I call these "tweakers" at work and will do so from here on out)
- four blue (10-14AWG) 3M Scotchlok connectors
- electrical tape (heat shrink tubing could also work)
- handful of zip ties
- deep 1/2" socket and ratchet (a Crescent wrench will also do)
- 3/16" or 5/32" allen wrench (can't remember which, I'll update this weekend)
- blue Loctite
- black sharpie
- creeper
- work lights (I did this at night)
- a beer
Included Hardware
I have no affiliation with 4wheelparts, but they had the cheapest OTD price to ship the lights to my house. The box arrived with two lights, a wiring harness, a switch, a relay, and mounting hardware. This is the standard/included kit that comes with a 502313 order. The hardware consisted of two brackets, four allen bolts and four Nylock washers to mount the bracket to the light, and two large carriage bolts, nuts, lock washers, and flat washers to mount the bracket/light to a surface of your choice.
Existing Hardware
I made use of the existing fog light wires to make the Rigid operate as my stock fog lights did, but I cut the 9006 bulb plug off as I saw no use for it.
Installation Procedure
1. Remove as many fasteners as necessary to pull your fender liner out of the way so you're comfortable and have plenty of work area access. My rig is running Dobinsons MRA and 305s, so I had already Dremeled enough liner away that I only had to remove one bolt.
2. Remove the black plastic moulding surrounding the stock fog light housing. It's held in by four sturdy clips and pulls out towards the front of the vehicle. Get behind it with your hands, a prybar, a flathead screwdriver, a tweaker, whatever you want... don't be afraid to use a lil' muscle!
3. Remove the stock fog light housing. It is held in by two plastic locating pins on each side. I found it easiest to use a screwdriver and push the inside pin facing the motor out of its housing and towards the front of the vehicle. Then, pry the other pin out. There is no perfect way to do this. The housing comes out of the front of the bumper... again, use some muscle!
4. Cut the two wires leading to the 9006 bulb connector as close as possible to the connector.
5. Use the provided Rigid hardware to mount the bracket to the light. Tighten the inside bolt all the way; it's hard to get to once the light is installed. Leave the outside bolt loose.
6. Mock up the light fitment. Focus on getting the bottom bracket level with the bumper. This is a good time to check how the moulding surround piece will fit back in.
7. Holding the light in place, use the Sharpie to mark the bumper where you will drill a hole to mount the bracket.
8. Drill the hole.
9. Mount the light into the hole you just drilled. Carriage bolt head faces the pod, nut and washers thread on from the underside. I used some Loctite for fun.
10. Cut the Rigid wiring harness that plugs into the lead from the light pod. Leave about 6 inches of wire on AFTER the quick-connect.
11. Using your pliers, grab two Scotchlok connectors and hook up the factory wires from the plug you cut in step 4 to the Rigid harness. My tweaker came in handy here to make sure each wire was in the correct channel (I put Toyota wires in the inside channel closest to the hinged cap). Green Toyota wire to Red Rigid wire, White w/Black Stripe wire to Black Rigid wire.
12. Test for operation. Your lights should come on when the fog light and headlight switches are both on.
13. Use some zipties to tidy up your loose cables and tape off any exposed parts of the Scotchlocks that could let moisture or debris in.
14. Reinstall the black plastic moulding surround piece. Depending on your mounting location, this may take some muscle.
15. Bolt up your fender liner.
16. Repeat steps 1-15 for the other side of your 4Runner.
17. Admire your work!
Edits: 0
Last night, I installed Rigid D2 Driving Lights (model 502313) in my fog light housing location. Here's how I did it.
My rig is out of commission getting long tubes put on, so I will take more pictures and upload them once it's back. Also, this is my first time doing a writeup; the first three steps are written with extra tips and tricks, and the rest are just the next part of the procedure. If you think the extra tips are helpful information, please let me know and I will update the writeup to include them on every step.
This guide focuses on the light mounting location rather than every possible way to wire them. It is written under the assumption that you have basic wrenching knowledge. For example, I will not give you a step-by-step procedure for mounting the bracket to the pod; I will just say "mount bracket to pod". But, I will provide insight on tricky procedures or explain what I did for some steps!
PSA
The lights I bought are advertised as "off-road use only." They do not have a cutoff, so if you drive with these on at night on busy public roads, you are blinding other drivers and are not a nice person... unless you're road raging:flame:, in that case I won't stop you.
Stuff I Had On Hand
- Rigid LEDs and all included equipment
- phillips and flathead screwdriver
- drill with small (no more than 1/8") bit and 3/8" bit
- cutters/snips/dikes (whatever you want to call them)
- wide nose pliers
- baby flathead screwdriver (I call these "tweakers" at work and will do so from here on out)
- four blue (10-14AWG) 3M Scotchlok connectors
- electrical tape (heat shrink tubing could also work)
- handful of zip ties
- deep 1/2" socket and ratchet (a Crescent wrench will also do)
- 3/16" or 5/32" allen wrench (can't remember which, I'll update this weekend)
- blue Loctite
- black sharpie
- creeper
- work lights (I did this at night)
- a beer
Included Hardware
I have no affiliation with 4wheelparts, but they had the cheapest OTD price to ship the lights to my house. The box arrived with two lights, a wiring harness, a switch, a relay, and mounting hardware. This is the standard/included kit that comes with a 502313 order. The hardware consisted of two brackets, four allen bolts and four Nylock washers to mount the bracket to the light, and two large carriage bolts, nuts, lock washers, and flat washers to mount the bracket/light to a surface of your choice.
Existing Hardware
I made use of the existing fog light wires to make the Rigid operate as my stock fog lights did, but I cut the 9006 bulb plug off as I saw no use for it.
Installation Procedure
1. Remove as many fasteners as necessary to pull your fender liner out of the way so you're comfortable and have plenty of work area access. My rig is running Dobinsons MRA and 305s, so I had already Dremeled enough liner away that I only had to remove one bolt.
2. Remove the black plastic moulding surrounding the stock fog light housing. It's held in by four sturdy clips and pulls out towards the front of the vehicle. Get behind it with your hands, a prybar, a flathead screwdriver, a tweaker, whatever you want... don't be afraid to use a lil' muscle!
3. Remove the stock fog light housing. It is held in by two plastic locating pins on each side. I found it easiest to use a screwdriver and push the inside pin facing the motor out of its housing and towards the front of the vehicle. Then, pry the other pin out. There is no perfect way to do this. The housing comes out of the front of the bumper... again, use some muscle!
4. Cut the two wires leading to the 9006 bulb connector as close as possible to the connector.
5. Use the provided Rigid hardware to mount the bracket to the light. Tighten the inside bolt all the way; it's hard to get to once the light is installed. Leave the outside bolt loose.
6. Mock up the light fitment. Focus on getting the bottom bracket level with the bumper. This is a good time to check how the moulding surround piece will fit back in.
7. Holding the light in place, use the Sharpie to mark the bumper where you will drill a hole to mount the bracket.
8. Drill the hole.
9. Mount the light into the hole you just drilled. Carriage bolt head faces the pod, nut and washers thread on from the underside. I used some Loctite for fun.
10. Cut the Rigid wiring harness that plugs into the lead from the light pod. Leave about 6 inches of wire on AFTER the quick-connect.
11. Using your pliers, grab two Scotchlok connectors and hook up the factory wires from the plug you cut in step 4 to the Rigid harness. My tweaker came in handy here to make sure each wire was in the correct channel (I put Toyota wires in the inside channel closest to the hinged cap). Green Toyota wire to Red Rigid wire, White w/Black Stripe wire to Black Rigid wire.
12. Test for operation. Your lights should come on when the fog light and headlight switches are both on.
13. Use some zipties to tidy up your loose cables and tape off any exposed parts of the Scotchlocks that could let moisture or debris in.
14. Reinstall the black plastic moulding surround piece. Depending on your mounting location, this may take some muscle.
15. Bolt up your fender liner.
16. Repeat steps 1-15 for the other side of your 4Runner.
17. Admire your work!