12V fuse block inside center console

4RExplorer

New member
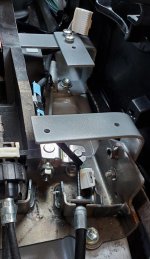
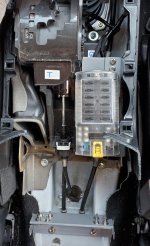
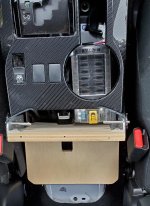
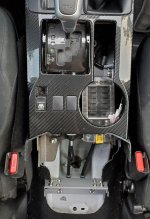
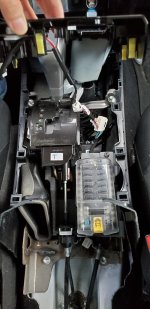
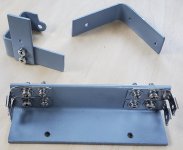
Using some homemade brackets made from 1/8" steel bar, I installed a 12V fuse block inside the center console, where the cup holder on the passenger side normally is. The fuse block will draw power from the auxiliary battery and be grounded at the OEM ground point on the inside fender near the starter battery.

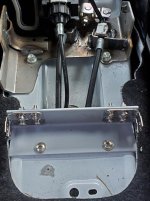
16 AWG wires from this fuse block will lead to Deutsch DT 2-pin connectors which are rated to handle up to 13 amps. Four of these Deutsch DT connectors will be mounted on a bracket made from angle iron and bolted to the 4Runner floor at the rear of the center console.

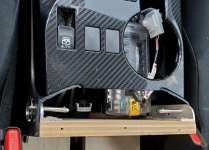
I cut away the rear part of the center console (the part with the storage box) to make it a lot easier to move from the rear of the vehicle to the front seats. The angle iron bracket that holds the four DT connectors will also support a small plywood platform to step on when moving to the front. ABS sheet will cover the open rear of the center console and the top where the cup holder used to be.
 

Attachments

  • Brackets assembled.jpg
    Brackets assembled.jpg
    129.6 KB · Views: 632
  • Deutsch DT bracket installed.jpg
    Deutsch DT bracket installed.jpg
    134.7 KB · Views: 648
  • Fuse block brackets installed.jpg
    Fuse block brackets installed.jpg
    137.6 KB · Views: 666
  • 12V fuse block mounted.jpg
    12V fuse block mounted.jpg
    141.3 KB · Views: 634
Register to hide this ad
seems like it would be a fire hazard if you spilt your beer on it.

before anyone judges...a man cant watch youtube videos about 4r mods while driving with out drinking a beer....or scotch.
 
Why in that inaccessible location?
Sorry, I didn't explain it well. Those four small brackets that I bolted to the angle iron will hold the female (receptacle) half of the four Deutsch DT connectors, so that they will point rearward. I took out the 2nd row seats to make the entire space rear of the front seats available for storage and sleeping. So this location for the DT connectors will be very accessible from the "living space" in the rear of the vehicle. For example, the 12V fridge will be just behind the front passenger seat. I will modify the end of its power wire so that it will terminate in the male ("plug") half of a DT connector, to plug into one of the DT receptacles on the angle iron.

The "step platform" (just a rectangle of ABS or 3/4" plywood, about 9 1/2" wide x 6" deep) that rests horizontally on top of the angle iron will extend maybe only an inch or so rear of the vertical leg of the angle iron, so it won't block access to the DT receptacles.

This location for the 12V fuse block also minimizes the length of heavy (4 AWG) wiring. The auxiliary battery will be in the engine bay, on the passenger side, just on the other side of the firewall from the glove compartment. The main positive wire from that battery will go through the firewall, under the glove compartment, into the center console, and rearward to the 12V fuse block. Then the main ground wire from the 12V fuse block will go forward through the center console, left across the underside of the dash on the driver's side, then through the firewall to the OEM ground point on the inner fender by the starter battery. This way I have to run only one red wire and one black wire through the firewall.
 
seems like it would be a fire hazard if you spilt your beer on it.

before anyone judges...a man cant watch youtube videos about 4r mods while driving with out drinking a beer....or scotch.

Yes. Deutsch DT connectors are waterproof, and all the wires are fused, but it still might be a good idea to shield the 12V fuse block from spills. There are also other connectors inside the center console (for the OEM 12V receptacle and the rear window up/down control).
 
Sorry, I didn't explain it well. Those four small brackets that I bolted to the angle iron will hold the female (receptacle) half of the four Deutsch DT connectors, so that they will point rearward. I took out the 2nd row seats to make the entire space rear of the front seats available for storage and sleeping. So this location for the DT connectors will be very accessible from the "living space" in the rear of the vehicle. For example, the 12V fridge will be just behind the front passenger seat. I will modify the end of its power wire so that it will terminate in the male ("plug") half of a DT connector, to plug into one of the DT receptacles on the angle iron.

The "step platform" (just a rectangle of ABS or 3/4" plywood, about 9 1/2" wide x 6" deep) that rests horizontally on top of the angle iron will extend maybe only an inch or so rear of the vertical leg of the angle iron, so it won't block access to the DT receptacles.

This location for the 12V fuse block also minimizes the length of heavy (4 AWG) wiring. The auxiliary battery will be in the engine bay, on the passenger side, just on the other side of the firewall from the glove compartment. The main positive wire from that battery will go through the firewall, under the glove compartment, into the center console, and rearward to the 12V fuse block. Then the main ground wire from the 12V fuse block will go forward through the center console, left across the underside of the dash on the driver's side, then through the firewall to the OEM ground point on the inner fender by the starter battery. This way I have to run only one red wire and one black wire through the firewall.

And how much disassembly of the interior will be required to check a fuse in the case of a malfunction?

I have a secondary electrical system too, but my accessory fusebox is behind the kick panel in the passenger footwell. It takes mere seconds to pop that off to check or replace a fuse.
 
And how much disassembly of the interior will be required to check a fuse in the case of a malfunction?

I have a secondary electrical system too, but my accessory fusebox is behind the kick panel in the passenger footwell. It takes mere seconds to pop that off to check or replace a fuse.

I'm still working on the cover for the open area of the center console, since I cut away the rear part of it. The prototype, made of plywood, is ugly; maybe something better looking can be made from ABS. But the disassembly for good access to the fuse block is pretty quick: pull two ball detent pins to release the cover, then lift up the rear of the OEM center console cover.

Since the fuse portion of the fuse block sits directly below the circular cup holder opening, a hinged cover over that opening could provide even faster access. It's a little tricky to remove the cover of the fuse block when reaching in through that cup holder hole, but it can be done. There is just enough space at the rear of the fuse block to push that yellow tab to release the fuse block cover.

This location for the fuse block could work well if the USB ports or DT connectors coming from it are somewhere near the center console. But I think your location in the kick panel works better if the wiring from the fuse block runs under the door scuff plates to the rear of the cargo area.
 

Attachments

  • Side view.jpg
    Side view.jpg
    137.1 KB · Views: 504
  • Top view.jpg
    Top view.jpg
    136.6 KB · Views: 507
  • Top view without prototype cover.jpg
    Top view without prototype cover.jpg
    137.1 KB · Views: 545
  • Opened up.jpg
    Opened up.jpg
    140.6 KB · Views: 505
I also have two secondary fuse terminals in my truck along with a dual battery system.
My secondary battery (under the hood) supplies all my non OEM accessories. The Bussman relay and fuse panel is also under the hood.
The second sub panel is in the rear wheel well under the plastic tray for the added outlets.
Both easy to access. I removed the screw that hold the tray in place.
Yes I did have to increase the wire size to the rear panel due to length and amps, but that was not difficult to run in the rocker panels.

You are more than welcome to go to my album pages and see the write ups on these mods.

Note You don't have to take the ground wire back to the OEM location.
If you grounded your second battery correctly just take it there.
Don't forget to fuse the main conductor to your fuse panel at the battery.

I look forward to your end result. keep us posted
 
Last edited:
Note You don't have to take the ground wire back to the OEM location.
If you grounded your second battery correctly just take it there.

I've read various recommendations on where to ground the secondary battery system: OEM ground point on the fender near the starter battery; auxiliary battery negative terminal; a sturdy part of the vehicle body; or even two out of three of these. My understanding is that the OEM ground point on the fender is the ground for the vehicle's entire electrical system, so I chose that location.

I put a negative bus bar inside the engine bay, on the driver side inside fender just forward of the firewall. It receives ground wires from the 12V fuse block in the passenger cabin, the auxiliary battery, the auxiliary battery charger, and a relay that sends power to the charger. All of these components except the 12V fuse block are in the engine bay. The negative bus bar then sends a 4 AWG wire to the OEM ground point on the fender.
 

Members online

No members online now.

Forum statistics

Threads
278,309
Messages
3,554,071
Members
248,016
Latest member
Advally Service

Trending content

Back
Top