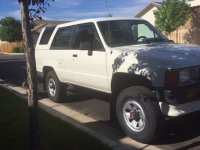
1992 T4R 2LT slow build

Arild

New member
Hi from Belgium!

First of all, i'm a noob. This is my first car build ever and i have very little experience. Second, English is not my native language so please go easy on me :)
We own a small Suzuki Grand Vitara which served us very well (and still will be) but we needed a bigger car because we're expecting. My first idea was to buy a TLC HJ61 but they are 5 times the price of a T4R and an endless war against rust. This was 6 months ago. The search continued until i stumbled across this forum. I was sold and started online screening for decent 4runner's for sale. In Belgium there were only 2 of them and rusted like hell. So i needed to expand my search area and found something in Italy.

That being said, this is what i bought:


It's a 1992 gen 2 T4R with the infamous 2LT engine and has 275.434 KM on the odo. Imported from Italy so very little rust.


To do (in order of importance):

Basic maintenence: fluids, belts and stuff
Engine cooling: got a leak, need new hoses (and maybe radiator)
Transmission: sometimes he jumps out of 1st gear
Wiring: the PO istalled an alarm system but it doesn't work. I found some messy cable management.
Tailgate window: will go up with key but not down (already found a ton of info online)
New rim's / tires: not sure what size/type.
Roof rack: but there are no pre drilled holes or rails... :confused:
Rear bumper: i want a rear bumper with swingout arm for spare tire and bike rack.

That's about it for now. I hope you pro's can guide me a bit. This is going to be and interesting learning process. This will also be a slow build but i will do my best in updating this thread.

Arild out.
 
Last edited:
Register to hide this ad
My power windows stopped working last week so i started googling and borrowed a multimeter from a friend. (nope, still haven't got my own) Someone at lcc.net suggested looking for broken wires in the drivers side front door.

He was spot on:


Fixing those brought the power lock back too. But i found some sloppy wiring from the PO:


But that leaves me with a broken tailgate window. This is the situation:

Goes UP and DOWN with button
Goes UP only with key

I'm going to measure the voltage today and see if i can get any answers. I found a ton of info online about fixing a broken tailgate window but none of them helped so far. I still have a lot of reading to do...

Tomorrow i will visit a local 'toyota 4x4 only' garage/shop for parts and info. It's the first trip for me and my 4runner so fingers crossed.
 
Nice rig!

First thing I would do is kill that rust and seal it up good. POR 15 products have been my go-to for years and is amazing stuff... think zinc.

I'm not a very experienced T4R owner but played elsewhere. 'Noob, junior', etc are all bullshittery laden terms folks made up to let us think we can finally become someone on this and other sites. :sad:

You have already found things many would struggle with.

Well done. But kill that rust.
 
A rust-treatment is indeed one of the things i must do first. Now that the chassis is still in good schape... Good to let me know!

I have a question about the rims. I don't think these are the factory original toyota rims. Should i keep them or not? I know this is a personal staste but i'm thinking about either painting these black (powder coating) or buying new 8 spoke black rims.

The rims are not on top of the list but i need new tires anyway so i might buy/paint rims at the same time...


The top pick shows the rims that I have on a stock '89. Rigs in Europe are a bit different. I do not know a lot about the turbo diesel but would take one in a heart beat. I bet a lot of the issues come from folks who are not familiar with driving a small (or large) diesel.

I know I'm harping at this point but in reviewing those pics it will take major effort to mediate that rust... all but frame-off exposure. I'm sure your climate will exacerbate the issue quickly. Even just spraying on some zink oxide throughout and letting it dry on will interrupt the chemical/electrical process (oxidation) until you can better get to it.

I'm excited for you...for me as well. We are both embarking on the 4runner adventure.

http://www.toyota-4runner.org/attachment.php?attachmentid=300523&stc=1&d=1528430414
 

Attachments

  • IMG_1206.JPG
    IMG_1206.JPG
    103.7 KB · Views: 1,288
Ok, it has been a while but i'm back with new questions :)

I'm planning to replace the hoses of the cooling circuit. These are rated up to 130°C.

P1014720.jpg


P1014721.jpg


I still need to buy the 2 main radiator hoses.

So i disconnected them and found this...

P1014732.jpg


P1014734.jpg


P1014735.jpg


How bad is this and what can i do about it? Do i just cut off the ugly part or do i grind off the rust and clean it?
 
...
How bad is this and what can i do about it? Do i just cut off the ugly part or do i grind off the rust and clean it?

You may be able to get by by just cleaning the accessible corrosion off with a brass / steel brush. Then a thorough radiator flush. Here in the U.S. we have the Prestone Radiator Flush. (https://prestone.com/products?detail=AS105Y)

Follow instructions for radiator flushing
During drain and rinse phases make sure you run the rinse water (from garden hose) both forward and backward (based on water pump direction) through the system to flush out loose solid debris.
 
More info...
By running rinse water through A or B hose with the heater control valve completely open, and plugging the appropriate openings, you will be be able to run the rinse water backward through heater core and radiator to more thoroughly flush loose debris.
Do it such that rinse water runs from bottom of radiator, up and out through the filler opening.

I'm not quite sure which direction the coolant runs through the heater core during normal operation, so I would introduce rinse water in both directions; through A hose into firewall, then through B hose into firewall

YuxcEhfwG7yWPWjeN9ZV2RXe3mOgVfAvMGCAB_f4hYLkd8qi_0rs6J5QyvvqHFrMbvoCyMZEER1B6KMHsnq0m3YS9MBr8X56PmTTaqsLtM6PVn7skdRmOKqSUEuNfxMhjRQVRl9jCu_EpKQ_G9tlspGMgfHSTFbfxJO4C2uuXNmbH841QhZ2AGGfs1x6CaNWSC7x-spT7GN9DPw63Gg1sq2U9MEqCQDDnNa_gOVr5kf1tesJ7oBNcKqq5VzPra0dHCnhMtu8rJy_ki9QDh8JrxKyCrFOR8HiQpzh87BRydroFsy3ul5yVfiS_Wsq6Vy_kiy38UlbPu60fBIOzV0JVQTJPxT38W8CiXcz3J4Kv61yB9cUD7eeiQ8S_lLptF03gi2fMgnmqXSaPSwwck-sHKKQLHVwT0IWB36xPJlco96IfikzxV6ULgY5-vGgycbw-ORsXNO3NMFz6VgHgcM7PJYCAvg0lsVsg6ZtkAcYo2WMLy46ZLjhHYcBNKb_3B42n5tIdfGDwuiCdDc1viIgcYhTGd7AXkiDgA3ujfOfMYruWg7q8VJgdOE-c6LMRb7kFxorj5O90g81yckFBl0k2CebsUHxy60R6x9k6q1W=w437-h777-no
 
Last edited:
I'm not quite sure which direction the coolant runs through the heater core during normal operation, so I would introduce rinse water in both directions; through A hose into firewall, then through B hose into firewall

I will try to figure that out and let you know.

I was also thinking of letting the engine run hot for about 20min and repeating the proces a few times.
 
Last edited:
...I will try to figure that out and let you know.
I was also thinking of letting the engine run hot for about 20min and repeating the proces a few time.
Thanks!
Yes, in fact the popular Prestone flush solution's "heavy-duty flush" which I did means driving with the flushing solution many miles for many hours before draining and rinsing.
Great excuse for a 2-day road-trip :)

XklV7pHObWdvohj4Th_ntKcsSEP5JA_ZqzA9BYXECWKzXt2UAjwMoWuNtZh9L96rNntS2_WdSPoXKQRQIYcP9AHOjZfde6D-Cg6KVLqvUAc4je8m1wuMf5kxl241Jhr80CRnalNjkzhuougsNM2ZOt8YAG6nOx1LTliNyL2xjlyTIIU4YorTOEMIDiUzvRPVMf2elCRSaWeU1ccvZq3FgyRCZZanDUZfSTLOMdDt1XZmLW7c1TNpf3SOoHhgYNEHgTu4j5d8BUYKMCJ9lD7g394nunORl8ArOWrUcfldSrVjLzTqjz-C4-b9IVDbgM-RLiShMxK_t1ILgus_uDGXgl5WIkrhOYvvXCn_bw6fob3XbF1rzTyGAmyBE7Gk_viG9EsbAA7MI8qtZt3Mc8OigtCesGCAOsPrGwBvnmIxZTTkjylsP_BfcSfO79FGthWjJedoNNRduF37WBo615sCVinjHZa4fZwypEoXSJMgEeOZQDWxJqmEgPwPYI5OBKX-wsb9gCn_3VpO-TCJTwGqQXaJahkQeeFfsfyZP3pNFJbWsa62ZLfF2s0eQ32_Q1uRNyYIK-TGzbw9LO47UnztgBKMrsuoka9zCiG7-TLk=w1380-h776-no


For drain and rinse, I also run water through the system for a few minutes with engine hot = thermostat open, let it cool, backflush again with garden hose. Repeat. I admit I like overkill when it comes to cooling system because the common issue with all our vehicles had been with the cooling system.
 
Well, i did some more dismantling today and i'm not happy. I let the pictures do the talking...

This is how my coolant looks like btw:

P1014742.jpg


And these are the tubes:

P1014741.jpg


P1014748.jpg


P1014751.jpg


P1014752.jpg


P1014753.jpg


Soaked them in some degreaser product for half an hour:

P1014754.jpg


After brushing and grinding:

P1014760.jpg


P1014761.jpg


P1014762.jpg


So it's clean. But i'm worried about the condition of the pipes. I'm trying to find a way to replicate them in some way.

I'm also concerned about the condition of the circuit of the engine-block itself.
 
I've had pipes like that in the past. One trick I used was clamp behind a corroded section- the pressure will stress the clamp hose and pipe section. obviously it will leak if clamped at that "V" at the end, but if you have enough solid section behind, it should be fine. You might want to use as broad a clamp as possible. Bring mindful of the clamp position, it has dome the job on cars I've had.


Another alternative might be to use some thin sheet metal and form it in an overlapping manner around the depressed area where it clamps.
 
As to the undercarriage, give it a good wash- maybe twice. I've had dust ah mud masquerade as rust until I really looked at it. One of my vehicles came from Alabama where there is red clay mud all over. I thought the frame had surface rust until I scratched it and saw paint. I washed the underside with a lawn sprinkler for an hour or so and had quite a bit of red mud clumps. One of the trucks I looked at on my search looked have a lot of fine surface rust but licking my thumb and then wiping revealed paint.


Obviously you can't "wash" all the rust away, but a good cleaning will help figure out what's what.
 
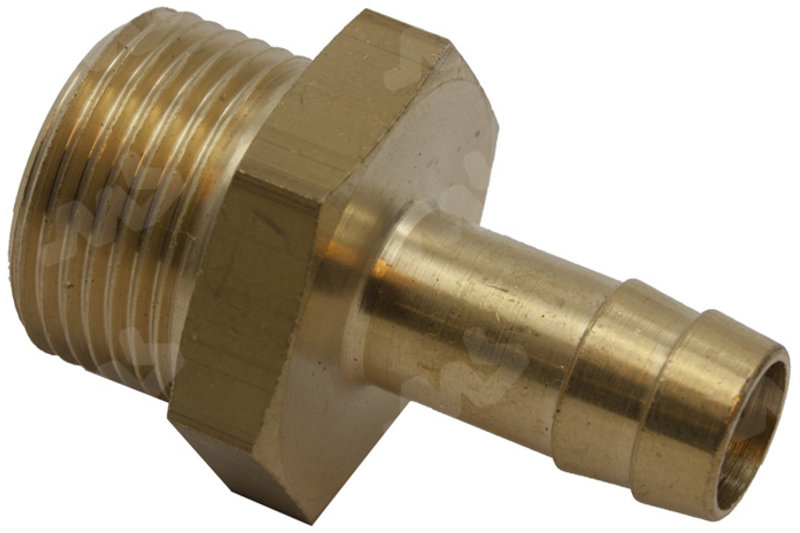
I decided to replace the cooling pipes with something else because they are completely worn out. The rust is just too bad. I can do more cleaning and grinding but i'm sure it will leak and the rust will come back in time.

Maybe this:

MB441-t-800x533.png


and this:

2875.jpg


I'm figuring out what kind of metal the new fittings need to be made off. I think the coolant may not work with every metal? This needs more research though.

As for the coolant flow direction, i figured it out quite easy :)

airflow.jpg


Now something else i want to try:

2018-07-05_20.47.03.jpg


This black hose runs from the top of the engine to the air intake. (air intake was removed in the picture) I believe it directs gasses (and oil) that originate from over-pressure or something?? (not my best english and correct me if i'm wrong)
The problem is my air intake and turbo is flooded with oil. The filter is fine, no oil there, but the result is oil leaking out the air duct in to the engine bay.

Maybe i can solve the problem by adding some type of 'oil waste basket'? I know there are few diesel owners here and i think this is a typical diesel problem (is it ?) but has this been done before?

Man, i only got the car for one month... :)
 
My new fittings are ordered and will be delivered on tuesday. Hopefully i can get the cooling circuit back operational next weekend and start flushing.

Until then, more cleaning:

P7074814.jpg


P7074815.jpg


P7074819.jpg


P7074822.jpg


P7074823.jpg


I could buy a new radiator if they are not too expensive. For now this one is still ok i think.
 
Ok, i have her running again with the new cooling hoses and i got way better temperatures. The temp gauge doesn't go past half way during 30min trips at 70km/h max. Still need to try out the highway but so far so good.

The bad news is i found a new leak... ugh.
P7164839.jpg


So i did not connect the interior heating.

Engine bay:
P7164833.jpg


These two go to the rear heater.
P7164835.jpg


From the engine bay to the front heater. (not connected for now)
P7164836.jpg


Return hose from heater, turbo and engine block.
P7164837.jpg


Someone doesn't give a sh*t...
P7164832.jpg


So i replaced the old tubes with these. They are used to connect hot water from solarpanels.
Inked_P7164838_LI.jpg


  1. hot water from engine bay (in)
  2. cold water to engine bay (out)
  3. hot water to rear heater
  4. got this one wrong! i'ts the cold water from rear heater and must be connected to hose #2!
  5. cold water from turbo
  6. cold water from engine bay
  7. hot water to front heater (not connected)
  8. cold water from front heater (not connected)

I need some additional parts to get the interior heating working but now that i understand the cooling circuit it will be much easier to work with.

On to the next thing: stabilizer bar (please correct me, i don't know the exact english word)

These are worn out.
P7164831.jpg


I managed to get the top bolt of fairly easy.
P7164829.jpg


New rubbers (+€100 holy sh*t) comming in wednesday.
 
Hi again with a new update!

Made a 45min trip on the highway today and sadly the temperature showed near the red line while cruising at 90/100km/h.

I'm getting a 'new' radiator. There is a company called 'ARD' not far from where i live. They are specialized in cleaning and overhauling radiators. What they do is cutting off the top and bottom and putting a new thicker rad in between. So you have a rad that has twice the capacity whilst maintaining the same size.

The good news: i found someone who is willing to work with me on the 4runner. So i'm not alone anymore and he has way more knowledge then me. He also has some spare Range Rover Defender spings that we can use to replace the old ones.

But first thing first: new radiator.
 

Members online

Forum statistics

Threads
278,312
Messages
3,554,085
Members
248,016
Latest member
Advally Service

Trending content

Back
Top