Lesson learned that makes strut installation trivial!
I got a set of OEM shocks for 50.00 shipped.
I apologize for not having updated this thread in a while.
To update ...
I put the struts in on Labor Day, after reading everything I could on the subject, including the factory shop manual (FSM) and Chiltons (which is simply a rehash of the FSM).
Both the FSM & the Chiltons say key steps are:
- "Stabilize the suspension" <== but they don't explain nor do they show how
- And, if needed, they hint: "lower the suspension" <== no explanation provided, nor do they show how
It may be important to note that many DIYs "solve" this "lower the suspension" problem by temporarily disconnecting the sway bar, removing the four brake-related bolts, disconnecting the ball joint, or leveraging with brute force that I just didn't have in me (trust me, I tried).
For the first strut, due to lack of an explanation, I skipped the FSM key step of "stabilizing" the suspension; so I had to resort to the FSM hint of "lowering the suspension" in order to line up the lower shock bolt with the lower control arm. After failing with 2-foot long pry bars and assorted crowbars with pipes added as leverage, I hit upon the beautiful idea of using a Sears Craftsman hydraulic 6-ton bottle jack (P/N 950282, 8 5/8 inches to 16 13/16 inches) on top of the lower control arm.
That jack & its specific placement for 2WD vehicles made all the difference!
For the next strut, I had (by now) figured out how to elegantly "stabilize" the suspension; but I didn't do a good enough job on that second try - so - I had to also "lower" the suspension with the bottle jack; it was easy enough to do and the bolt just slipped into place, without any need for hammering or forcing it in.
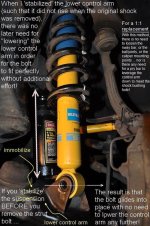
By my third strut (because I had forgotten to put a washer back on the top of the first strut), I had honed the stabilization step, so it only took a minute or two to immobilize the lower control arm. On this third try, with the lower control arm locked in place, there was no need for the FSM hint of lowering the suspension!
The lower control arm, as shown in the picture below, remained immobilized in the exact location it was in before I had removed the previous shock!
The first try took hours; the second took about a half hour; and the third was done in 20 minutes, from start to finish!
Lesson learned (for a one-to-one replacement):
- If you stabilize the lower control arm before you remove the strut, (such that the lower control arm remains in place after you remove the strut), you can then quite easily put the new strut in since all the bolt holes automatically line up perfectly!
- With good stabilization, there is no need to further lower the suspension using workarounds such as disconnecting sway bars, loosening caliper bolts, unbolting ball joints, or leveraging with pry bars.