1997 2WD 4Runner front shock 'blown' (need parts, suppliers, & 2wd-DIY-steps advice)

Status
Not open for further replies.
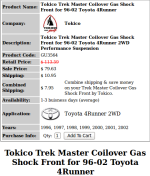
As far as I can tell, the Tokico Trek Master Coilover gas shock GU3564 is the equivalent part for the Toyota P/N 48510-39406.

I realized belatedly that googling for the Toyota part number gets me inflated prices. It's best to google for the Tokico part number instead of the Toyota part number, apparently.

When they arrive, would you recommend renting the $55 spring compressor from Autozone or buying a spring compressor ($20 to $250) or paying a mechanic to compress the springs?
 

Attachments

  • tokico_trekmaster.png
    tokico_trekmaster.png
    75 KB · Views: 1,224
Last edited:
It depends how mechanically inclined you are. Since you are dealing with stock springs, no lift and stock shocks, i wouldn't worry about spring compressor tools.


Lift the 4runner up and set vehicle on jack stands.

Jack up lower control arm to relieve pressure off the top center strut nut.

Loosen the strut nut and remove.

Slowly lower the jack, letting the lower control arm drop.

The strut and spring will be separated at this point and just have to remove the lower bolt to completely remove the strut.

Installation is the reverse - Bolt strut to lower control arm, install spring and then jack the lower control arm back up pushing the strut back into the top hat. Install center nut and tighten.
 
i wouldn't worry about spring compressor tools

Interesting.

I am mechanically inclined & I don't (usually) mind buying tools (because most of the time, the tool costs less than the mechanic does); but (and this is a big one), I've never done shocks before.

I have all the hand tools most others have (sockets, wrenches, etc.), including the Toyota factory manuals, and a good Costco floor jack, chocks, jack stands, etc.

Since I've never done shocks before (and since springs are dangerous), I'd want to do it the most-recommended way (i.e., the way you guys do it).

When I googled for the tools for removing Toyota shocks, I thought most people used spring compressors - but - if there's a better (cheaper, safer, easier) way, I'm all for it.

Which method do you think is safer & easier?

  • Allowing the vehicle's weight to compress the springs
  • Compress the springs off the vehicle with one of the many spring compressors available (see this listing)

45448d1306962073-style-spring-compressor-do-you-recommend-using-3rd-generation-4runner-spring_compressor_style_7.png
 
I have that tool and i still do it the way i mentioned. That tool is really too big for the toyota springs.

Doing it with out the tool sounds intimidating but it really isn't. Now, if you putting longer springs for a taller lift, then and spring compressor would be required. but in your situation, no tool needed.
 
That tool is really too big for the toyota springs

Interesting.

BTW, I stopped by O'Reilly Auto Parts today to see what their spring compressing tool looks like. The one they lend for $50 is the simple two steel bolt style with hooks on each end.

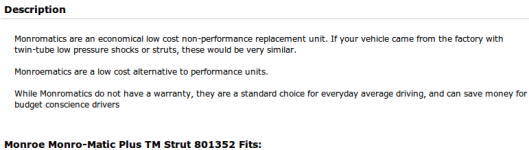
They wanted to sell me $60 Monroe-Matic 801352 struts (which they had in stock).

I said I needed to research them first ...

What do you guys think about those shocks?

Googling, they seem like a 1:1 replacement for Tokico (but that's what the advertisers say).
 

Attachments

  • monroematics.png
    monroematics.png
    20.5 KB · Views: 1,050
The last two sets of front right tires wore out prematurely (mostly the right front tire tread was worn off the outside few inches).

Tire wear on only one side can be a sign that your LBJs are on their way out.

I would have the truck's LBJ's inspected. I wouldn't do it yourself since you are not that mechanically inclined, at least with regards to suspensions.

If the LBJs fail, as they are known to do on older trucks, you could crash horribly. Any decent Toyota mechanic should know the procedure for inspecting the LBJs.
 
would the method for removing the shock from the spring like singtoe mentioned work if im going to use the stock springs with new oem shocks but with a daystar 1" top spacer added?? since im only adding an inch to the overall height, will i need to do the spring compressor method. singtoes method sounds simple and easy and if i could go that route i will. anybody??? thanks. have a 97 2wd by the way
 
@ hdoggie24

I would just use the search function for keywords "install" and "spacer", you find some good write ups.
 
IMO for what your vehicle is used for- shocks are shocks.. No matter what you buy it will be stiffer up front. Im in no way saying don't go with OEM parts. Have you looked on Ebay yet? I got a set of OEM shocks for 50.00 shipped.
 
Lesson learned that makes strut installation trivial!

I got a set of OEM shocks for 50.00 shipped.

I apologize for not having updated this thread in a while.

To update ...
I put the struts in on Labor Day, after reading everything I could on the subject, including the factory shop manual (FSM) and Chiltons (which is simply a rehash of the FSM).

Both the FSM & the Chiltons say key steps are:

  • "Stabilize the suspension" <== but they don't explain nor do they show how
  • And, if needed, they hint: "lower the suspension" <== no explanation provided, nor do they show how
It may be important to note that many DIYs "solve" this "lower the suspension" problem by temporarily disconnecting the sway bar, removing the four brake-related bolts, disconnecting the ball joint, or leveraging with brute force that I just didn't have in me (trust me, I tried).

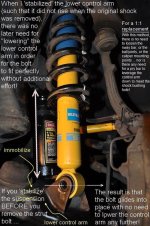
For the first strut, due to lack of an explanation, I skipped the FSM key step of "stabilizing" the suspension; so I had to resort to the FSM hint of "lowering the suspension" in order to line up the lower shock bolt with the lower control arm. After failing with 2-foot long pry bars and assorted crowbars with pipes added as leverage, I hit upon the beautiful idea of using a Sears Craftsman hydraulic 6-ton bottle jack (P/N 950282, 8 5/8 inches to 16 13/16 inches) on top of the lower control arm. That jack & its specific placement for 2WD vehicles made all the difference!

For the next strut
, I had (by now) figured out how to elegantly "stabilize" the suspension; but I didn't do a good enough job on that second try - so - I had to also "lower" the suspension with the bottle jack; it was easy enough to do and the bolt just slipped into place, without any need for hammering or forcing it in.

By my third strut (because I had forgotten to put a washer back on the top of the first strut), I had honed the stabilization step, so it only took a minute or two to immobilize the lower control arm. On this third try, with the lower control arm locked in place, there was no need for the FSM hint of lowering the suspension! The lower control arm, as shown in the picture below, remained immobilized in the exact location it was in before I had removed the previous shock!

The first try took hours; the second took about a half hour; and the third was done in 20 minutes, from start to finish!

Lesson learned (for a one-to-one replacement):

  • If you stabilize the lower control arm before you remove the strut, (such that the lower control arm remains in place after you remove the strut), you can then quite easily put the new strut in since all the bolt holes automatically line up perfectly!
  • With good stabilization, there is no need to further lower the suspension using workarounds such as disconnecting sway bars, loosening caliper bolts, unbolting ball joints, or leveraging with pry bars.

 

Attachments

  • fsm_stabilizing_the_lower_control_arm.jpg
    fsm_stabilizing_the_lower_control_arm.jpg
    122 KB · Views: 11,142
Last edited:
Status
Not open for further replies.

Members online

No members online now.

Forum statistics

Threads
278,315
Messages
3,554,123
Members
248,016
Latest member
Advally Service

Trending content

Back
Top