2002 4Runner - Suspension Question

Didn't mean I wasn't going to change it out. Just that the process following, from the comment above, wasn't needed prior to my swapping it out.

"if you haven't kept up with the fluid changes (every 3~4 years), might be worth dumping in a coolant cleaner a few weeks ahead of time and going through a few drain and fills (with distilled water) before the swap."

The Radiator is on my list, but probably should be further up:
1. Front Stabilizer Bar Links
2. Front Bushings
3. Lower Ball Joints
4. Rear Bushings
5. Radiator

But my list is what I'm initially comfortable with (after just swapping out the Rear Sway Bar Links last weekend), what parts are arriving in the mail next, what I can swap out knowing I have no spare vehicle at this point, plus having a few very busy weekends in July.

I’m just glad I posted for help… As otherwise Lower Ball Joints and Radiator weren’t even thoughts in my mind after 330,000 miles… ☹
 
rusty or not? - Living in Northwest Wisconsin - with lots of salty roads... so underneath... yes
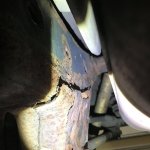
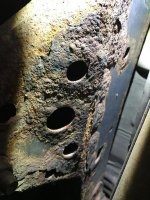
Step 1 then is to check the frame closely for rust damage. #1 location is the rear lower link bracket on the frame near the muffler. Check for holes/damage where the bracket is welded to the frame.

If that is bad, that will put the rest of the maintenance/repair work in context...

-Charlie
 
I wouldn't add anything to that radiator for fear it would come apart, overheat, and blow the head gasket or leak into the transmission. Normally I would but you are on borrowed time. Once the temp gauge says it is hot it is too late so get a Scangauge or similar so you can read the actual engine temperature.
Definitely go with OEM LBJ's also.
 
Step 1 then is to check the frame closely for rust damage. #1 location is the rear lower link bracket on the frame near the muffler. Check for holes/damage where the bracket is welded to the frame.

If that is bad, that will put the rest of the maintenance/repair work in context...

-Charlie

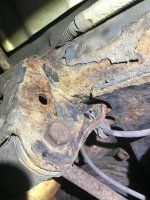
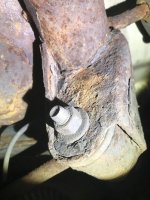
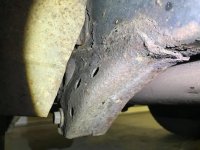
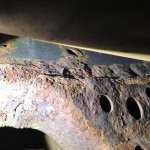
Here's some pictures of the area that I think you were referencing in regards to the "bracket is welded to the frame." I saw rust, and the black undercoating coming off, but no actual holes.
 

Attachments

  • 209462411_762243464471500_4223915095147179609_n.jpg
    209462411_762243464471500_4223915095147179609_n.jpg
    137.5 KB · Views: 300
  • 206900641_319643993219789_395712645213389117_n.jpg
    206900641_319643993219789_395712645213389117_n.jpg
    134.1 KB · Views: 291
Here's some pictures of the area that I think you were referencing in regards to the "bracket is welded to the frame." I saw rust, and the black undercoating coming off, but no actual holes.


Here’s the bracket you want to look at:

89b7ee6d9936b8f8ffda1ba71f79fe25.jpg

See how in this photo the rust has penetrated the weld seam.

View from under the truck, facing out, looking at the inboard side of the rear trailing arm mount. Especially where the bracket is welded to the frame rail. The tire you see in the photo is the inside of the rear passenger tire.

Here’s another angle closer up (unfortunately blurry):
ad78e697dc1a605f64e6a1f5944a1a95.jpg


You can see from the close up that you could push a screwdriver into/through that weld seam. Not good. That’s actual structural damage.

If your trailing arm mount looks like this, then in my opinion that might change your plans for this truck.
 
Last edited:
Based on those upper link pics, I expect the lower link brackets to be pretty bad... That should be figured out before any other maintenance.

-Charlie
 
Here's what mine look like.... See attached pics....
 

Attachments

  • 206079337_4072151692834506_2413691540514883055_n.jpg
    206079337_4072151692834506_2413691540514883055_n.jpg
    134.4 KB · Views: 239
  • 203254324_418358729237937_8103187831906984693_n.jpg
    203254324_418358729237937_8103187831906984693_n.jpg
    130.5 KB · Views: 291
  • 202524310_862983950967422_2475497355292931581_n.jpg
    202524310_862983950967422_2475497355292931581_n.jpg
    123 KB · Views: 236
  • 200387359_209465451067295_9039459631559717169_n.jpg
    200387359_209465451067295_9039459631559717169_n.jpg
    142.1 KB · Views: 233
Here's what mine look like.... See attached pics....

Aw nooo man. I would forget everything else and get that issue sorted out first. There's really no point in fixing the suspension up first if the bracket is about to snap due to rot. I do know there are weld kits that can be bought to fix it.
 
Thanks for the info on my frame and the welding that needs to be done...

But since I had parts arriving today in the mail... I knocked out the following in about 3.5 hours.

1. DONE - Front Stabilizer Bar Links
2. DONE - Front Bushings

It took longer than it should of just because it was my first time doing both - and I had to make two walking trips to the HW store about a block away... Remember I only have 1 vehicle with my other attending college 100 miles away :-)

The Front Stabilizer Bar Links came out relatively easy. Had one broken top nut on the driver side, and had to Dremel cut off the bottom nut on the passenger side. But that went fast.

The Front Stabilizer Bushings were a little more fun. With having to get to the four bolts from the top. Thought I needed a deep socket so that was the first walk to the HW store - but not needed. Plus I broke one bolt off. So had to get the bolt out. And ended up breaking the welded nut off the bracket too. So the second walk to the HW Store.

But all is complete and back together. And test drive went well

Once I got it all back together, I noticed another package at the door - Lower Ball Joints. But that's a task for tomorrow as I need to pick up a Tie Rod Puller kit from Advance first.

Than to knock out the two Rear Stabilizer Rod bushings after that.

Than to purchase a Radiator and install - that looks fairly easy... and should be easy on this old body.

Than back to the rear frame issues and fixing it somehow...

Needed to knock these other things out... as I have two road-trips in the next 3 weeks that I'm heading out on... and not much time to get things done. And a single dad with full custody of a 15 year old that is a very busy boy - but has not started drivers training just yet. So tons of running.

Thanks Again... I catch up again once I get some more tasks done.
 
Thanks for the info on my frame and the welding that needs to be done...

But since I had parts arriving today in the mail... I knocked out the following in about 3.5 hours.

1. DONE - Front Stabilizer Bar Links
2. DONE - Front Bushings

It took longer than it should of just because it was my first time doing both - and I had to make two walking trips to the HW store about a block away... Remember I only have 1 vehicle with my other attending college 100 miles away :-)

The Front Stabilizer Bar Links came out relatively easy. Had one broken top nut on the driver side, and had to Dremel cut off the bottom nut on the passenger side. But that went fast.

The Front Stabilizer Bushings were a little more fun. With having to get to the four bolts from the top. Thought I needed a deep socket so that was the first walk to the HW store - but not needed. Plus I broke one bolt off. So had to get the bolt out. And ended up breaking the welded nut off the bracket too. So the second walk to the HW Store.

But all is complete and back together. And test drive went well

Once I got it all back together, I noticed another package at the door - Lower Ball Joints. But that's a task for tomorrow as I need to pick up a Tie Rod Puller kit from Advance first.

Than to knock out the two Rear Stabilizer Rod bushings after that.

Than to purchase a Radiator and install - that looks fairly easy... and should be easy on this old body.

Than back to the rear frame issues and fixing it somehow...

Needed to knock these other things out... as I have two road-trips in the next 3 weeks that I'm heading out on... and not much time to get things done. And a single dad with full custody of a 15 year old that is a very busy boy - but has not started drivers training just yet. So tons of running.

Thanks Again... I catch up again once I get some more tasks done.
 
Just finished replacing both the LT and Rt Lower Ball Joints - Took 4 hours… and 1 walk to the HW store. Not to bad a job for the first time doing it. I could easily cut the time in half on the next go-around.

Main issues were:
1. Breaking one of the 4 Lower Ball Joints bolts.
2. Removing the four 330,000 mile, 20 year old Castle Nut Cotter Pins – a pain.
3. Getting the Outer Tie Rod Castle Nuts off – had to use a chisel to break lose.

I put the old castle nuts back on the Outer Tie Rod – I need to order both and replace.

QUESTION – The biggest issue left is that broken bolt stud in the Driver Lower Ball Joint Assembly. It’s the rear outside one – and I don’t know what to do to get it out.

I had to put everything back together for the time being, to have a drivable vehicle. Not a safe option missing 1 of 4 bolts – but my only option.

Thoughts???
 
QUESTION – The biggest issue left is that broken bolt stud in the Driver Lower Ball Joint Assembly. It’s the rear outside one – and I don’t know what to do to get it out.


Thoughts???

The normal methods...

If there's any thread remaining, penetrating oil, heat, tapping with a hammer and then vice-grips.

If there's no thread remaining to grab, then center-punching the broken bit, penetrating oil, heat and either a normal drill if the thread passes all the way through (I can't remember if there's access to the back side) or a Reverse drill bit if you can only get at it from the one side.

If it doesn't come out with the reverse drill bit (or you can't find one), then you're getting into "EZ-out" territory. I've used them but don't like to. Depending on how centered you've managed to drill the hole, a better option might be to just drill out as large as possible First. That means a larger EZ-out, which are harder to break...

But if you break one, you're SOL. So the decision to just drill out to the right size and tap might be next. Generally speaking, you'd want to go the next size up for the tap to have clean metal, but then you get into oddness of fastener sizes. You could get back to the right thread sizes with a Time Sert or Helicoil.


I think those bolts are 1-time use, so you might want to consider ordering 3 more while you deal with this. I'd just re-use the ones you've got for the time being, just no hardcore wheeling, yeah? :D
 
There is no thread remaining… Broke off even…

With this being so low to the ground even with jacked… and facing fully down… I don’t think I can get a center punch, hammer or drill bit even to be able to center punch or drill it…

There is no access to the other end of the broken off bolt… just from the bottom for this specific bolt…

I feel this means that I would need to pull out that full assembly and put it on a bench… to work on it… Which looks like a chore to pull all of that out…

Bolts… I had bought ALL brand new bolts (4 each side) for the Lower Ball Joint Replaement.

Hard core wheeling… this is pretty much a commuting truck – 30 miles each way to work and back…

Just debating whether I leave it like this… I know not ideal.. but….
 
There is no thread remaining… Broke off even…

With this being so low to the ground even with jacked… and facing fully down… I don’t think I can get a center punch, hammer or drill bit even to be able to center punch or drill it…

There is no access to the other end of the broken off bolt… just from the bottom for this specific bolt…

I feel this means that I would need to pull out that full assembly and put it on a bench… to work on it… Which looks like a chore to pull all of that out…

Bolts… I had bought ALL brand new bolts (4 each side) for the Lower Ball Joint Replaement.

Hard core wheeling… this is pretty much a commuting truck – 30 miles each way to work and back…

Just debating whether I leave it like this… I know not ideal.. but….

Will have to fix it. 3 bolts with 8% more stress won't last long. It Is going to be a pita with all the rust. May be get another knuckle from a salvage yard. They go for about 40 bucks and then pb blaster the rest of the bolts. your cam bolts might also be seized so having a set on hand might be good. As mentioned by [MENTION=315156]Brian.[/MENTION] might be worth a shot to try his recommendation.
 
Like others said OEM ball joints only. There are lots of threads how the other ones fail quickly. Also, I have bilstein shocks and love them. They make going over bumps enjoyable. Highly recommend those.
 
I installed McGeorge Toyota OEM Lower Ball Joints with new bolts already... Just have (1 of 4) busted off mount bolts I need to fix.

I am looking at Blisten or KYB shocks... but I'm just a bit worried after looking at the upper mount point on the rears about how I'm going to be able to access them and get them out.
 
Question again...

What is easier to change?
1. Front Struts
2. Rear Shocks

My feel is the Front Struts... but I'm hoping the fronts come preinstalled somehow with that Spring. I'm just not sure how I'm going to get to that top rear shock nut to get it off with 331,000 miles on them.
 
Question again...

What is easier to change?
1. Front Struts
2. Rear Shocks

My feel is the Front Struts... but I'm hoping the fronts come preinstalled somehow with that Spring. I'm just not sure how I'm going to get to that top rear shock nut to get it off with 331,000 miles on them.
Unless you got loaded front struts it will not come with the spring or the top hat or assembled in any way
 

Members online

Forum statistics

Threads
278,307
Messages
3,554,055
Members
248,016
Latest member
Advally Service

Trending content

Back
Top