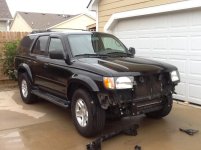
2002 Operation Blackout

LimitedBlack

New member
Current: 1.4.15

Back:
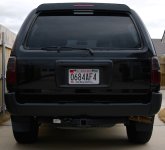
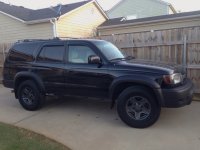
DSC00017.jpg

Front:

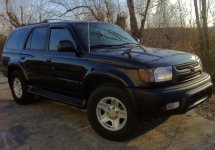
674861d8780c40638de2be093c5c27fb.jpg

Im going to try and explain everything I do here and post as many pics as possible ... Starting with paint ... Going to suspension ... inside and out ...

I know there are a zillion threads here about painting fenders and bumpers but I am gonna start by throwing my hat in the ring and let you guys know how I plan to go about it. More pictures forthcoming, but I plan to get started on the grill and front bumper tomorrow and move on back to the fenders and rear bumper when I finish the front up. Stay tuned and I will keep updating everything I do, have a laundry list of things to get done ...

Im thinking the flat(ish) black of the Rusto bed liner on the gloss black paint is gonna b killer.

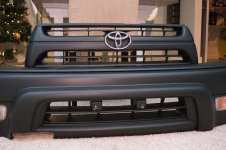
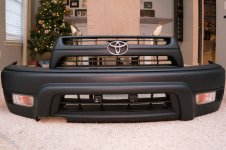
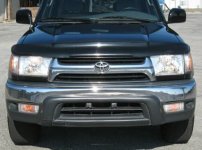
I settled on a good sanding & cleaning / Adhesive Promoter (plastic parts) and Self Etching primer (metal-chrome parts) / several coats of Rustoleum Bed Liner. After a little experimenting I decided to go with the Rusto because of the deeper black and the finer texture. Heres the front before:

Screen Shot 2014-12-26 at 12.07.38 AM.jpg

I managed to pull the front grill and emblem off easier than I expected. Only one clip casualty, due to some gnarly buildup, it was not able to be salvaged and had to be snapped off because it was stuck.

I used Ajax and cleaned the grill up and removed the emblem, hit it with some 150 grit sandpaper and gave it a good rinse, then scrubbed it again with Ajax. Its drying and in the morning I plan to hit it with the Adhesive promoter and bed liner.

It got dark on me so I will pull the bumper and start cleaning and prepping the plastic and bumper tomorrow. Im using the 150 Grit because the bed liner is textured anyway and I am hoping for better adhesion with a rougher surface. I am not worried much about the plastic, its the chrome I don't want to peel on me. Any advise would be appreciated. Just don't tell me not to do it ... I am pretty invested at this point LOL! :pound:
 

Attachments

  • Screen Shot 2014-12-26 at 12.07.38 AM.jpg
    Screen Shot 2014-12-26 at 12.07.38 AM.jpg
    81.7 KB · Views: 2,633
  • DSC00017.jpg
    DSC00017.jpg
    79.7 KB · Views: 2,598
  • IMG_1664 copy 2.jpg
    IMG_1664 copy 2.jpg
    66.7 KB · Views: 1,707
  • 674861d8780c40638de2be093c5c27fb.jpg
    674861d8780c40638de2be093c5c27fb.jpg
    134.2 KB · Views: 4,372
Last edited:
Register to hide this ad
Update

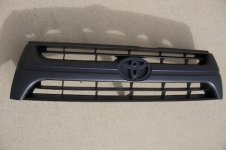
Grill got sanded with some 150, since it was a harder plastic, and I shot it with 3 coats of Adhesive Promoter. I don't know what I expected these coats to look like but it was just a nice thick layered coat of flat clear spray. I didn't get a picture of the painting because I was worried about getting everything right the first time. (and possibly I was pretty high on the fumes - this stuff is POTENT - WEAR A MASK!) But here it is finished ...

DSC00004 copy.jpg

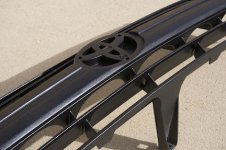
Closer ...

DSC00005 copy.jpg

VERY happy with the result at this point ... there is some chromatic aberration in the pic but I assure you its a deep black. The texture is perfect too ... It "feels" tough (we will see) but not lumpy. The key for me was to take my time and get 4 good coats + 1 light coat. Trying to prevent some peeling, I went ahead and sprayed all around the front and back edges. To me this makes it look a little nicer.

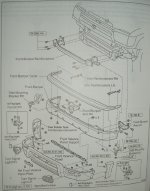
On to the front Bumper ... Ok I may be the only idiot that doesn't know how to take one of these bumpers off and after much searching i found this diagram ...

aaabumper.jpg

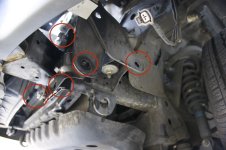
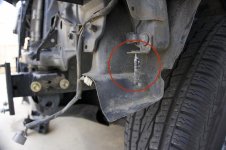
Definitely helps but nothing like getting under the thing and investigating ... The screws circled below have to come out and presto! There it is ...

DSC00002 copy.jpg
DSC00003 copy.jpg

(images are of the front driver side)
NOTE: REMOVING THESE SCREWS GIVE YOU THE ENTIRE BUMPER AND BRACKETS ... THE SAFEST WAY TO PULL EM APART BY YOURSELF ...

Working on the top lip and valance now ... more to come ... :car:
 

Attachments

  • aaabumper.jpg
    aaabumper.jpg
    128.8 KB · Views: 3,514
  • DSC00002 copy.jpg
    DSC00002 copy.jpg
    101.4 KB · Views: 2,269
  • DSC00004 copy.jpg
    DSC00004 copy.jpg
    19.9 KB · Views: 1,677
  • DSC00005 copy.jpg
    DSC00005 copy.jpg
    26 KB · Views: 1,615
  • DSC00003 copy.jpg
    DSC00003 copy.jpg
    34.9 KB · Views: 1,699
Last edited:
More ...

Ok, everything done except the bumper ... same protocol on the plastic parts as before ...

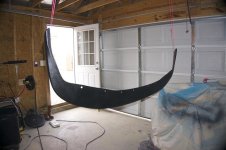
I HIGHLY RECCOMMEND STRINGIN' THESE THINGS UP AND HANGING THEM TO PAINT!

DSC00006 copy.jpg

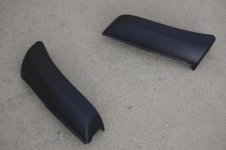
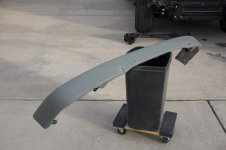
Front Lip

DSC00008 copy.jpg

Front bumper Fenders

DSC00010 copy.jpg

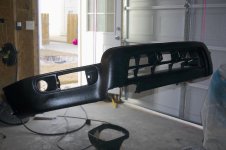
Front Bumper Valance

DSC00009 copy.jpg

Chrome Bumper - I got this bad boy sanded down REAL fast with a palm sander and hit it with some self-etching primer. There were a few rust spots on the back when I pulled it off and my OCD kicked in ... Had to give that some rust spray ... now its drying.

I hope to have everything cured up nice and back on the truck tomorrow. It says on the can to let it cure for 72 hrs before sliding anything across the bed of the truck (can of Rusto bed liner) but who really uses that stuff for a truck bed anyways ... gonna move everything in the dining room before it gets cold tonight to try and get it to cure a little faster ... Im sure the wife is gonna LOVE that ... :boom:
 

Attachments

  • DSC00006 copy.jpg
    DSC00006 copy.jpg
    48 KB · Views: 1,599
  • DSC00008 copy.jpg
    DSC00008 copy.jpg
    50.7 KB · Views: 1,601
  • DSC00010 copy.jpg
    DSC00010 copy.jpg
    43.9 KB · Views: 1,566
  • DSC00009 copy.jpg
    DSC00009 copy.jpg
    41.5 KB · Views: 1,628
Last edited:
Nice work, would enjoy working with you.
I've painted many cars, and still don't understand how adhesion promoter works so well being so thick. Why can't they make some that goes on thin & even?
 
Nice work, would enjoy working with you.
I've painted many cars, and still don't understand how adhesion promoter works so well being so thick. Why can't they make some that goes on thin & even?
Dunno bro .. this is my first time working with it ... I have a lot of experience spray painting this or that, but never plastic and never a vehicle. I love the look that the flat bedliner gives so I decided to give it a roll. I hope it holds up. I found that the promoter kind of soaked into the plastic so I kept spraying until i saw a nice even coat sitting on top of the piece, hopefully i didn't over-do it. I was thinking this may have been due to the fact that I sanded the glossy/finished surface off first?

There are a lot of threads here and there on applying the bed liner and the only constant was PREP IT! I went all out on the prep ... clean/sand/clean/sand/rinse/adhesive promoter(or primer)/paint ... so hopefully it will test out well.

Wasn't really nervous about doing her face ... but sides are a different story ... I will say that the spray liner is EXTREMELY forgiving and the spray pattern is EXTREMELY fast and dense. I did find a couple of the nooks and crannies where it got a little heavy and I just took a shop towel and gave it a blot (DONT RUB IT) and put a fine mist over it and you couldn't even tell I got a little spray happy. I ended up with about 4 1/2 - 5 coats total on everything and it took about 1 1/2 and of adhesive promoter, a little self etching primer, and 4 cans of bedliner.

As for the product at this point ... I couldn't be happier with it ... It was extremely easy to apply, very forgiving, and has dried to an even texture and color.
 
Uv coat

I have everything painted and curing at this point, can anyone tell me if I should try to find a UV coat to shoot over it before i put it back together tomorrow? I don't mind touching up here and there, I expect that to happen, but i don't want it to look like chalk in 6 mo. ... or will that even happen?
 
Lights!

As soon as my grandparents drove this bad boy off the lot ... a week later a rock hit the headlight and they just decided to never fix it. I decided to fix it. I will eventually replace them but for now I need an easy fix to keep the water out ... the condensation is driving me insane!

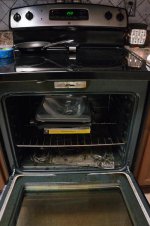
I saw a post (can't find it to give them credit) where they heated the lamp in the oven and peeled it back to paint inside .. basically an easy (scratch that - cheap) way to get black headlamps.

I already have everything off so i decided to give it a run ...

Logo.jpg

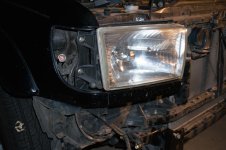
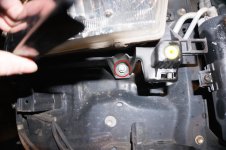
Before - There are two screws on the left of the lamp that have to come off

Logo-2.jpg

Logo-3.jpg

and these ...

Logo-4.jpg

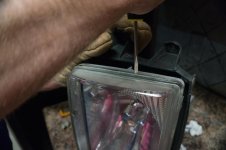
Throw that bad boy in the oven for about 10 min @ 250 ... PUT IT ON SOMETHING ... cardboard, or i used an old phonebook ...

Logo-6.jpg

This was the tricky part ... HEATED plastic that is over 10 years old becomes BRITTLE ... it was a little tedious but not hard. you just have to take your time and work slowly!

Logo-5.jpg

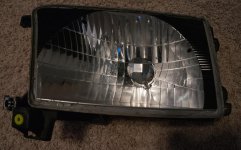
After I got everything apart i threw it back in the oven for about 5 min so i could scrape the old adhesive off ... goes very quick if you heat it then scrape it ... very very slow if you let it cool ... Masked off the outer portion of the lens ... shot it with some black and let it dry!

Logo-7.jpg

After it has dried, grab a tube of black exterior sealant (in a caulk tube) and run a generous bead in the channel. Put it back together and put the clips back on and reassemble.

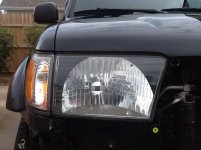
Logo-8.jpg

AFTER! Pretty pleased with it ... looks much better!

P.s. She is due for a bath ... forgive the mess ...
 

Attachments

  • Logo-2.jpg
    Logo-2.jpg
    105 KB · Views: 1,575
  • Logo.jpg
    Logo.jpg
    105 KB · Views: 1,620
  • Logo-3.jpg
    Logo-3.jpg
    94.5 KB · Views: 1,580
  • Logo-4.jpg
    Logo-4.jpg
    67 KB · Views: 1,560
  • Logo-5.jpg
    Logo-5.jpg
    97 KB · Views: 1,594
  • Logo-6.jpg
    Logo-6.jpg
    70.5 KB · Views: 1,551
  • Logo-7.jpg
    Logo-7.jpg
    108.1 KB · Views: 1,562
  • Logo-8.jpg
    Logo-8.jpg
    88.1 KB · Views: 1,579
Last edited:
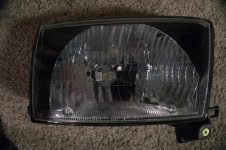
Headlights

More pics of the head lights please !

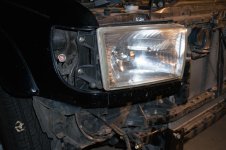
Whatcha wanna c ... I will take some more ... Here is a straight on shot:

IMG_1522.jpg

I still haven't put everything back on from painting it all. Its been raining like a mother all night and morning, it stopped just long enough for me to get this one and its suppose to rain all day tomorrow too ... getting antsy to get it back on but I'm being patient...
 

Attachments

  • IMG_1522.jpg
    IMG_1522.jpg
    71.8 KB · Views: 2,096
As soon as i get it back together she's getting a wash, clay bar, and a couple coats of wax ... she really looks great when she's shined up ...
 
Ya that's what I wanted to see. Maybe one more of the whole truck with the lights off, head on, off to the side.

I'm thinking I might do the same to my lights. Did you do the corner lights black inside as well?

I've been thinking about doing this, but haven't seen any shots of the amber bulbs on with the black housings.
 
Looks good! I'm kinda in the process of getting rid of all the chrome on my black 01 too. So far I got the grill by doing a satoshi and matching it black. I would like to make the bumper black too, but I'm apprehensive to do anything with the stock one because the chrome is peeling on it and I don't know if I will be able to get paint to stick very well. I might just buy an ebay primered one and paint over that instead and replace the stock one with that. I really like those headlights. Now I might need to try that, I'm just afraid to mess it up...

Where in Alabama are you at?
 
Ya that's what I wanted to see. Maybe one more of the whole truck with the lights off, head on, off to the side.

I'm thinking I might do the same to my lights. Did you do the corner lights black inside as well?

I've been thinking about doing this, but haven't seen any shots of the amber bulbs on with the black housings.

No, I didn't do the corner markers. I was wanting to, but DANG those things are sealed in and also held in with little tabs. I see it being possible, but extremely difficult. I see someone really getting pissed because they broke it, that plastic is pretty fragile when its hot.

Theres black trim around the corners from the factory so I tried to get it open and eventually just left it be and I think it matches up pretty good.

IMG_1523.jpg
 

Attachments

  • IMG_1523.jpg
    IMG_1523.jpg
    75.6 KB · Views: 2,276
If you do decide to do it, Be sure to get a really good bead of caulk around the outside of the housing, it may smash out, yes, but you will not see it. MORE the better here ... It was really not that hard to do. It took longer to let the lens paint dry than anything else.
 
Looks good! I'm kinda in the process of getting rid of all the chrome on my black 01 too. So far I got the grill by doing a satoshi and matching it black. I would like to make the bumper black too, but I'm apprehensive to do anything with the stock one because the chrome is peeling on it and I don't know if I will be able to get paint to stick very well. I might just buy an ebay primered one and paint over that instead and replace the stock one with that. I really like those headlights. Now I might need to try that, I'm just afraid to mess it up...

Where in Alabama are you at?

Near Birmingham ... I was a little apprehensive about doing the bumper, but the palm sander took it down to the metal pretty quick ... I used a 120 grit to start with and finished it off by gradually increasing. I think the etching primer would do a good job in protecting it if you wanted to save a few bucks ... just spray over the edges and be sure to coat the final paint over that.

Cant tell you how easy the headlights were ...
 
Great. Now can you take a picture with just the left light turned on and right off, but from a birds eye view?

Just kidding. Thanks, looks good. Think I'll add this mod to my list.
 
Stupid rain ...

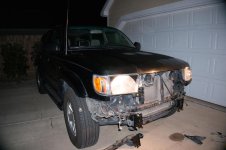
This rain is driving me crazy! ... got everything all ready to go back on but It seems like it is going to rain until monday ... Quick preview ... I stacked everything just for effect and ...

truck-2.jpg

truck.jpg

Whatcha think guys?
 

Attachments

  • truck-2.jpg
    truck-2.jpg
    108.4 KB · Views: 876
  • truck.jpg
    truck.jpg
    114 KB · Views: 934
Looking good! I'm impressed how well the headlights turned out, I really didn't think it'd work that well. Nice! Too bad about those corner lights though..
 

Members online

Forum statistics

Threads
278,306
Messages
3,554,045
Members
248,016
Latest member
Advally Service

Trending content

Back
Top