

adamderry
New member
Hey all, this is my first post, thanks to everyone on here for all the great info so far!
I picked up my first 4Runner last Thursday. It's a 2004 Sport with XREAS, 150,000 kms, stock except a Borla dual side exit exhaust system. So far I've absolutely loved the 4R, but I'm sick in the head and can't drive stock vehicles so the modding bug hit fast. I'm using the vehicle to travel to and from wellsites, and so I wanted to upgrade so that I could make it through the mud a little better.
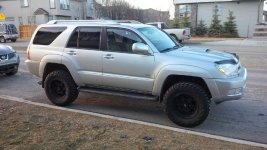
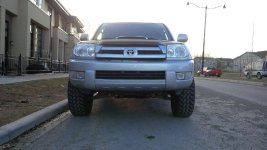
This week I installed the Daystar 2.5/1.5 spacer kit, 265/70/17 Nitto Trail Grapplers, and Pro Comp 17" 7089 0mm offset wheels. I also put on a K&N intake kit and a hood deflector (we have a lot of gravel on our roads here to help with traction during the winter).
I was hoping to show others on this forum what this setup looks like as a reference and to also comment on how easy the Daystar install was. Some of the other members here have posted "How-to's" and those were helpful but I wanted to mention that the new kits do not require the disassembly of the spring and strut. The kit includes thread-on stud extenders, which makes the job very pleasant.
I have a few questions:
1. I just took the truck out for my first test drive and have noticed that there is some rubbing. I believe it to be coming from the wheel well liners. Has anyone had this same experience? And have you been able to trim the wheel well liners so that there is no rubbing? Can you please describe where you trimmed?
2. Does anyone have suggestions as to additional parts that I really should install? For instance, is an adjustable pan hard bar a good idea with a 1.5 rear lift? Anything I should do before taking it for an alignment?
Thanks for any insight! Here's some pics! And yes I know the front skid plate is missing, I pulled it off because it's quite rusted and I'm going to bead blast and paint it before I put it back on.
I picked up my first 4Runner last Thursday. It's a 2004 Sport with XREAS, 150,000 kms, stock except a Borla dual side exit exhaust system. So far I've absolutely loved the 4R, but I'm sick in the head and can't drive stock vehicles so the modding bug hit fast. I'm using the vehicle to travel to and from wellsites, and so I wanted to upgrade so that I could make it through the mud a little better.
This week I installed the Daystar 2.5/1.5 spacer kit, 265/70/17 Nitto Trail Grapplers, and Pro Comp 17" 7089 0mm offset wheels. I also put on a K&N intake kit and a hood deflector (we have a lot of gravel on our roads here to help with traction during the winter).
I was hoping to show others on this forum what this setup looks like as a reference and to also comment on how easy the Daystar install was. Some of the other members here have posted "How-to's" and those were helpful but I wanted to mention that the new kits do not require the disassembly of the spring and strut. The kit includes thread-on stud extenders, which makes the job very pleasant.
I have a few questions:
1. I just took the truck out for my first test drive and have noticed that there is some rubbing. I believe it to be coming from the wheel well liners. Has anyone had this same experience? And have you been able to trim the wheel well liners so that there is no rubbing? Can you please describe where you trimmed?
2. Does anyone have suggestions as to additional parts that I really should install? For instance, is an adjustable pan hard bar a good idea with a 1.5 rear lift? Anything I should do before taking it for an alignment?
Thanks for any insight! Here's some pics! And yes I know the front skid plate is missing, I pulled it off because it's quite rusted and I'm going to bead blast and paint it before I put it back on.
Attachments
Last edited:


