**2013 SHROCKWORKS Group Buy**

For your drooling consideration.

toy2g-albums-5th+gen-picture19567-bump4.jpg


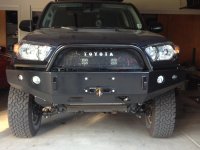
Installed and ready to rock.

2 4Runners...one being a 5th gen. Now you are just rubbing it in our faces. The armor looks great and jealous of your driveway.
 
**UPDATE**
Mark tells me that February kicks off their busy time of year, so he wants all our group buy orders submitted before then by 1/31/13 by 11:59pm
HERE IS YOUR SHROCKWORKS GROUP BUY DISCOUNT CODE
T4R-GB-15

A question for those of you who participated in this group buy....

Was the initial minimum 10 orders or 20?

Thanks. Trying to work out another deal with Mark.
[MENTION=67079]Fjatheart[/MENTION]
 
ugamurph: interested in another group buy if you happen to make it work. I figure you'll want to start gauging interest.

Sounds good. I'm going to get with Mark tomorrow to iron out some details then post up a new GB thread in the next day or so. Anyone else interested, send me a PM. Thanks.
 
Sounds good. I'm going to get with Mark tomorrow to iron out some details then post up a new GB thread in the next day or so. Anyone else interested, send me a PM. Thanks.

Just make sure when you do post a new page to be EXTREMELY clear on the wait time. Last buy some people forgot. Does it take a while, yes? Is it a great looking bumper and functional, yes! Also Im pretty sure I am the only one not just in my city but my state with a SW Bumper(most others have their Heeps, I mean Jeeps). Good luck and cheers!
 
Still loving the Shrockworks bumper but wanted to provide an update for folks having trouble with the signal/running lights that Shrockworks provides.

I know it is well documented that the bulb holders are not waterproof and fail miserably but I figured 'what the hey - I'll give them a shot'. Well, suffice it to say that they're terrible and I've already had several bulbs burn out and one outright explode due to the water collecting nature of the housings.

Thanks to the_josh for informing me about these LED, weathertight marker/signal lights. Just figured I'd post up for anyone else needing a more reliable/waterproof option than the Hella signals.

LED markers for Shrockworks bumper

You'll need a resistor to run them as turn signals but you won't be replacing 1157 bulbs every other week!

Once again - love the bumper but the markers are a documented disappointment. Shrockworks would be better off just not providing any.
 
Last edited:
Finally got my bumper painted and cleared today. It needs to cure for a couple days before I wet sand and polish it out.

Here are a couple pics:

898c1a09-3084-44db-9385-fbd0417b1785_zps049260f4.jpg~original


SAM_1220_zps3701d202.jpg~original
[/URL]
 
Last edited:
Weekend project

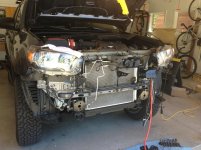
Finally dove into the Shrockworks front bumper install this weekend. I definitely recommend having 2 extra hands when installing with a winch! It was a bear! Looks nice and close to what i have seen of others finished product. Not super tight with the body replacements below the headlights but the rest was awesome! Check it out.
 

Attachments

  • naked front end.jpg
    naked front end.jpg
    133.9 KB · Views: 357
  • Shrockworks,bumper installed.jpg
    Shrockworks,bumper installed.jpg
    126.5 KB · Views: 385
Finally got my bumper painted and cleared today. It needs to cure for a couple days before I wet sand and polish it out.

Here are a couple pics:

Before you go doing the finish work, I would shoot a layer or two in the light bucket tubes. It doesnt look like there is much of any coverage there and it will be visible, particularly in the fog light buckets.
 
Before you go doing the finish work, I would shoot a layer or two in the light bucket tubes. It doesnt look like there is much of any coverage there and it will be visible, particularly in the fog light buckets.

Been much too long since I have been over here and I wanted to update. The powder grey in the light buckets is actually primer over-spray from when I painted the exterior shell. Beneath it is etching primer and several coats of gloss black, and I also taped them off and hit them again with more gloss before going in for round two today.

**Disclaimer** What follows is a rant and my expression of displeasure with the initial fit of my bumper. **

I spent today actually getting the bumper bolted on. I am not sure what exactly was wrong with my particular bumper but the Jig must have been off a little the day it was welded up.

I ended up grinding and greasing and beating to get it to bolt on. It WOULD NOT go on with the brackets attached, so I ended up loosely bolting one bracket to the bumper and the other was just sitting on the frame horn (no hardware at all), which allowed me to get it started, then I had to beat on it SO HARD that I actually deformed the passenger side tow point to get it on, and thank GOD I welded the winch reinforcing points in because after all that beating and fighting, I had it just close enough that I was able to start the bolts in the end of the frame and pull it the remaining inch+ to get it home.

I then had to put the floor jack under it with the main bolts loosely installed and basically pick up the front-end and use the weight of the truck to slide the bumper up to get it adjusted up and get the body gap set. Fortunately for me I have a drill small enough to make the two extra holes in the brackets because it IS NOT coming back off.

Now I know everyone has said that they go on tight and blah, blah, blah, but what I am saying is that mine was beyond tight, to the point of being off. Not so bad that it wouldn't go on, but off enough that it required some moderate modification to get it to actually fit. Off enough that it had to be installed with basically no hardware and had to be manhandled to the point of metal distortion to get it to "bolt-on"

Why am I so upset, well two main reasons. First while I expected for this to be a project and was fully prepared for the task, what I was not planning on was having to physically alter the bumper in order to get it installed which leads to my second issue which is that because of the beating and banging I effed up my paint job. It doesn't need a full rework and I am by no means a professional but I was well pleased with the product, anyway, but as I mentioned earlier the tow points are so badly worked over that I am going to have to grind them down and prime and repaint them as well as a number of other places that will need sanding and repainting. I special ordered said paint to match my cladding and now I will be re-ordering more so that I can touch up these places. At $25 per can, it is not cheap.

Ok, now that I have all that off my chest and aside from the fitment issues, I am very pleased with how the bumper looks. It is late and I still have to finish up some wiring and tighten and finish installing all the hardware but I will try to get some pictures up tomorrow of the the finished product.
 
Still loving the Shrockworks bumper but wanted to provide an update for folks having trouble with the signal/running lights that Shrockworks provides.

I know it is well documented that the bulb holders are not waterproof and fail miserably but I figured 'what the hey - I'll give them a shot'. Well, suffice it to say that they're terrible and I've already had several bulbs burn out and one outright explode due to the water collecting nature of the housings.

Thanks to the_josh for informing me about these LED, weathertight marker/signal lights. Just figured I'd post up for anyone else needing a more reliable/waterproof option than the Hella signals.

LED markers for Shrockworks bumper

You'll need a resistor to run them as turn signals but you won't be replacing 1157 bulbs every other week!

Once again - love the bumper but the markers are a documented disappointment. Shrockworks would be better off just not providing any.

good to know, thanks!

I will get some of those LEDs now...
 
Been much too long since I have been over here and I wanted to update. The powder grey in the light buckets is actually primer over-spray from when I painted the exterior shell. Beneath it is etching primer and several coats of gloss black, and I also taped them off and hit them again with more gloss before going in for round two today.

**Disclaimer** What follows is a rant and my expression of displeasure with the initial fit of my bumper. **

I spent today actually getting the bumper bolted on. I am not sure what exactly was wrong with my particular bumper but the Jig must have been off a little the day it was welded up.

I ended up grinding and greasing and beating to get it to bolt on. It WOULD NOT go on with the brackets attached, so I ended up loosely bolting one bracket to the bumper and the other was just sitting on the frame horn (no hardware at all), which allowed me to get it started, then I had to beat on it SO HARD that I actually deformed the passenger side tow point to get it on, and thank GOD I welded the winch reinforcing points in because after all that beating and fighting, I had it just close enough that I was able to start the bolts in the end of the frame and pull it the remaining inch+ to get it home.

I then had to put the floor jack under it with the main bolts loosely installed and basically pick up the front-end and use the weight of the truck to slide the bumper up to get it adjusted up and get the body gap set. Fortunately for me I have a drill small enough to make the two extra holes in the brackets because it IS NOT coming back off.

Now I know everyone has said that they go on tight and blah, blah, blah, but what I am saying is that mine was beyond tight, to the point of being off. Not so bad that it wouldn't go on, but off enough that it required some moderate modification to get it to actually fit. Off enough that it had to be installed with basically no hardware and had to be manhandled to the point of metal distortion to get it to "bolt-on"

Why am I so upset, well two main reasons. First while I expected for this to be a project and was fully prepared for the task, what I was not planning on was having to physically alter the bumper in order to get it installed which leads to my second issue which is that because of the beating and banging I effed up my paint job. It doesn't need a full rework and I am by no means a professional but I was well pleased with the product, anyway, but as I mentioned earlier the tow points are so badly worked over that I am going to have to grind them down and prime and repaint them as well as a number of other places that will need sanding and repainting. I special ordered said paint to match my cladding and now I will be re-ordering more so that I can touch up these places. At $25 per can, it is not cheap.

Ok, now that I have all that off my chest and aside from the fitment issues, I am very pleased with how the bumper looks. It is late and I still have to finish up some wiring and tighten and finish installing all the hardware but I will try to get some pictures up tomorrow of the the finished product.

Sorry for all the trouble!

I've installed probably close to 20 of these exact bumpers on everything from the '96 Runners(my own) up to the 2004 Tacomas and know that some have been an absolute BEAR, but on others have gone completely flawless. In every case we've measured the bumper mounting against the jig and it has checked out every time. With the way these things are assembled you really have to try to build it out of wack for it to happen. It has in every case been a variable on the trucks end....Honestly there have been twice that I had to stick my hi-lift between the frame rails to spread them apart a bit.

All that being said and I know it doesn't help your case much, but we have in the past month or two decided that it might help to narrow the mounting a bit on the bumper to help out in these cases. We didn't want too go to far so that it would hurt the guys on the opposite side of the spectrum, but enough that this sort of thing isn't as painful.
 
Justin,

I understand, but I must say that I was very disappointed at the amount of work that had to be done to this "bolt-on" bumper. Don't get me wrong this is an awesome bumper and I am very pleased that I went with SW, just a bit trying on a mans patience.
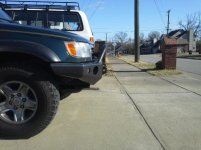
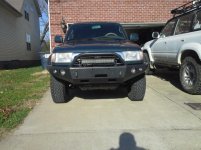
And with that since this is the group buy thread, I feel like I should post some pictures of the finished product. Color matched to the factory cladding and LED lights installed.
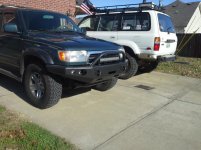
 

Attachments

  • 4runner front 1.jpg
    4runner front 1.jpg
    76.9 KB · Views: 233
  • 4runner front 2.jpg
    4runner front 2.jpg
    66.9 KB · Views: 202
  • 4runner front 3.jpg
    4runner front 3.jpg
    82 KB · Views: 227

Members online

Forum statistics

Threads
278,316
Messages
3,554,120
Members
248,016
Latest member
Advally Service

Trending content

Back
Top