2014 Aim / adjust headlights after level or lift

Ok, so we followed all the pointers given by you all, we finally found a Phillips screwdriver that would grab the teeth, we took pictures and we took notes....

Parked 4R in our driveway, thought it was fairly level, but pictures say not so much. Hopefully it is our old driveway that is out of whack and the truck is not leaning that bad.

Pics hopefully tell the story. There is a row of block on the house that is different than the rest of the block, use it as a reference point.

We turned the screwdriver a total of 15 complete revolutions and we estimate that the lights lowered 6". At 10 turns, we estimated it to be at 4" lower (no picture) and then we turned it another 5 and stopped.

I then drove down the road and back and confirmed there was no blinding effect going on. We did not do this before we started so we really did not have anything to gauge it against.

Last picture represents what I think is good projection of lights on street.

And as they say, if Mama is happy, then everyone is happy! Done.
Thanks for all the pointers. Hope to help the next soul that comes along and reads this thread. Next, will work on popping those caps off and plastidipping them. :)

Thanks for the pics, the projectors have a nice and clean cut off line.
 
114693d1395894041-2014-aim-adjust-headlights-after-level-lift-aim3.jpg

May I ask you something...do you see the bit of "glare" directly above the cutoff (right around the center of your garage door)? Is that actual glare or just light reflecting upwards from the ground? I've never been able to see a clean beam pattern shot on these OEM projectors and am very curious if they have built-in "squirrel spotters" to light up overhead road signs :)
 
Although CURRENTLY I have a Cornfed spacer lift 2.0 front and 1.0 back . There is an inch of rake to it. Ive never adjusted and actually now I think the lights are where supposed to be. I never get flashed even with the fogs on.

As long as your rake is 1" plus you should be fine.
 
May I ask you something...do you see the bit of "glare" directly above the cutoff (right around the center of your garage door)? Is that actual glare or just light reflecting upwards from the ground? I've never been able to see a clean beam pattern shot on these OEM projectors and am very curious if they have built-in "squirrel spotters" to light up overhead road signs :)

That is the Squirrel spotters. Its a slit in the projector housing that lets some of the light to aim upwards so it lights up the street signs. With halogen bulbs, it doesn't glare oncoming drivers. But with HID bulbs, which are 3 times as bright, it can glare oncoming drivers. This can be adjusted if you are running HID's, you just bend it half way down.
 
That is the Squirrel spotters. Its a slit in the projector housing that lets some of the light to aim upwards so it lights up the street signs. With halogen bulbs, it doesn't glare oncoming drivers. But with HID bulbs, which are 3 times as bright, it can glare oncoming drivers. This can be adjusted if you are running HID's, you just bend it half way down.

THANK YOU, I've been trying to get a solid answer on this, but apparently no one else with a 2014 can see it (or chooses not to, lol). I'm assuming you bent yours out of the way after installing the pnp HID kit? How is the glare control after bending, much better?
 
I haven't bent mine down. I tried but the 2014 projectors on the 4runner are different than other projectors. The bulb loads sideways, not straight through the back. I couldn't see the flap to be able to bend it down.
The glare while not horrible, is still there and I want to fix this. I have not been flashed yet, but when i drove behind my wife she said they were kind of bright, this is with it aimed properly. The only way I can think of is to pull the headlight assembly off the car and try to fix, might have to take apart the projector.
Also I think the people who did the HID in the 2014 projectors are fooling themselves to think it their lights are glaring other people. Like I have said, its not bad but enough that it should be fixed. Just because they haven't been flashed doesn't mean they are not glaring oncoming traffic. So many times I see bright lights with hid in halogen reflectors, or misaimed lights, but I don't flash unless I am out on a country road with no other cars around.
When I do the flap mod, I will do a write up and post on the forum to teach other 2014 4runner owners how to do it right. I would retrofit, but I don't think there is any retrofit out there that would work with a side loading bulb.
 
Last edited:
Here is a picture of a projector housing. You can see the squirrel spotter flap. Also our 2014 bulbs load not from the back, but from the side. The HID bulbs are also longer than stock H11 bulbs, so the bulb extends beyond the width of the flap. Some of the light leaks out the side of the squirrel spotters.

Camry-Projector-1-1.jpg~original


Here is a picture of my headlights on a cement wall. Cut off looks good, don't see too much glare above the cutoff line. You would think these are good, but if you stand in front of the headlights there is glare up higher than the main cutoff line.
WP_20140228_013_zpsb065a1a3.jpg~original


Picture of my headlight, with white paper taped on to show the light scatter. You can clearly see the squirrel spotters and also the light leak out the side of the spotters.

WP_20140331_004_zpsc62a0146.jpg~original
]
 
If you look above the headlight area there is a hole in that front plastic engine bay liner. Use a Philips head screw driver. Right is lower, left is higher.
I can see it in your last picture, upper left hand hole of that picture.

Answered.
 
Last edited:
Here is a picture of a projector housing. You can see the squirrel spotter flap. Also our 2014 bulbs load not from the back, but from the side. The HID bulbs are also longer than stock H11 bulbs, so the bulb extends beyond the width of the flap. Some of the light leaks out the side of the squirrel spotters.

Camry-Projector-1-1.jpg~original


Here is a picture of my headlights on a cement wall. Cut off looks good, don't see too much glare above the cutoff line. You would think these are good, but if you stand in front of the headlights there is glare up higher than the main cutoff line.
WP_20140228_013_zpsb065a1a3.jpg~original


Picture of my headlight, with white paper taped on to show the light scatter. You can clearly see the squirrel spotters and also the light leak out the side of the spotters.

WP_20140331_004_zpsc62a0146.jpg~original
]


Adjusted mine because I kept getting flashed with a 2.75/2" lift. I think mines low after adjustment will go up some . Back 25ft wall at lowes

50E5571F-73C1-4C17-8A5A-1289B5FA43FE.jpg~original


Hi beams

C71D31A0-9AEE-4EF4-BBE3-9A82C69302CF.jpg~original
 
Last edited:
can someone tell me where the adjustment for the fog lights are located? and are they adjusted the same way?

thanks in advance.

great info on headlights.

***NM, found it, thanks.
 
Last edited:
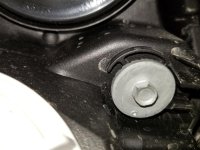
I realize this thread is old and this is probably one of the simplest things you can do with your vehicle, but i found a better way to adjust the headlight level.

Instead of using a #2 Philips (mine wasnt catching constantly and i didnt want to mash/grind anything down took ugly), I used my phone to look at the assembly that you'd be turning with the Phillips bit and it's all one piece.

I used a sharpie to mark the initial position of the adjustment. Then, i used a socket wrench with a 8mm socket at the back of the adjustment thing to turn the adjustment and just counted the number of teeth as it revolved.

Way easier and nicer to count/keep consistent/adjust.
 

Attachments

  • 20181205_214508.jpg
    20181205_214508.jpg
    133.9 KB · Views: 548
Last edited:
I realize this thread is old and this is probably one of the simplest things you can do with your vehicle, but i found a better way to adjust the headlight level.

Instead of using a #2 Philips (mine wasnt catching constantly and i didnt want to mash/grind anything down took ugly), I used my phone to look at the assembly that you'd be turning with the Phillips bit and it's all one piece.

I used a sharpie to mark the initial position of the adjustment. Then, i used a socket wrench with a 8mm socket at the back of the adjustment thing to turn the adjustment and just counted the number of teeth as it revolved.

Way easier and nicer to count/keep consistent/adjust.

Which direction did you move the adjustment to make it go down?
 
Doh! Now that i've had a chance to look at it i realize how simple your solution is. Thanks for the alternative.
 

Members online

Forum statistics

Threads
278,313
Messages
3,554,091
Members
248,016
Latest member
Advally Service

Trending content

Back
Top