2014 Trail - Silver bumper accent removed

Plastidip

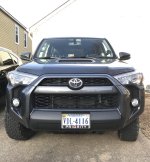
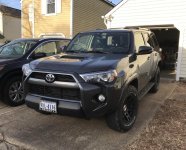
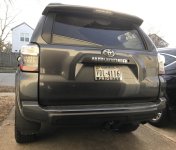
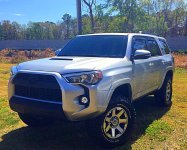
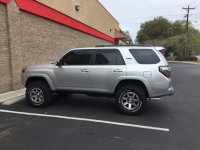
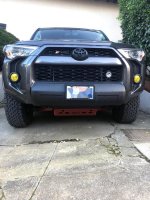
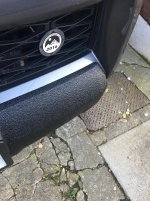
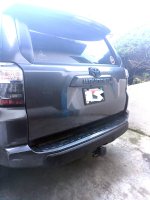
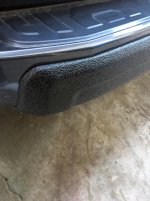
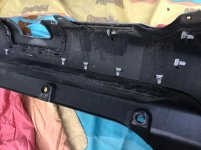
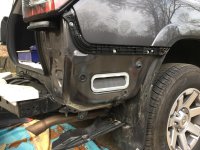
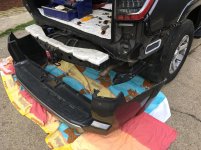
Thanks for all the help guys! I plastidipped the front and rear valences on my MGM TEP. Here's the finished product. I did 10 coats.

I was able to take off the front valence using the tutorials on the forum and it turned out absolutely amazing IMO... Better than I'd hoped. I tried to tape off the rear valence rather than remove it and I'm not satisfied with how the edges turned out. It'll do for now because you gotta be looking for the imperfections to notice them, but I'll be taking it off to do it right the next time I have a free few hours.
 

Attachments

  • IMG_0402.jpg
    IMG_0402.jpg
    133.8 KB · Views: 3,568
  • IMG_0401.jpg
    IMG_0401.jpg
    138.3 KB · Views: 3,362
  • IMG_0400.jpg
    IMG_0400.jpg
    129.1 KB · Views: 3,420
I've never used plastidip. Does it actually come off cleanly?

Does anyone have the valence pieces wrapped instead? Just curious about which would be the best choice.
 
I've never used plastidip. Does it actually come off cleanly?

Does anyone have the valence pieces wrapped instead? Just curious about which would be the best choice.

It depends, it will always come off without a residue (at least in my experience) if that is what your asking. However depending on how thick it was applied, age, etc if may not just "peel" off. I have had to work on several things that the coating was not thick enough on instead of peeling off in sheets it basically had to be "plucked" off the surface. Not hard, just time consuming. Overall though I love dip. It holds up very well when done correctly and its 100% reversible.

People have dipped, wrapped and painted their front valences, there is no right answer here just depends on what you are going for , your skills and resources. If I had a friend with a paint shop or a vinyl shop I would have no problems going that route but alas I don't and Dip DIY was most inline with what I wanted to tackle for the cost.
 
Ok, that makes sense. Getting it painted seems cost prohibitive so it looks like plastidip or vinyl wrap it is.
 
Can this trim removal be done (front and rear bumper) then install the trd pro black trim?

Also anyone have an estimate of repair at their dealer?

I bought the trd pro front and rear black valances factory Toyota parts for under 375.00 shipped from a dealer back east. it is just a little time consuming.
patience is best practice when removing. and don't forget the rear mud guards need to be loose. but removing the bumpers is really easy. the one thing I would do before you start is buy some extra clips they can break.
 
Plasti-dip looks like ASS, even if done correctly.

This has been one of the first modifications I wanted to do to my truck, but didn't want to spend that amount of money on trim pieces. So, I took the plasti-dip route and it sufficed for a while... with that said, IMHO plasti dip looks like complete trash after a while, even if done correctly. Nicks from rocks, bugs don't wash off easily, and just overall doesn't look smooth. Especially not fitting for a $30k+ vehicle. Now that I have done more of the expensive modifications like lift tries etc.. I will definitely be buying the valances and eventually the TRD PRO grille.
 

Attachments

  • IMG_5816.jpg
    IMG_5816.jpg
    137.6 KB · Views: 7,186
Last edited:
Nice, I live in Raleigh and might go hit up the same shop...did they just wrap them while installed on the bumper? How did the edges turn out close up?

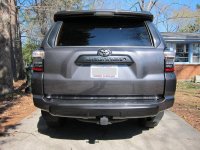
They did the job w/o removing them. Did have to do front in 3 pieces. 2 "end caps" then main piece overlaps those. I have seen a video on youtube where someone tried to use one piece on front and didn't work out well b/c of how much material ends up on the ends (would need to pleat or remove triangles to get it to lay flat).

Regarding the edges, I'm pleased. They are clean. I don't have any close up pics of the edges, but this Google Photos album has full res. pics of front and back that will allow you to zoom in a bit.

I stumbled upon this shop while searching, but if you visit their site and/or Facebook page, you can get an idea of the quality of their work.

EDIT: I took some up close pics w/ phone and added them to the linked album.
 
Last edited:
This thread has inspired me. I was about to purchase the front and rear valance and decided instead to lightly wet sand, prime and paint the front valance first and see how it goes. I previously did the same to my roof rack and absolutely love how it turned out. I will keep you all posted and will post some pictures when it's complete.
 

Attachments

  • IMG_5806.jpg
    IMG_5806.jpg
    136.1 KB · Views: 8,201
This thread has inspired me. I was about to purchase the front and rear valance and decided instead to lightly wet sand, prime and paint the front valance first and see how it goes. I previously did the same to my roof rack and absolutely love how it turned out. I will keep you all posted and will post some pictures when it's complete.


Did you paint or use PlastiDip?


Sent from my iPhone using Tapatalk
 
This thread has inspired me. I was about to purchase the front and rear valance and decided instead to lightly wet sand, prime and paint the front valance first and see how it goes. I previously did the same to my roof rack and absolutely love how it turned out. I will keep you all posted and will post some pictures when it's complete.


This is the route I plan on taking soon. I think I'm going to use "SEM trim black" paint as I've heard it's quite resilient and holds up well in sun.

The other thing I was considering was plastidiping but then applying Dipyourcar.com's product called Dip Coat. Makes the dip harder and not so rubbery which makes it hold up better.


Sent from my iPhone using Tapatalk
 
I just painted mine using Krylon Fusion Black Satin. This paint is specifically formulated to stick to plastic. I removed the valances (see below), cleaned them with the soapy water and then wiped them down with some mineral spirits. I applied 5 coats of paint, waiting about 30 minutes between coats. For the 6th and final coat, I waited about 2 hours before applying.

This is VERY easy to do by removing the front and rear bumpers. I tried to do it without removing the bumpers and the spaces were too tight for my hands. Removing the bumpers sounds like a daunting task, but it is actually one of easiest things I've done to my 4Runner.

Here's a video on front bumper removal: https://www.youtube.com/watch?v=cm58R6CJKl8

Once you have that off, you can see the clips that hold the valance to the bumper. Use a screw driver to press the tab and slide them out.

I couldn't find a video of rear bumper removal. I did find various pictures and text descriptions of removing it. I took some pictures in hopes in helps the next shadetree mechanic...

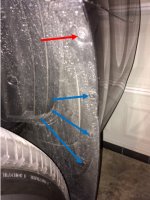
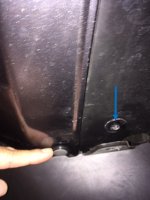
In the 1st picture below, you can see a red arrow that points to a 10mm screw you need to remove. The blue arrows point to three push-in clips. To remove those, use a small flat-head screw driver. Insert it into the groove on the top side of the clip and pry the center cap up. Then just pull out the clip.

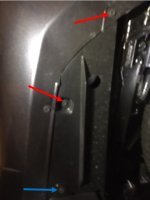
In the 2nd picture below, the arrows point to 10mm screws you need to remove. The blue screw is special. Once the blue screw is removed, you can move the mud flap out of the way and access another push-in clip shown in the 3rd picture. The blue arrow in the 3rd picture is where the blue screw in the 2nd picture used to be. My finger is pointing at the push-clip.

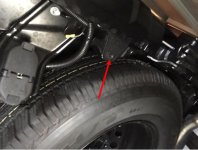
In the 4th picture, the red arrow points to one more 10mm screw you need to remove. It's over towards the center of the bumper by the hitch and spare tire. IIRC there is also a push clip in this area.

Repeat pictures 1-4 for the other side of the truck.

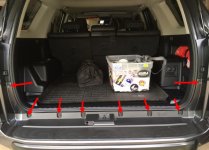
The 5th picture shows the other screws you need to remove.

To physically remove the bumper, pry the bumper away from the raised retainer clip that is located where the first screw you removed was (the red screw in the 1st photo). Then, give the bumper a tug away from the rear of the vehicle. There are some clips in the segment behind the wheel that will release. The bumper will slide freely and off the back of the truck. Now you have easy access to the valance clips.

 

Attachments

  • rear1.JPG
    rear1.JPG
    129.2 KB · Views: 6,817
  • rear2.JPG
    rear2.JPG
    81.2 KB · Views: 6,817
  • rear3.JPG
    rear3.JPG
    103.7 KB · Views: 6,784
  • rear4.jpg
    rear4.jpg
    39.3 KB · Views: 6,773
  • rear5.jpg
    rear5.jpg
    43.8 KB · Views: 6,768
Last edited:
^^^^^^^^
Thank you, GearJunkie88! This is the best how-to info I have come across for removing the rear bumper. I need to remove both bumpers to cut the slots to receive Trail valances that I acquired. This’ll help a lot!
 
I had sprayed my originals with some Rustoleum and it looked great, the problem was after a few months the front valence gets hit with all sorts of road rockets and starts to show silver freckles, coming from the Jeep world where I have plastidipped many things, it can start to peel over time, I decided to just order a new set of valences from the dealer and have them coated with Line-X.

Cost was $200 total to cover both.
This will last far longer than rattle can and plastidip...
plus I like the way it stands out more.
 

Attachments

  • IMG_4796.jpg
    IMG_4796.jpg
    132.6 KB · Views: 8,530
  • IMG_4797.jpg
    IMG_4797.jpg
    132.5 KB · Views: 8,294
  • IMG_4798.jpg
    IMG_4798.jpg
    135.6 KB · Views: 8,316
  • IMG_4799.jpg
    IMG_4799.jpg
    132.8 KB · Views: 8,232
Plasti vs Paint

I plasti dipped the front and it sufficed for a bit but then it starts looking hideous after a while i.e chips, bugs, and overall just crappy looking. The roof rack I wet sanded, primed, and painted which is what I'm going to do to the from valance as soon as I get a chance.

Sent fro

Did you paint or use PlastiDip?


m my iPhone using Tapatalk
 
I had sprayed my originals with some Rustoleum and it looked great, the problem was after a few months the front valence gets hit with all sorts of road rockets and starts to show silver freckles, coming from the Jeep world where I have plastidipped many things, it can start to peel over time, I decided to just order a new set of valences from the dealer and have them coated with Line-X.

Cost was $200 total to cover both.
This will last far longer than rattle can and plastidip...
plus I like the way it stands out more.

Looks good, I want mine semi-gloss with no textured finish to match the rest of the truck.
 
Viynl seems pretty hard to get right compared to plastidip. I think a $10 can that you spray and can peel off sound easier. I've never looked, is vinyl expensive?

Local vinyl shop wanted to charge me something like $175 for both pieces I think.
 
It depends, it will always come off without a residue (at least in my experience) if that is what your asking. However depending on how thick it was applied, age, etc if may not just "peel" off. I have had to work on several things that the coating was not thick enough on instead of peeling off in sheets it basically had to be "plucked" off the surface. Not hard, just time consuming. Overall though I love dip. It holds up very well when done correctly and its 100% reversible.

People have dipped, wrapped and painted their front valences, there is no right answer here just depends on what you are going for , your skills and resources. If I had a friend with a paint shop or a vinyl shop I would have no problems going that route but alas I don't and Dip DIY was most inline with what I wanted to tackle for the cost.

I PD'ed the front chrome bar of my old 2010 SR5. I apparently did not do it thick enough and then it was on there for aging 6+ years. It was all chipped and getto looking a few years in. I decided to take it off before bringing to the dealership to trade it. I tried peeling, heat gun, plastic paint scraper, etc. and it was just coming off in TINY little pieces. Finally I just sprayed with a bunch of goo gone, let it sit for a few, and then rubbed with a rag. It started really coming easily. I just did that section by section. Took less than an hour vs probably a few hours the other way.
 
I just painted mine using Krylon Fusion Black Satin. This paint is specifically formulated to stick to plastic. I removed the valances (see below), cleaned them with the soapy water and then wiped them down with some mineral spirits. I applied 5 coats of paint, waiting about 30 minutes between coats. For the 6th and final coat, I waited about 2 hours before applying.

This is VERY easy to do by removing the front and rear bumpers. I tried to do it without removing the bumpers and the spaces were too tight for my hands. Removing the bumpers sounds like a daunting task, but it is actually one of easiest things I've done to my 4Runner.

Here's a video on front bumper removal: https://www.youtube.com/watch?v=cm58R6CJKl8

Once you have that off, you can see the clips that hold the valance to the bumper. Use a screw driver to press the tab and slide them out.

I couldn't find a video of rear bumper removal. I did find various pictures and text descriptions of removing it. I took some pictures in hopes in helps the next shadetree mechanic...

In the 1st picture below, you can see a red arrow that points to a 10mm screw you need to remove. The blue arrows point to three push-in clips. To remove those, use a small flat-head screw driver. Insert it into the groove on the top side of the clip and pry the center cap up. Then just pull out the clip.

In the 2nd picture below, the arrows point to 10mm screws you need to remove. The blue screw is special. Once the blue screw is removed, you can move the mud flap out of the way and access another push-in clip shown in the 3rd picture. The blue arrow in the 3rd picture is where the blue screw in the 2nd picture used to be. My finger is pointing at the push-clip.

In the 4th picture, the red arrow points to one more 10mm screw you need to remove. It's over towards the center of the bumper by the hitch and spare tire. IIRC there is also a push clip in this area.

Repeat pictures 1-4 for the other side of the truck.

The 5th picture shows the other screws you need to remove.

To physically remove the bumper, pry the bumper away from the raised retainer clip that is located where the first screw you removed was (the red screw in the 1st photo). Then, give the bumper a tug away from the rear of the vehicle. There are some clips in the segment behind the wheel that will release. The bumper will slide freely and off the back of the truck. Now you have easy access to the valance clips.

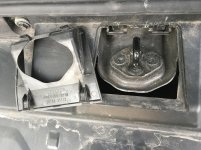
Thanks for the great write-up! I really took my time, put anti-seize on bolts, pet my nosy dog and stuff and still managed to take the bumper off, remove the silver trim and put the bumper back under an hour and a half. Here are some more photos.

:iagree:As another forum member pointed out, remove the square plastic piece around the latch by prying from the back side of it.
 

Attachments

  • IMG_2625.jpg
    IMG_2625.jpg
    137.1 KB · Views: 6,646
  • IMG_2619.jpg
    IMG_2619.jpg
    133.3 KB · Views: 6,621
  • IMG_2617.jpg
    IMG_2617.jpg
    133.4 KB · Views: 7,315
  • IMG_2614.jpg
    IMG_2614.jpg
    138.4 KB · Views: 6,601

Members online

Forum statistics

Threads
278,313
Messages
3,554,090
Members
248,016
Latest member
Advally Service

Trending content

Back
Top