2016 SR5 - Power Back Window Problem - Help!

David H

New member
Hello 5th Gen Forum
Hope you can help :help: me out with my 2016 SR5 4x4.
I have the dreaded Power Back Window problem. It sticks. Window won’t go all the way down. Sticks at half way. Then when closing, it bumps the rubber strip at the top and jam protection kicks in sending it 4 inches back down again. Happens every time.
By jiggling the power back window switch or turning the key in the rear hatch lock, I can gently nudge the window up until it’s fully closed, but the rear wiper, washer, heated back screen don’t work.
All started a month ago when we had a cold spell here in London, England, and the battery ran flat. I couldn’t get it to fully charge in the icy conditions outdoors (-5 Centigrade), so I disconnected the battery and brought it inside to charge in a warm place. Battery is fine now, but Rear Hatch is not!
Prior to this battery disconnect, I hadn’t used the back window much. Maybe a couple of times a year. But I used the Wiper/ Washer/ Heated Rear Screen all the time.
Rear Wiper/ Rear Washer/ Heated Rear Screen all not working - as if the back window is not fully closed. I’ve checked the Rear Wiper, it’s properly seated in the recess plastic bracket.
I’ve checked the window lock button on the driver’s door. It’s off. All the other windows operate normally and auto open and close all the way down and all the way up.
I’ve tried the ‘normalize’ procedure shown on page 150 of the Owner’s Manual, (Close window & hold switch up for extra 6 seconds/ Open window & hold switch down for extra 2 seconds/ Close window and hold switch up for extra 2 seconds) but this won’t work because the window won’t fully close, and if jiggled close, still won’t fully open.
I’ve tried the re-initialize process procedure for when the battery runs flat or is disconnected. This works fine on the 4 side windows, but not on the back window as it won’t fully open or fully close!
I’ve taken off the rear door interior trim and cleaned the two channels and two white plastic wheels the screen runs up & down on. I’ve cleaned the cables and their guide-wheels and given them a couple of drops of oil. I’ve cleaned the crud out of the bottom of the door and made sure the drain holes are clear. I’ve checked the regulator and channels and motor and wheels for rust, and there is some, but nothing has rusted through or jammed. I’ve checked all the wiring for damage (none found), and re-attached a couple of cable ties that were missing. And I’ve cleaned the rubber channels and seals all around the back window, plus liberally sprayed silicone oil into the channels - no obstructions found, channels now nicely lubricated.
And today I’ve discovered that if, when the window is already down 4 inches from the first anti-jam bump, I hold the window down and turn the back door key right in the lock (to raise the window), the anti-jam protection kicks in again and the window instead lowers another 4 inches. Once more and it lowers all the way down. Then, using the power back window switch (or the back door key) to close, the window goes all the way up until it reaches the top rubber strip when it once again bumps down 4 inches due to anti-jam!
All very frustrating. I’ve run out of ideas.
One further complication is that I don’t even have a Dealer option as I imported my 4Runner to England in 2018, and as it’s not a UK or even European Toyota model, the Dealer network here in England doesn’t support the 4Runner!
Long post - long shot!
Can anyone help :help:? All advice gratefully accepted. You are my only remaining hope!
Cheers, David H
 
Last edited:
Register to hide this ad
Have you read through the RM.zip (don't know if a link is floating around somewhere anymore or not) or other Toyota Service manual for the 4Runner? Lot's of good information that you may have already tried.
---
Auto Up Operation does not Fully Close Power Window (Jam Protection Function is Activated)

DESCRIPTION

If any door glass or a power window regulator motor does not operate smoothly, the jam protection function may be triggered automatically, resulting in the auto up function being unable to fully close the window.

HINT:

This symptom may occur for any of the windows.

INSPECTION PROCEDURE

HINT:

Since the power window control system has functions that use LIN communication, first confirm that there is no malfunction in the communication system by inspecting the LIN communication functions in accordance with the "How to Proceed with Troubleshooting" procedures. Then, conduct the following inspection procedure.

NOTICE:
When a power window regulator motor is reinstalled or replaced, the power window control system must be initialized.
After any door glass or a door glass run has been replaced, the jam protection function may operate unexpectedly when the auto up function is used. In such cases, the auto up function can be reinitialized by repeating the following operations at least 5 times:
Close the power window by fully pulling up the multiplex network master switch or power window regulator switch and holding it at the auto up position.
Open the power window by fully pushing down the multiplex network master switch or power window regulator switch.

PROCEDURE

1.

PERFORM INITIALIZATION (APPLICABLE LOCATION)

(a) Initialize the power window regulator motor (applicable location) WINDOW / GLASS: POWER WINDOW CONTROL SYSTEM: INITIALIZATION (2010 4Runner) .
NEXT

2.

CHECK POWER WINDOW CONTROL SYSTEM (AUTO UP/DOWN FUNCTION (APPLICABLE LOCATION))

(a) Check that all door power windows move when the auto up/down function of the multiplex network master switch and power window regulator switch (for rear LH and rear RH sides) is operated WINDOW / GLASS: POWER WINDOW CONTROL SYSTEM: OPERATION CHECK (2010 4Runner) .
OK:
Auto up/down function is normal (applicable location).
NG
CHECK WINDOW GLASS SLIDING MOVEMENT (APPLICABLE LOCATION)

OK
END (PROBLEM DUE TO INITIALIZATION FAILURE)
3.

CHECK WINDOW GLASS SLIDING MOVEMENT (APPLICABLE LOCATION)

(a) Remove the power window regulator motor.
(b) Install the window glass to the door glass run.
(c) Check if the power window regulator operates smoothly.
(d) Check that the window glass slides smoothly when sliding it up by hand.
OK:
Window glass slides smoothly.
HINT:

Make sure that the following conditions are met:

The window glass fits with the glass run without improper contact or deformation.
Foreign objects are not caught in the glass run.
CAUTION:
Perform initialization again.

NG
REPLACE POWER WINDOW REGULATOR MOTOR (APPLICABLE MOTOR)

OK
INSTALL WINDOW GLASS CORRECTLY (REMOVE FOREIGN OBJECTS CAUSING IMPROPER FIT OR REPLACE PARTS)
---
 
Have you read through the RM.zip (don't know if a link is floating around somewhere anymore or not) or other Toyota Service manual for the 4Runner? Lot's of good information that you may have already tried.
---
Auto Up Operation does not Fully Close Power Window (Jam Protection Function is Activated)

DESCRIPTION

If any door glass or a power window regulator motor does not operate smoothly, the jam protection function may be triggered automatically, resulting in the auto up function being unable to fully close the window.

HINT:

This symptom may occur for any of the windows.

INSPECTION PROCEDURE

HINT:

Since the power window control system has functions that use LIN communication, first confirm that there is no malfunction in the communication system by inspecting the LIN communication functions in accordance with the "How to Proceed with Troubleshooting" procedures. Then, conduct the following inspection procedure.

NOTICE:
When a power window regulator motor is reinstalled or replaced, the power window control system must be initialized.
After any door glass or a door glass run has been replaced, the jam protection function may operate unexpectedly when the auto up function is used. In such cases, the auto up function can be reinitialized by repeating the following operations at least 5 times:
Close the power window by fully pulling up the multiplex network master switch or power window regulator switch and holding it at the auto up position.
Open the power window by fully pushing down the multiplex network master switch or power window regulator switch.

PROCEDURE

1.

PERFORM INITIALIZATION (APPLICABLE LOCATION)

(a) Initialize the power window regulator motor (applicable location) WINDOW / GLASS: POWER WINDOW CONTROL SYSTEM: INITIALIZATION (2010 4Runner) .
NEXT

2.

CHECK POWER WINDOW CONTROL SYSTEM (AUTO UP/DOWN FUNCTION (APPLICABLE LOCATION))

(a) Check that all door power windows move when the auto up/down function of the multiplex network master switch and power window regulator switch (for rear LH and rear RH sides) is operated WINDOW / GLASS: POWER WINDOW CONTROL SYSTEM: OPERATION CHECK (2010 4Runner) .
OK:
Auto up/down function is normal (applicable location).
NG
CHECK WINDOW GLASS SLIDING MOVEMENT (APPLICABLE LOCATION)

OK
END (PROBLEM DUE TO INITIALIZATION FAILURE)
3.

CHECK WINDOW GLASS SLIDING MOVEMENT (APPLICABLE LOCATION)

(a) Remove the power window regulator motor.
(b) Install the window glass to the door glass run.
(c) Check if the power window regulator operates smoothly.
(d) Check that the window glass slides smoothly when sliding it up by hand.
OK:
Window glass slides smoothly.
HINT:

Make sure that the following conditions are met:

The window glass fits with the glass run without improper contact or deformation.
Foreign objects are not caught in the glass run.
CAUTION:
Perform initialization again.

NG
REPLACE POWER WINDOW REGULATOR MOTOR (APPLICABLE MOTOR)

OK
INSTALL WINDOW GLASS CORRECTLY (REMOVE FOREIGN OBJECTS CAUSING IMPROPER FIT OR REPLACE PARTS)
---

Thanks mo_mo.

I've found the post with a link to the 2016-19 4Runner Repair Manual and downloaded in full. Now have 8,593 pages of bedtime reading to get through - and hopefully answers to my back window problem!

The initialization procedure you posted appears to be for a 2010 4Runner? Maybe I can find the 2016-19 equivalent in the RM.

Cheers for your help. I'll post again once I've fixed it - OR - for further assistance!!

David H
 
Here is the link for the 4Runner Repair Manual: TOYOTA 2016-2019 4Runner Repair Manual RM27F0U
Thanks fkheath

I've downloaded the 2016-19 4Runner Repair Manual and now have 8,593 pages of bedtime reading to get through - and hopefully answers to my back window problem!

As per mo_mo's post I reckon I need the initialization procedure for my 2016 SR5 - must be somewhere in the 2016-19 RM.

Cheers for your help. I'll post again once I've fixed it - OR - for further assistance!!

David H
 
Hello RedSled

#savagescotty sure is a funny guy!

I've bought an aerosol can of WD40 Specialist High Performance Silicone Lubricant just like Scotty uses in the video. And sprayed it the rubber window channels and seals just like Scotty. And it made a difference. The back window slid super smoothly to the top of the frame but disappointingly still bumped the rubber strip at the top and jam protection kicked in sending it 4 inches back down yet again! Same on the way down. Glides extra smooth to the half-way point but disappointingly still sticks there!!

Reckon I need to find the initialization procedure required after battery disconnection, and try that. Currently thumbing through the 8,593 page 2016-19 4Runner Repair Manual looking for it. Must be in there somewhere!!!

Thanks for your suggestion - once I've finished the 8,593 pages, I'll deffo be watching more of #savagescotty's YouTube videos for sheer entertainment value + car fix tips.

Cheers, David H
 
Power Back Window Problem Identified - but not yet Solved!

Here's me thinking I just had to 'normalise/ initialize' the Power Back Window!

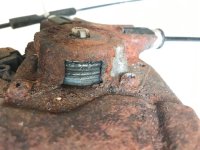
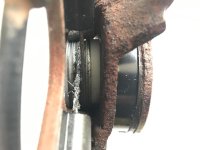
Turns out the Regulator Sub Assembly wire cable which runs through the Motor Pulley has been damaged by grit caught up in the cable sleeves and motor pulley where it runs through the metal cover of the Motor. Damaged so bad that the wire cable now grates against the metal cover when moving the glass up and down. Small pieces of wire have been snapped off - more come off each time I run the glass up and down. Lots of it caught up in the motor pulley. So much damage that the wire cable looks ready to snap!

Beyond repair - so with that and the rust, a replacement Power Window Motor and Regulator Sub Assembly are ordered (thanks eBay!) - and a challenging home mechanic project is coming up to get the old ones out and the new ones in!!

Wish me luck :noidea: !!!

Cheers, David H
 
Hey David H, I believe I have the same problem. We’re you able to pull off this repair? Any tips? Also, we’re you able to pull out the old motor with the window stuck in the down position?

Thanks!
 
Power Back Window Problem Solved - Repair Completed!

Hey David H, I believe I have the same problem. We’re you able to pull off this repair? Any tips? Also, we’re you able to pull out the old motor with the window stuck in the down position?

Thanks!

Hey Slide 531

Sorry to hear you have the same problem!

Yes, I completed the repair on Tuesday this week. Had to wait a while for the parts to arrive from the USA. My Tailgate Window/ Wiper/ Heater all now working 100% Perfect.

Have you seen this 07-01-2017 thread from lightfreak: Liftgate Window Regulator Corrosion
It’s in the 4th Gen Forum, but the Tailgate internals are pretty much identical on a 5th Gen.

Make sure to read Rytanium’s Post #31 on page 3 Liftgate Window Regulator Corrosion where he gives a step by step guide to replacing the Tailgate Window Regulator.

This all REALLY helped me.

One edit to their instructions is that I did NOT have to remove the Window Glass from the Tailgate. With the Tailgate open so the Window was horizontal, I removed the 4 Bolts holding the Window onto the Regulator brackets and slid the glass up into the closed position. This means you can’t close the Tailgate until you’ve completed the repair, so best to have everything ready before you start.

If you have the same problem as me, and the cable and pulley are damaged, you’ll need to buy a complete Regulator Sub Assembly. This comes with the pulley and cable and is attached by 3 screws to the Power Window Motor. The Motor detaches and can be re-used, although mine was so rusty I replaced it.

I don’t think it’s possible to pull out the old motor or the Regulator Sub Assembly with the window stuck in the down position, there’s not enough space inside the Tailgate to do this. You’ll need to remove the 4 Bolts I mentioned above, and slide the Window Glass up into the closed position. I reckon this is possible as in the down position you’ll be able to access the 4 bolts.

Hope this helps.

If I were you, I’d make absolutely sure the problem is with the wire cable and motor pulley before buying the parts and starting the repair. Maybe you’ve already removed the Tailgate interior panel and the service hole plastic cover and the metal bracket across the service hole, and you’ve popped your head in there with a head-torch on to check the wire cable and the motor pulley for damage? If so, the repair is definitely do-able - go for it!!

I replaced one side of the Tailgate Wire Harness whilst I was in there, as it had some damage and a botched fix by the previous owner. Whole repair took me 8 hours. Maybe an experienced mechanic would have done it quicker, but I took my time and did everything slowly and surely!

Let me know if you’d like any more help.

Cheers, David H
 
Hey Slide 531

If I were you, I’d make absolutely sure the problem is with the wire cable and motor pulley before buying the parts and starting the repair. Maybe you’ve already removed the Tailgate interior panel and the service hole plastic cover and the metal bracket across the service hole, and you’ve popped your head in there with a head-torch on to check the wire cable and the motor pulley for damage? If so, the repair is definitely do-able - go for it!!

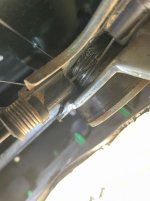
Hey, thanks for the speedy reply, this is super helpful! Can't say for sure but i can see that there is a cable that is frayed where it enters the housing. I expected to see this cable move and get jammed against the housing when I tried the window though and it didn't so I'm not totally sure that is the problem. Didn't get a photo of the cable coiled on the motor but it looked a bit mangled.

Hitting some dirt roads this afternoon so I have it all covered with cardboard but going to pull it apart again on Sunday and take another look.

Thanks!!
 

Attachments

  • IMG_0045.jpg
    IMG_0045.jpg
    135.2 KB · Views: 6,233
Hey, thanks for the speedy reply, this is super helpful! Can't say for sure but i can see that there is a cable that is frayed where it enters the housing. I expected to see this cable move and get jammed against the housing when I tried the window though and it didn't so I'm not totally sure that is the problem. Didn't get a photo of the cable coiled on the motor but it looked a bit mangled.

Hitting some dirt roads this afternoon so I have it all covered with cardboard but going to pull it apart again on Sunday and take another look.

Thanks!!

Hello slide531

From your photo it sure looks like you have a frayed cable.

I’d say that’s the cable run at bottom end of the regulator channel on the driver’s side of the vehicle, so when you close the window the frayed piece of wire doesn’t go into the housing, it goes the other way and runs alongside the regulator channel where it wouldn’t have any housing to squeeze through. But where is the other end of the frayed cable? Most likely somewhere inside the black sleeve the other side of the housing. And that could be your problem. If the loose frayed cable other end is tangled up inside the black sleeve it is most likely jamming up inside the sleeve when you try to close the window, and causing the ‘pinch sensor’ to kick in and roll your window back down every time.

And maybe there’s more fraying cable at the pulley coil on the motor. You say it looked a bit mangled. You should take another look at that and get a photo.

I’ve attached photos of my frayed cable where it is coiled on the pulley coil attached to the motor. When I first saw a loose piece of wire similar to the one in your photo, I snipped it off with pliers hoping the window would then work OK. But after a few open and close actions with the window there were a lot more loose frayed cable ends, as you can see from my photos.

I hope your frayed cable isn’t the problem, but I reckon it is! Like I said, take another look at the cable where it meets, and winds round the pulley coil on the motor. If you see frayed cable there too, that’s the problem for sure.

You can’t just replace the cable. You have to buy the full Regulator Sub-Assembly, but you can get this (Toyota Part No. 69807-35030) from a Toyota Dealer for around $125, and following the instructions I linked you to earlier you can do the repair yourself. No need to replace the Power Window Motor unless that is badly rusted or damaged.

If you need any more help on the repair, let me know.

I notice from your photo that there’s a lot of mud inside your Tailgate. That was the same with mine. The Tailgate interior isn’t watertight, when the back window gets wet, the rain water, or other gunk, runs down inside the Tailgate. Dust gets in there too! That’s the reason there’s a plastic sheet sealed with butyl strip over the service hatch, it keeps the water/gunk/dust away from the electrics and wire harness. But water/gunk/mud/dust gets inside the tailgate behind that plastic sheet, and it contacts the window regulator and motor, sticks to them and over time damages them. Like other posts on this subject say, it’s important to keep the drain holes at the bottom of the tailgate clear, and I’d say important to flush the Tailgate out with clean water when you’ve been off roading, or driving through dirt, salt or sand, by hosing water onto the back window and letting it run down the outside of the window into the Tailgate. You can also get access to the bottom of the interior of the Tailgate by popping out the two black plastic closing hand holes which are on the bottom of the Tailgate. They pop out easily if you pull hard on the top edge of the black plastic. Once they are out, you can get your hand, and a hose, inside the tailgate and pull out/ hose out mud/ salt/ sand/ gunk, and you can clear the inside of the drain holes.

I hope you don’t think I’m being a smart-ass here with all my comments and advice! I’ve learnt all this the hard way over the last 6 weeks, and want to share my knowledge with others to help them with or help them avoid the same thing happening to their 4Runner!!

Cheers, David H
 

Attachments

  • David H_4Runner Tailgate Motor Pulley Coil 2.jpg
    David H_4Runner Tailgate Motor Pulley Coil 2.jpg
    136.6 KB · Views: 6,198
Hey David!

Can’t tell you how much I appreciate your help and taking the time to write this all up! Got back from my trip last night and hoping to get in there for another look today. You are right that that is the cable at the bottom on the drivers side. Iirc, it didn’t move in or out when I tried the window, so it makes perfect sense that that wire being jammed up inside the housing is the problem. The window only goes about an inch before returning to the down position.

Last time I used the window a few weeks ago it had a problem closing but I was able to get it to go all the way up by repeatedly trying to close it and getting it an inch or two farther up until it closed completely. I was afraid it was going to have a problem but decided I need to take a look eventually and now it’s stuck down (and a week before I was planning a week long camping trip). I’ll get a picture of the pulley when I open it up again.

Great advice all around, truck gets a lot of time on dirt and in snow and I’ve probably (definitely)been a bit lax in keeping it clean. Will keep you updated
 
I raised the window one inch and paused it and here is what I see on the pulley. Definitely need to replace the Regulator sub-assembly.
 

Attachments

  • B138F395-EA08-468D-B2FC-EC2C4CB9C334.jpg
    B138F395-EA08-468D-B2FC-EC2C4CB9C334.jpg
    120.9 KB · Views: 6,137
Power Back Window Problem - Extra Advice!

I raised the window one inch and paused it and here is what I see on the pulley. Definitely need to replace the Regulator sub-assembly.

Hey slide531

That looks exactly like the issue I had! (Although with a lot more rust!!)

You'll deffo have to replace the Regulator Sub-Assembly.

Power Window Motor most likely OK, as the metalwork in your photos isn't rusty or corroded. Your cable probably sucked in grit from the dirt/mud/sand/salt inside your tailgate and the to and fro of cable movement frayed the wire.

If you have a local Dealer they should have the replacement part in stock, or an express delivery internet purchase. The full repair took me 8 hours, but at least 3 hours of this was removing the Wire Harness, prepping the replacement and fitting the new Wire Harness (I bought the replacement on eBay and had to swap most of the plastic clips over as the breakers yard had snapped them on removal), so you could get the job done in 4 hours one day/night this week, and still make your camping trip!?

I'd recommend you clean all the mud and grime out of the interior of the Tailgate once you remove the old sub-assembly and before fitting the new one. Otherwise you have the detailed step by step instructions from Rytanium’s Post #31:
Liftgate Window Regulator Corrosion
and lightfreak's repair photo diary:
Liftgate Window Regulator Corrosion , to follow - what could possibly go wrong!!

take note of lightfreak's tip in post #11:

"The coiled end of the [new] regulator cables comes tightly zip tied. It will come flying apart if you're not careful. It's a little tricky to get onto the motor, you just have to wiggle the round coiled part onto the square nut of the motor assembly until it locks in and sits flush. Then press the rest of it into place and screw the cover back on."

I didn't have to do this, as my sub-assembly came (from the breakers yard) with the motor already attached.

If you have any questions, please post here, or send me a PM. I'm not sure where in the USA you live - seems like West Coast? I'm in London, England, so we're 8 hours time difference apart. London being 8 hours ahead of you. So if I don't reply straight away, I'm probably asleep!!

Good Luck with the Repair. Let me know how it goes!

Cheers, David H
 
Hey Slide 531

Sorry to hear you have the same problem!

Yes, I completed the repair on Tuesday this week. Had to wait a while for the parts to arrive from the USA. My Tailgate Window/ Wiper/ Heater all now working 100% Perfect.

Have you seen this 07-01-2017 thread from lightfreak: Liftgate Window Regulator Corrosion
It’s in the 4th Gen Forum, but the Tailgate internals are pretty much identical on a 5th Gen.

Make sure to read Rytanium’s Post #31 on page 3 Liftgate Window Regulator Corrosion where he gives a step by step guide to replacing the Tailgate Window Regulator.

This all REALLY helped me.

One edit to their instructions is that I did NOT have to remove the Window Glass from the Tailgate. With the Tailgate open so the Window was horizontal, I removed the 4 Bolts holding the Window onto the Regulator brackets and slid the glass up into the closed position. This means you can’t close the Tailgate until you’ve completed the repair, so best to have everything ready before you start.

If you have the same problem as me, and the cable and pulley are damaged, you’ll need to buy a complete Regulator Sub Assembly. This comes with the pulley and cable and is attached by 3 screws to the Power Window Motor. The Motor detaches and can be re-used, although mine was so rusty I replaced it.

I don’t think it’s possible to pull out the old motor or the Regulator Sub Assembly with the window stuck in the down position, there’s not enough space inside the Tailgate to do this. You’ll need to remove the 4 Bolts I mentioned above, and slide the Window Glass up into the closed position. I reckon this is possible as in the down position you’ll be able to access the 4 bolts.

Hope this helps.

If I were you, I’d make absolutely sure the problem is with the wire cable and motor pulley before buying the parts and starting the repair. Maybe you’ve already removed the Tailgate interior panel and the service hole plastic cover and the metal bracket across the service hole, and you’ve popped your head in there with a head-torch on to check the wire cable and the motor pulley for damage? If so, the repair is definitely do-able - go for it!!

I replaced one side of the Tailgate Wire Harness whilst I was in there, as it had some damage and a botched fix by the previous owner. Whole repair took me 8 hours. Maybe an experienced mechanic would have done it quicker, but I took my time and did everything slowly and surely!

Let me know if you’d like any more help.

Cheers, David H

Do you have the Part #s for the Regulator sub-assembly?

Edit: I see it now in a post above. Wife is having this issue on her 2014. Dog stepped on the console button causing rear window to go down. Would not return all the way up. She finally got it up with the Scotty Silicone approach. She is currently at our Montana home overseeing construction of a 2nd garage; I’m done at our Fullerton, CA home working the day job and home projects on the weekends. I’ll inspect the sub assembly when I’m next up there in mid-June and order replacement if needed.
 
Last edited:
Rear window on our 2014 SR5 was not consistently going all the way up. Dog would inevitably step on the switch, sending the window down. Silicone spray helped some, but dog wants in the front passenger seat when it is vacant. Sometimes on first attempt the window will go all the way up, but comes up short on subsequent attempts. Seems like the motor gets tired.

I pulled the panel and could not see any cable fraying. It does seem like the motor or pulley is binding. So I ordered the regulator sub-assembly. It was $138 plus $45 shipping from an OEM Toyota Parts online site. Other sites it was $185 to $285.

Truck is stuck in the garage as we are building a 2nd garage. New apron outside the old garage and can't drive on the concrete for 10 days. Wife is driving her other 4Runner, a 2023 ORP.
 
Rear window on our 2014 SR5 was not consistently going all the way up. Dog would inevitably step on the switch, sending the window down. Silicone spray helped some, but dog wants in the front passenger seat when it is vacant. Sometimes on first attempt the window will go all the way up, but comes up short on subsequent attempts. Seems like the motor gets tired.

I pulled the panel and could not see any cable fraying. It does seem like the motor or pulley is binding. So I ordered the regulator sub-assembly. It was $138 plus $45 shipping from an OEM Toyota Parts online site. Other sites it was $185 to $285.

Truck is stuck in the garage as we are building a 2nd garage. New apron outside the old garage and can't drive on the concrete for 10 days. Wife is driving her other 4Runner, a 2023 ORP.

Regulator sub-assembly arrived and I installed it today in about two hours. Old assembly was rusty, but the cables were not frayed, though definitely gacked up in their cable sheaths. Did a couple tests and it went partially up, then down, then fully up, then down, then fully up and it stopped, locked in the up position. The regulator motor seemed very weak and I suspect that is the problem. Before I buy a replacement, I'd like to check the fuse, but can't find a fuse box in the cab and the manual does not provide location and listing of fuses.

1st Update: Went out to check the fuse box in the engine bay, but there is no specific listing for window motors. Went and checked the other windows and they all work. Then I checked the liftgate window. It now goes half-way down to a hard stop. The other way it goes fully up, every time. I will pull it apart tomorrow am (I'm on vacation at our Montana home) and see what's binding it up.

2nd Update: Took the panel off and observed from inside the trunk area while wife operated the window. The cable on the driver's side had slipped under a nylon slide at the midpoint of the track. Repositioned the cable on top of the slide and now it goes fully down and up as designed, repeatedly.

Maybe now I'll get to do some fly fishing.
 
Last edited:

Members online

Forum statistics

Threads
278,307
Messages
3,554,050
Members
248,016
Latest member
Advally Service

Trending content

Back
Top