2019 Pro Basket Rack - Deleted :(

Niahd0,

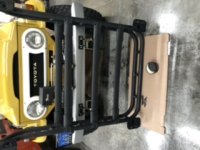
Finally today I got my Pro rack off. Post some pictures shortly. Talk about nerve racking!! Lol. Great instructions by Niahd0. Like he said take your time and turn the bolts out slowly. Feel tight turn them back and forth a little till there no resistance because of the lock tight. :rockon:


327807cfa268bce6940c5b40fdb91f60.jpg


Sent from my iPhone using Tapatalk
 
Thanks to everyone for tips. Was able to use the info to take mine off successfully !
 

Attachments

  • C6A49981-ADFA-4715-A5F2-23B07D5C85B1.jpeg
    C6A49981-ADFA-4715-A5F2-23B07D5C85B1.jpeg
    31.6 KB · Views: 2,355
  • 02B01CB3-BF44-4C02-B483-5CCEB87DA9B1.jpeg
    02B01CB3-BF44-4C02-B483-5CCEB87DA9B1.jpeg
    18.8 KB · Views: 2,349
  • 8F1D7D82-5B16-4536-A02A-8C30B3E9C90D.jpeg
    8F1D7D82-5B16-4536-A02A-8C30B3E9C90D.jpeg
    24.2 KB · Views: 2,322
none at all. exact fit.

i have installed

- an SR5/Limited rack from 2016 model onto my 2011 Trail with out an issues, before trading it in for the 2019
- installed 2011 Trail rack on the 2019 Pro without an issues.

the 2010-2013 and 2019 comes with the same type of bolts (with black heads as the heads stay exposed) where you need a '*' type of socket for taking the bolts out... where as the rest of trims (2010-2019) the bolts come with 10mm/12mm regular socket type bolts.... but the size, thickness, and the thread patterns are exactly the same.

long story short, no issues, the pattern for holes in the roof is identical across all trims 201-2019

Gobi moved my rack from my 2010 Trail to my 2020 ORP with out issue. 2010-2020 seem to be identical.
 
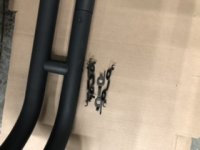
Thank you for the info! When going from the pro rack to stock rails we would need the center silver bolts and rubber washers (in picture below). The one thing I overlooked or cant seem to find is that all we need? are there any other gaskets or hardware, does anyone have a part# for the stock bolts/gaskets and do we need any additional sealant? Thanks!
349138d1574864127-2019-pro-basket-rack-deleted-sc3-jpg
 
WTB 2010-2018 Roof rails

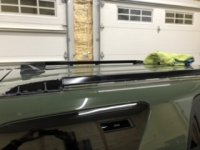
Hello. I am removing a 2020 TRD Pro roof rack and would like to replace with the rails from previous years.

Thanks
Andrew
 
Thank you for the info! When going from the pro rack to stock rails we would need the center silver bolts and rubber washers (in picture below). The one thing I overlooked or cant seem to find is that all we need? are there any other gaskets or hardware, does anyone have a part# for the stock bolts/gaskets and do we need any additional sealant? Thanks!
349138d1574864127-2019-pro-basket-rack-deleted-sc3-jpg

you don't need anything else. how do I know this? I have taken off my wifes 2010 limited chrome rack rails and my most recent 2020 TRDOffRoad black rack rails and what is found is..... the roof, then the rack, then the rubber washer, and then the bolt. nothing else.
 
Loosened the other 3 foot posts with no issue. Got to the 4th foot post and wow it did not want to be removed. Stripped out one of the bolts on the 4th foot. Ended up drilling the head off that bolt. Question is, I ordered 63187-35020. I should just be able to hit whats left of the bolt with a punch which will drop that bracket onto the headliner, right? Does the new bracket come with adhesive or is that needing to be added.

Thanks in advance. Talk about a nightmare, should have gotten a new Torx bit before removing as the one I had was a little worn.
 
Loosened the other 3 foot posts with no issue. Got to the 4th foot post and wow it did not want to be removed. Stripped out one of the bolts on the 4th foot. Ended up drilling the head off that bolt. Question is, I ordered 63187-35020. I should just be able to hit whats left of the bolt with a punch which will drop that bracket onto the headliner, right? Does the new bracket come with adhesive or is that needing to be added.

Thanks in advance. Talk about a nightmare, should have gotten a new Torx bit before removing as the one I had was a little worn.


you are right about a better quality T40 torx.

good luck with that. I personally haven't ran into this issue so my advise won't be the best but based on what i know the receiving bracket will fall inside the headliner once tapped. you would need to get i the headliner to remove the old and put the new one in place. not sure how to make it stick. if you get no one to respond, at least put a solid 3m tape. some medium strength lock-tie from a local auto store for he new bolt would help too.
 
Loosened the other 3 foot posts with no issue. Got to the 4th foot post and wow it did not want to be removed. Stripped out one of the bolts on the 4th foot. Ended up drilling the head off that bolt. Question is, I ordered 63187-35020. I should just be able to hit whats left of the bolt with a punch which will drop that bracket onto the headliner, right? Does the new bracket come with adhesive or is that needing to be added.


Thanks in advance. Talk about a nightmare, should have gotten a new Torx bit before removing as the one I had was a little worn.


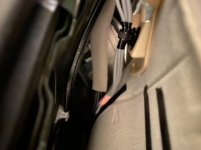
It appears to be just clipped in [emoji40]

afb9a7a5f1f97ba8a9fe5ee1ee3e9c79.jpg
 
I have had people reach out to me for tips regarding removing the Pro rack. Yes you need to be careful when you unbolt the rack.

(1) get the longest Socket Wrench you can find. The longer the wrench handle the safer / less risky this is going to be
(2) get T40 trox Socket and attach it to the wrench
(3) take a look at the picture attached that compares all type of bolts that come with the pro or non-pro factory racks. you will need a regular socket to remove SR5/Limited/2014+ TRD-OffRoad racks. you will need T40 socket for the TRD-Pro and 2010-13 Trail racks.
(3) repeat the following for each bolt on the roof to remove the TRD-Pro factory rack...
(3a) make sure the socket is properly engaged into the bolt. maintain continuous contact and don't let it come off
(3b) EXTREMELY SLOWLY but FIRMLY move the wrench counterclockwise while keeping the turning momentum at consistent speed with constant FORCE. Utilize the LONGER handle of the wrench to ensure you are not turning the bolt with sudden/accelerated momentum by using excessive force
(3c) if the BOLT being turned has excessive Lock tie/glue applied (circled in the picture - blue or pink), then you will feel that the BOLT is not easily turning. In such case UNTURN and TURN several times, and feel that the resistance is going away. This is a critical point of failure if you don't do it right.
(3d) MAKE SURE not to take out the entire BOTL... you need to work all ALL eight bolts at the same time... a few turns at a time. By doing this you are making sure that you won't bend the Bracket inside the roof and you are preventing it from spinning inside when taking out the second bolt
(4) if you manage to take all bolts off safely then you have done it. Life away the rack and make sure you also take out a butterfly shape type metal retaining thingy that you will find between the rack and the holes in the roof (you will see the while cylinders circled in the picture).

so there you have it. some people have NO issues no matter how they remove the bolts... that is because the PORT installer put just the right amount of glue on the bolts. some people have nightmare with this because they rush to take the bolts out and run into bend brackets and stuck bolts - thats because the GLUE put at the PORT is excessive.

sorry I am very wordy here...but its for your own benefit.


when it comes to mounting a replacement rack.....

- if you are using an after market rack, then use what the rack comes with

- if you are using a 2010-2013 Trail Edition rack then you will need to use the metal-double-hole-bracket before you put the rack on, and then use the rubber factory washers in-between the rack and the bolt.

- if you are using a non-Pro and non-2010-2013-Trail rack (which mean the standard silver, chrome, or the black 5th gen rails), then you do NOT use the metal-double-hole-bracket (that you found under the Pro tack) before you put the replacement rack on, but still use the rubber factory washers in-between the rack and the bolt.

BTW if the factory rubber washers are worn off like you said, then buy equivalent ones from a local hardware store. - or- you can buy a Toyota hardware kit that comes with bolts and the washers.


all the best.

Really wish I would have seen this before I started trying to remove the rack yesterday. I've got a 2020 TRD Pro, used a ratchet with a long handle to try to start removing the factory rack, but started stripping one of the bolts after it came free and then tightened back up. On the other side, I fear the bracket underneath dropped and didn't unturn-turn the bolt which likely would have freed it from its lock tite/glue. I know both of these issues will be a pain in the ass to deal with, but I'm wondering if anyone has any specific advice for moving forward. I'm hoping I don't have to remove the headliner to get the bracket. Any advice is appreciated. I just don't want to make the problems any worse than I've already made them.
 
does anyone know the weight of the 2019/2020 trd pro rack ? not the weight rating but the actual weight of the steel rack and its components.
 
Last edited:
does anyone know the weight of the 2019/2020 trd pro rack ? not the weight rating but the actual weight of the steel rack and its components.

Pretty sure it’s aluminum and plastic. Was very light I’m talking maybe 10-15 lbs.
 
Really wish I would have seen this before I started trying to remove the rack yesterday. I've got a 2020 TRD Pro, used a ratchet with a long handle to try to start removing the factory rack, but started stripping one of the bolts after it came free and then tightened back up. On the other side, I fear the bracket underneath dropped and didn't unturn-turn the bolt which likely would have freed it from its lock tite/glue. I know both of these issues will be a pain in the ass to deal with, but I'm wondering if anyone has any specific advice for moving forward. I'm hoping I don't have to remove the headliner to get the bracket. Any advice is appreciated. I just don't want to make the problems any worse than I've already made them.


I had to take apart the back to get the headliner down enough to reach the bracket when I completely stripped and then drilled out the head of the bolt. It wasn’t hard and with some plastic pry tools it was a simple evening job. Took me about 30 mins to undo and reinstall.
 

Attachments

  • 9E4A22CE-AEA2-4C39-8167-0268B9C24332.jpg
    9E4A22CE-AEA2-4C39-8167-0268B9C24332.jpg
    75 KB · Views: 964

Members online

Forum statistics

Threads
278,312
Messages
3,554,085
Members
248,016
Latest member
Advally Service

Trending content

Back
Top