
YourUncleFats
New member
First off thanks to [MENTION=47689]dpodo[/MENTION] for the inspiration and starting point for the Gen 3 window up with factory remote mod. The Gen 3 and Gen 4 harnesses are a little different, but I got my voltmeter and schematics out, figured out what wires did what, and made it happen. Herse a link to his Gen 4 write up:
Back Window Up Hack with Factory Key Fob - Toyota 4Runner Forum - Largest 4Runner Forum
If you want this for your 3rd gen, please read on.
As the title says, this mod will allow you to use a factory keyless entry remote on a 3rd gen 96-02 to roll up the rear window. I feel this is the most less obtrusive way to add to the back door ecu, and requires t-splicing into 4 wires coming out of the B18 wire harness of the back door ecu. I used T-splices for this mod as they do not require cutting and can be taken off easily if you want to remove this mod. You can tap into the wires however you see fit.
My mod includes 6 items. Few feet of 18 or 20-gauge wire (speaker wire is fine), "normally open" magnet switch, PAC TR7, T-splices with quick disconnects, 5 pin relay, insulated spade connectors. I had a few of these items laying around but here are links to the items. Its best if you buy the simple "normally open" or "no" magnet switch with the permanent wires as linked below because if you get "normally closed" or "nc" this mod will not work with these instructions. There are also magnet switches that do both "normally open" AND "normally closed" and you choose which circuit it is based on attaching your wires leads to 2 of 3 available poles. If you choose that magnet switch, wire it to be "normally open" and you’ll be fine.
NTE Electronics 54-630 Magnetic Alarm Reed Switch, SPST-NO Circuit, NO for Closed Loop System Action, Magnet Actuator, White
http://a.co/8tAHWv6
PAC TR-7 Universal Trigger Output Module for Video Bypass
http://a.co/fWEJ1NY
Ginsco 120 Pcs/60 Pairs Quick Splice Wire Terminals T-Tap Self-stripping with Nylon Fully Insulated Male Quick Disconnects Kit
http://a.co/iOqfme5
Audiopipe 12 VOLT DC 40 AMP SPTD AUTOMOTIVE RELAY 5 PIN WITH MOUNTING TAB
http://a.co/bvGBEt7
Ginsco 300pcs 22-18 / 16-14 / 12-10 Gauge Nylon Fully Insulated Female Spade Wire Crimp Quick Disconnects Wire Terminals Connector Set Red Blue Yellow
http://a.co/7potNgd
Explanation:
The back window can be rolled up and down by a key switch on the back door. When you use the key switch to roll down the window, the switch sends a grounded signal an internal relay of the back Door ecu, which sends positive and negative current to the window motor rolling it down. When you use the switch to roll up the window the same happens just with the polarity reversed, making the motor roll the window up. This mod just mimics the switch being used to roll up the window.
When programming your PAC TR7 you can choose 2, 3, 4, or 5 clicks as the trigger. I used a double click of the rear window button on the remote to roll up the window. When you double press the window button of the remote, the PAC TR7 detects this double press and activates the 5-pin relay causing it to close. The TR7 will only receives this double press signal if the window is rolled all the way down which closes a magnet switch in the back door. This prevents the TR7 from activating while the window is not fully down and trying to roll the window up at the same time. So, when the TR7 receives the double press, and the window is down, it closes the 5-pin relay. When the relay closes, it sends the ground signal to the back door ecu making it think the key window switch is in the window up position. I programmed the TR7 to keep the relay closed for 6 seconds, which is all the time needed to roll the window up.
Installation (connections made in no particular order, might be good idea to disconnect the battery during install to prevent damage if accidental short and potential damage to back door ecu):
Wires t-spliced into of the B18 harness of the Back door ecu are Blue #1 wire (main power), Green with red stripes #9 wire (Window roll up signal from window switch), Green #12 wire (signal of double press from the magnet switch), #26 White with black stripe (ground). The Blue #1 will be connected to the Red of the TR7, the Green with red stripes #9 will be connected to the #30 of the relays, the green #12 will be connected to one of the magnet switch wires, and the white with black stripe will be connected to the relay #86, #87, and the black wire of the TR7. Any of this making sense? good! After making these connections, you only have 2 more to make. These 2 connections are on the TR7 and they are the TR7 green wire connects to the second wire of the magnet switch and the TR7 blue wire goes to the relay #85. that’s it! simple!
For those that are hesitant about programming a PAC TR7, its simple. Mine came with great instructions, I just had to practice the procedure a few times to make sure I got it right. Patience is key, it make take a minute or 2 but it’s worth it. Disclaimer for the TR7, the TR7 has a 4 to 5 second window for detecting the double click, and since it is triggered off the positive current of the window rolling down, if you press the remote button as soon as you window has rolled down, it will detect that click as the second click and roll it back up. It's not a problem in my book, just dont be surprised when youre messing with it when you install it, and "single click" as soon as the window is finish rolling down and it rolls back up. Here’s a link to the instructions I had, I found the flow chart to be very helpful.
https://pac-audio.com/index.php?controller=attachment&id_attachment=68
Also I made a movie of how to program the PAC
Here is where I try to explain it with pictures…
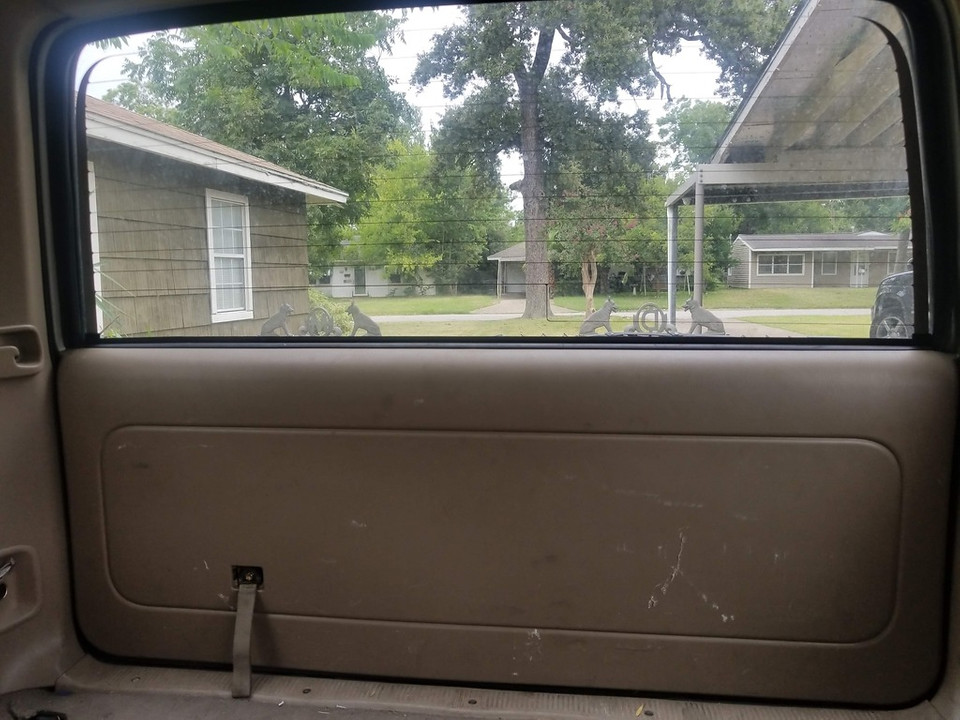
This is your back door...
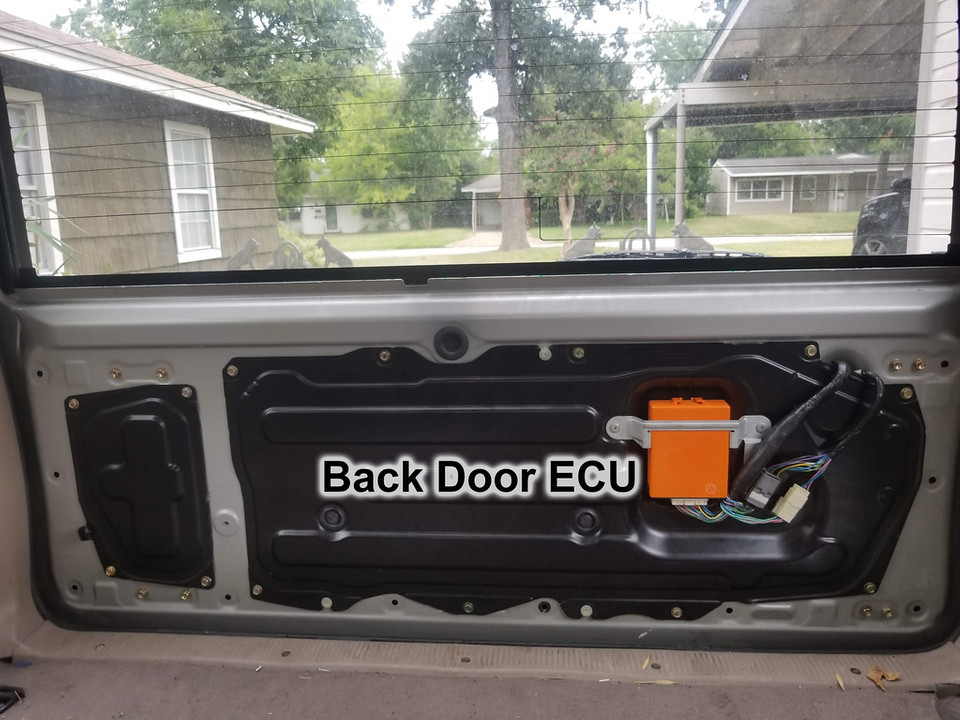
This is the back door ECU...
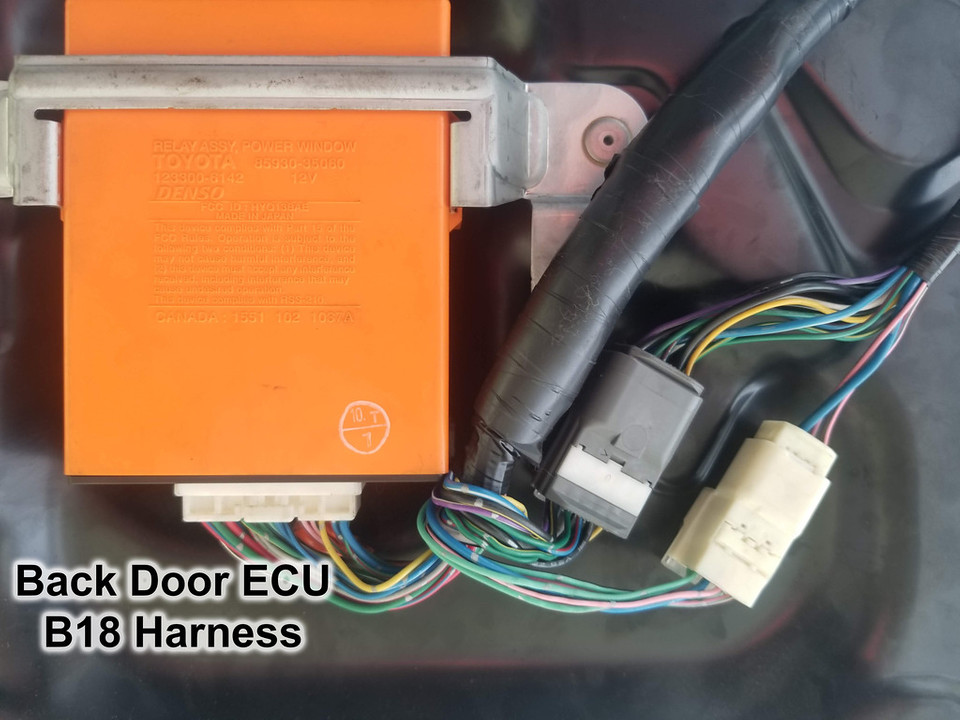
The white harness coming out of the bottom of the back door ecu is the B18 harness...
This is a pin guide taken from the field service manual of the B18 harness, showing which wires need to be located and spliced into.

Here is a picture of the T-splices on the wires of the B18 harness...
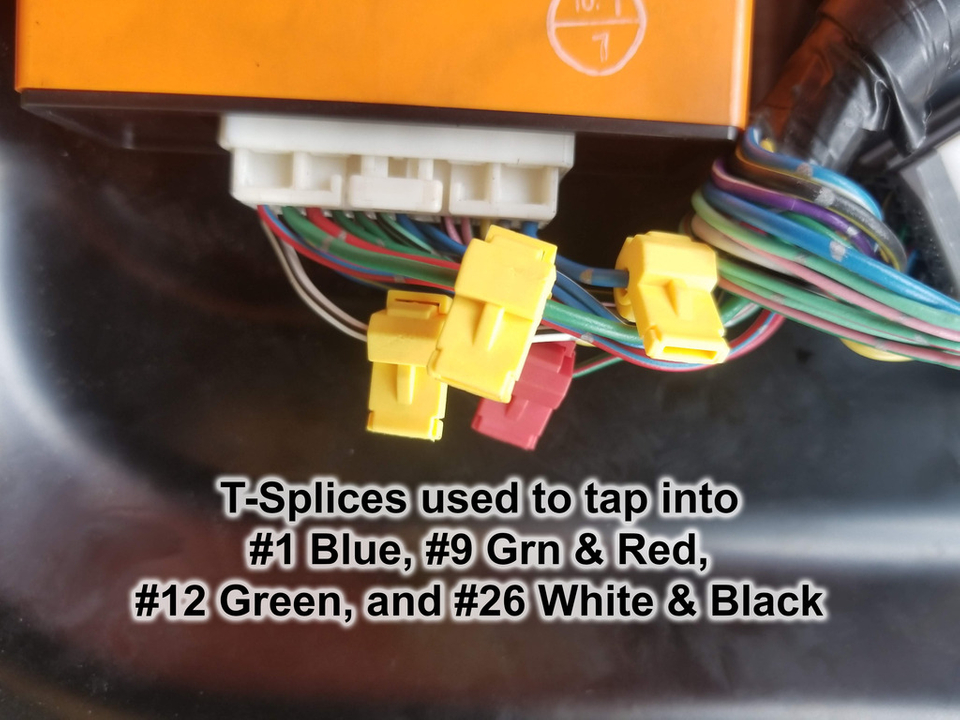
Here is what it looks like with the spade connectors connected...

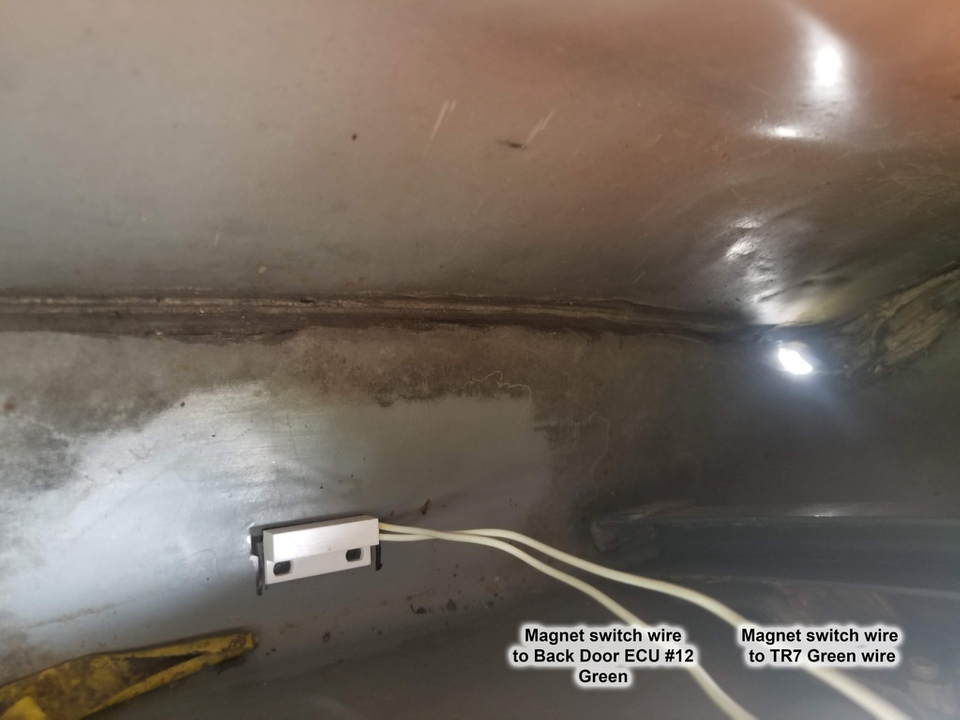
Here is a shot of the magnet switch base placed on the bottom of the back door. I clean the door real well with laquer thinner and used the supplied double sided sticky to attach it. I found where it needed to be placed by rolling the window all the way down and marking a spot where would work but be out of the way of all moving parts of the window.
Here is a shot of the magnet double stickied to the bottom of the window track, i cleaned this as well with laquer thinner to make sure its stuck on good. And making sure it lines up with the base magnet and is out of the way of all moving parts.

The next 2 shots are of both magnets in their sequence.
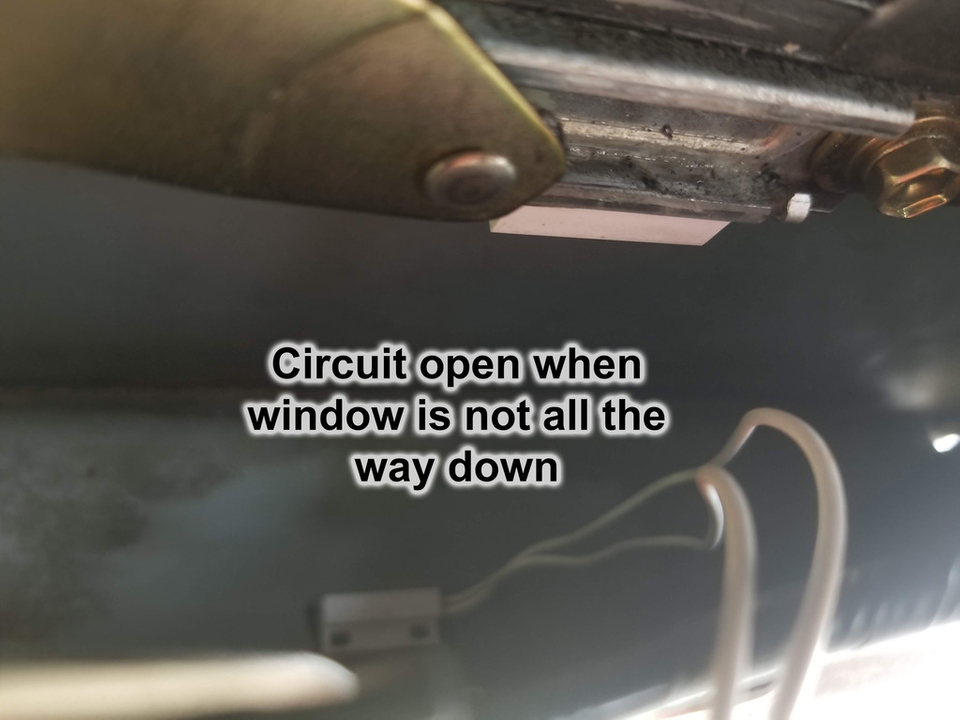
&

This is the bundle of the TR7 and 5-pin relay with corresponding connections.

Here is the whole setup before I cleaned it up…

And this last one is the finished install before putting the cover back on.

I’m ready for the critics and haters, but if you want something else because you don’t want to splice wires or it needs to be easier; ill be happy to hear your solution. If you can hook up your surround sound, you can do this, it’s simple.
Back Window Up Hack with Factory Key Fob - Toyota 4Runner Forum - Largest 4Runner Forum
If you want this for your 3rd gen, please read on.
As the title says, this mod will allow you to use a factory keyless entry remote on a 3rd gen 96-02 to roll up the rear window. I feel this is the most less obtrusive way to add to the back door ecu, and requires t-splicing into 4 wires coming out of the B18 wire harness of the back door ecu. I used T-splices for this mod as they do not require cutting and can be taken off easily if you want to remove this mod. You can tap into the wires however you see fit.
My mod includes 6 items. Few feet of 18 or 20-gauge wire (speaker wire is fine), "normally open" magnet switch, PAC TR7, T-splices with quick disconnects, 5 pin relay, insulated spade connectors. I had a few of these items laying around but here are links to the items. Its best if you buy the simple "normally open" or "no" magnet switch with the permanent wires as linked below because if you get "normally closed" or "nc" this mod will not work with these instructions. There are also magnet switches that do both "normally open" AND "normally closed" and you choose which circuit it is based on attaching your wires leads to 2 of 3 available poles. If you choose that magnet switch, wire it to be "normally open" and you’ll be fine.
NTE Electronics 54-630 Magnetic Alarm Reed Switch, SPST-NO Circuit, NO for Closed Loop System Action, Magnet Actuator, White
http://a.co/8tAHWv6
PAC TR-7 Universal Trigger Output Module for Video Bypass
http://a.co/fWEJ1NY
Ginsco 120 Pcs/60 Pairs Quick Splice Wire Terminals T-Tap Self-stripping with Nylon Fully Insulated Male Quick Disconnects Kit
http://a.co/iOqfme5
Audiopipe 12 VOLT DC 40 AMP SPTD AUTOMOTIVE RELAY 5 PIN WITH MOUNTING TAB
http://a.co/bvGBEt7
Ginsco 300pcs 22-18 / 16-14 / 12-10 Gauge Nylon Fully Insulated Female Spade Wire Crimp Quick Disconnects Wire Terminals Connector Set Red Blue Yellow
http://a.co/7potNgd
Explanation:
The back window can be rolled up and down by a key switch on the back door. When you use the key switch to roll down the window, the switch sends a grounded signal an internal relay of the back Door ecu, which sends positive and negative current to the window motor rolling it down. When you use the switch to roll up the window the same happens just with the polarity reversed, making the motor roll the window up. This mod just mimics the switch being used to roll up the window.
When programming your PAC TR7 you can choose 2, 3, 4, or 5 clicks as the trigger. I used a double click of the rear window button on the remote to roll up the window. When you double press the window button of the remote, the PAC TR7 detects this double press and activates the 5-pin relay causing it to close. The TR7 will only receives this double press signal if the window is rolled all the way down which closes a magnet switch in the back door. This prevents the TR7 from activating while the window is not fully down and trying to roll the window up at the same time. So, when the TR7 receives the double press, and the window is down, it closes the 5-pin relay. When the relay closes, it sends the ground signal to the back door ecu making it think the key window switch is in the window up position. I programmed the TR7 to keep the relay closed for 6 seconds, which is all the time needed to roll the window up.
Installation (connections made in no particular order, might be good idea to disconnect the battery during install to prevent damage if accidental short and potential damage to back door ecu):
Wires t-spliced into of the B18 harness of the Back door ecu are Blue #1 wire (main power), Green with red stripes #9 wire (Window roll up signal from window switch), Green #12 wire (signal of double press from the magnet switch), #26 White with black stripe (ground). The Blue #1 will be connected to the Red of the TR7, the Green with red stripes #9 will be connected to the #30 of the relays, the green #12 will be connected to one of the magnet switch wires, and the white with black stripe will be connected to the relay #86, #87, and the black wire of the TR7. Any of this making sense? good! After making these connections, you only have 2 more to make. These 2 connections are on the TR7 and they are the TR7 green wire connects to the second wire of the magnet switch and the TR7 blue wire goes to the relay #85. that’s it! simple!
For those that are hesitant about programming a PAC TR7, its simple. Mine came with great instructions, I just had to practice the procedure a few times to make sure I got it right. Patience is key, it make take a minute or 2 but it’s worth it. Disclaimer for the TR7, the TR7 has a 4 to 5 second window for detecting the double click, and since it is triggered off the positive current of the window rolling down, if you press the remote button as soon as you window has rolled down, it will detect that click as the second click and roll it back up. It's not a problem in my book, just dont be surprised when youre messing with it when you install it, and "single click" as soon as the window is finish rolling down and it rolls back up. Here’s a link to the instructions I had, I found the flow chart to be very helpful.
https://pac-audio.com/index.php?controller=attachment&id_attachment=68
Also I made a movie of how to program the PAC
Here is where I try to explain it with pictures…
This is your back door...
This is the back door ECU...
The white harness coming out of the bottom of the back door ecu is the B18 harness...
This is a pin guide taken from the field service manual of the B18 harness, showing which wires need to be located and spliced into.
Here is a picture of the T-splices on the wires of the B18 harness...
Here is what it looks like with the spade connectors connected...
Here is a shot of the magnet switch base placed on the bottom of the back door. I clean the door real well with laquer thinner and used the supplied double sided sticky to attach it. I found where it needed to be placed by rolling the window all the way down and marking a spot where would work but be out of the way of all moving parts of the window.
Here is a shot of the magnet double stickied to the bottom of the window track, i cleaned this as well with laquer thinner to make sure its stuck on good. And making sure it lines up with the base magnet and is out of the way of all moving parts.
The next 2 shots are of both magnets in their sequence.
&
This is the bundle of the TR7 and 5-pin relay with corresponding connections.
Here is the whole setup before I cleaned it up…
And this last one is the finished install before putting the cover back on.
I’m ready for the critics and haters, but if you want something else because you don’t want to splice wires or it needs to be easier; ill be happy to hear your solution. If you can hook up your surround sound, you can do this, it’s simple.
Last edited:


 it'll be my next weekend project.


