3rd Gen T4R DIY Maintenance, Repair and Modification Videos

96-00, the charcoal canister is located under the hood against the driverside fender. In the fsm the, schematic should be under 'Emission control: Evaporative emission control system '.

After you posted in his other thread, I looked back through my FSM in the EC section and found it. Sounds fairly complicated to test that canister for proper operation. Thanks for the info.
 
Sounds fairly complicated to test that canister for proper operation.

Testing the canister to make sure it is not leaking is pretty straight forward. You literally plug one opening & blow into another. You've done much more complicated jobs based on all your diy videos.
 
Testing the canister to make sure it is not leaking is pretty straight forward. You literally plug one opening & blow into another. You've done much more complicated jobs based on all your diy videos.

I was referring to all the steps related to the vacuum testing with a gauge, references to the special Toyota diagnostic tool, hooking up power to the canister if you don't have the special tool, etc. That seems pretty involved.
 
I believe this is what your looking for. It's right under your battery.
49c35e3f56c0b520e01c58e2116525df.jpg


Sent from my iPhone using Tapatalk
 
I was referring to all the steps related to the vacuum testing with a gauge, references to the special Toyota diagnostic tool, hooking up power to the canister if you don't have the special tool, etc. That seems pretty involved.

I got you & I do agree that testing the rest of the evap system is a bit more involved then testing the charcoal canister alone. I haven't tested the whole system yet but on the parts that I have tested, I had to re-read the instructions multiple times. The fsm does state that you can use a battery (I used a 9v based off search recommendations) if you don't have a Toyota hand held tester for turning the VSV valves on or off. Having a multimeter is helpful but probably not needed.

Edit: I'll redirect any other replies out of your diy thread.

I believe this is what your looking for. It's right under your battery.

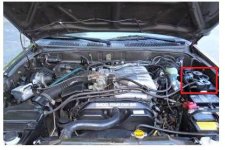
I think on the 96-00 it's actually this which is located behind the battery outlined in red (not my picture).

96-00 charcoal canister.jpg
 

Attachments

  • 96-00 charcoal canister.jpg
    96-00 charcoal canister.jpg
    29.6 KB · Views: 1,486
Last edited:
I'll add that the 96-00 canisters like to crack around the base. Almost impossible to see the crack(s) but super easy to repair with some RTV.

I fixed mine up just fine. I did notice once though that after I tried to wedge an old oil rag between the EVAP canister and the fuse box (always checking my fluids and like to keep a shop rag under the hood) I got an EVAP code 45 minutes later. I pulled the rag out and cleared the code; it never came back after that. I think the pressure from the wedged rag allowed a crack to be exposed again.

I too used a 9v to test the VSVs. If I recall correctly, just listening for switches to click if they are good.


​
 
I have a question on the LCA bushings video. If one were to attempt this job, How much of a jaw opening is need on the bench vise to fit the LCA and the bushing + a pair of channel locks?
 
I have a question on the LCA bushings video. If one were to attempt this job, How much of a jaw opening is need on the bench vise to fit the LCA and the bushing + a pair of channel locks?

That is an excellent question. The question was so good, I was willing to get on the wet ground outside to get the control arm measurement.

Here's the numbers:
Control Arm Sleeve that the bushing presses into - 1.75"
Balljoint Receiving Cup - 2.5"
Big Channel Locks - .5"

Total Length - 4.75"

So, I'd recommend using a vice that can at least open 5 inches. Now, if you use a longer balljoint receiving cup or a thicker pair of channel locks, you'd have to have an opening longer than 5 inches.
 
That is an excellent question. The question was so good, I was willing to get on the wet ground outside to get the control arm measurement.

Here's the numbers:
Control Arm Sleeve that the bushing presses into - 1.75"
Balljoint Receiving Cup - 2.5"
Big Channel Locks - .5"

Total Length - 4.75"

So, I'd recommend using a vice that can at least open 5 inches. Now, if you use a longer balljoint receiving cup or a thicker pair of channel locks, you'd have to have an opening longer than 5 inches.
Thanks for enduring the elements for me. I wonder if I could get away with a smaller vise if I used a 2nd pair of channel locks or a shorter cup. I don't think the bushings sticks out further than 0.5in?

Sent from my SM-G930T using Tapatalk
 
Thanks for enduring the elements for me. I wonder if I could get away with a smaller vise if I used a 2nd pair of channel locks or a shorter cup. I don't think the bushings sticks out further than 0.5in?

Sent from my SM-G930T using Tapatalk

A second pair of channel locks instead of a receiving up would work but it would have to be thick enough to allow the bushing to press all the way in. And definitely, a shorter cup would also work. I just got onto the wet ground again and you're right, it only sticks out .5 inches.

Now that I think about it, I would have rather had the balljoint cup doing the pressing on the sleeve and had the channel locks on the backside. Oh well. Anyway, great questions. Thanks!
 
A second pair of channel locks instead of a receiving up would work but it would have to be thick enough to allow the bushing to press all the way in. And definitely, a shorter cup would also work. I just got onto the wet ground again and you're right, it only sticks out .5 inches.

Now that I think about it, I would have rather had the balljoint cup doing the pressing on the sleeve and had the channel locks on the backside. Oh well. Anyway, great questions. Thanks!

I do have one more question. Please for the love of God do not go onto the wet grass again. Do by any chance know the diameter of the bushings or the inner diameter of the LCA sleeve? I have been scouring google to know avail.

Thanks again.
 
I do have one more question. Please for the love of God do not go onto the wet grass again. Do by any chance know the diameter of the bushings or the inner diameter of the LCA sleeve? I have been scouring google to know avail.

Thanks again.

No, I don't know the exact measurement. But, if you go to the Whiteline web page and give them a call, I'd imagine they could tell you the diameter of the bushing they sell for the LCA on our rigs.

I wasn't on wet grass but wet pavement. But, if you come up empty on a measurement, I can get under there again with my digital caliper tool and get the number for you.
 
No, I don't know the exact measurement. But, if you go to the Whiteline web page and give them a call, I'd imagine they could tell you the diameter of the bushing they sell for the LCA on our rigs.

I wasn't on wet grass but wet pavement. But, if you come up empty on a measurement, I can get under there again with my digital caliper tool and get the number for you.
Wow, whitline has exactly the type of info I have been searching for. I'm having a hard time understanding their specs though . I think I will email them to make sure. I'm thinking of trying to change my LCA bushings but the island makes that difficult. I don't have a bench vise but I did have an idea of using different sized sockets and a heavy duty threaded rod to "pull" the bushing into place. I'll be in the states for Christmas so I'm trying make a complete list of stuff I will need. Thanks for all the help.

Sent from my SM-G930T using Tapatalk
 
Wow, whitline has exactly the type of info I have been searching for. I'm having a hard time understanding their specs though . I think I will email them to make sure. I'm thinking of trying to change my LCA bushings but the island makes that difficult. I don't have a bench vise but I did have an idea of using different sized sockets and a heavy duty threaded rod to "pull" the bushing into place. I'll be in the states for Christmas so I'm trying make a complete list of stuff I will need. Thanks for all the help.

Sent from my SM-G930T using Tapatalk

The threaded rod technique should work. I recently saw it somewhere on a forum and it looks like a legit and very affordable way to get it done without a vice.
 
I wasn't going to, but I ended up creating this video to show that we all can make mistakes. Don't think all those videos on youtube doing repairs go smoothly, I could have edited this mistake out and made it look like the job went flawless. So this is a little video about cam plug replacement/ how to use a bolt extractor.

<iframe width="853" height="480" src="https://www.youtube.com/embed/Q69LAmr9YXA" frameborder="0" allowfullscreen></iframe>
 
Howdy Folks,

Here's a video of one of the most common and easy to do mods on your 3rd Gen. This video almost didn't happen due to some technomological difficulties but I was able to salvage it.

Enjoy the Show!

<iframe width="560" height="315" src="https://www.youtube.com/embed/tCGMa4vng_g" frameborder="0" allowfullscreen></iframe>

Hey Tim! Thanks for the videos! Either I missed it or you didn't say but how do you remove the breather? Thanks
 
Hey Tim! Thanks for the videos! Either I missed it or you didn't say but how do you remove the breather? Thanks

Are you talking about the removing the stock breather on the rear axel? Or the new one he is installing?

To remove the stock breather it just unscrews... it has threads going into the top of the axel on the drivers side of the rear axle.... the union that you put the new hose onto has the same thread pitch & just screws right into the same area...
 
Are you talking about the removing the stock breather on the rear axel? Or the new one he is installing?

To remove the stock breather it just unscrews... it has threads going into the top of the axel on the drivers side of the rear axle.... the union that you put the new hose onto has the same thread pitch & just screws right into the same area...
What he said. The OEM breather just unscrews from the top of the differential. You could either use a ratchet and 14mm deep socket or a 14mm wrench. Then the new nipple screws in place of the old breather and you run the line from that up to your gas fill tube.

Sent from my XT1060 using Tapatalk
 
Last edited:
Are you talking about the removing the stock breather on the rear axel? Or the new one he is installing?

To remove the stock breather it just unscrews... it has threads going into the top of the axel on the drivers side of the rear axle.... the union that you put the new hose onto has the same thread pitch & just screws right into the same area...

What he said. The OEM breather just unscrews from the top of the differential. You could either use a ratchet and 14mm deep socket or a 14mm wrench. Then the new nipple screws in place of the old breather and you run the line from that up to your gas fill tube.

Sent from my XT1060 using Tapatalk

Perfect. Thanks guys.
 
What he said. The OEM breather just unscrews from the top of the differential. You could either use a ratchet and 14mm deep socket or a 14mm wrench. Then the new nipple screws in place of the old breather and you run the line from that up to your gas fill tube.

Sent from my XT1060 using Tapatalk

What are the chances a clogged stock breather could have caused an axle seal to leak?
 
Last edited:

Members online

Forum statistics

Threads
278,317
Messages
3,554,128
Members
248,016
Latest member
Advally Service

Trending content

Back
Top