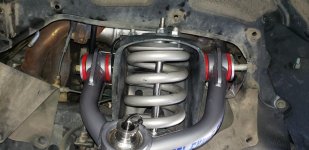
3rd gen upper ball joints (UBJ) the easy way!!

I personally would think twice about using that stuff. Have you read the threads about LBJ failure? And the work of putting it in if you have to shortly replace it again.

I would spend more and put in good quality and just do the parts you need to do.


Yep, that is what made me hesitant to use these parts... I am in the process of doing this today just came back to this thread as I am about to start with the upper ball joints.


I am using the sway bar links, struts, inner/ outer tie rod ends, and upper ball joints from this kit. I will keep a close eye on these components but they are A LOT less likely to cause a catastrophic accident than the lower ball joints, I will be ordering oem lower ball joints. FWIW the components seem to be of decent quality as far as fit and feel go, we will see with time how they wear. Like I said I will be keeping a close eye on them.
 
Did this today, amazed how easy it was after reading all of the people that had trouble.

I rented the three jaw puller but didn't even take it out of the box.

To detach ball joint from upper a arm I used a "pickle fork" with BFH. These are available for rent from the auto parts store for free, but I bought mine from harbor freight for 10$ and have used it several times.

I then realized what other people were talking about by not being able to fit the ball joint press in the wheel well (it is much bigger than i imagined from the pictures)

I had to detach the abs sensor line, and brake line brackets to get the "spindle"(which is the tall piece the axle goes through and ball joint is pressed into top of) out of the wheel well more and the press fits on fine then.

Then it is straight forward cut ball joint as seen in op, press old one out and new one in also used the same adapters as the op.

Took me about an hour to do the first side, and literally about 20 minutes for the other side.
 
Last edited:
[MENTION=102606]infamousRNR[/MENTION] and I recently did a Toytec Lift for [MENTION=146244]phokingchink[/MENTION] and we installed Total Chaos UCAs in the process. We show the non-cutting way to press them out and press in the Total Chaos special sleeve afterward. Video coming out very soon.
 
Thanks for this thread! I put on my spc uca's today and used the info i found here. I rented the autozone ball joint press kit and that was the only speciality tool i had to use to press out the old ball joints.

Now I'll swap out my rack bushings and hopefully get it aligned and new tires on Monday.

Thanks again!
 
[MENTION=102606]infamousRNR[/MENTION] and I recently did a Toytec Lift for [MENTION=146244]phokingchink[/MENTION] and we installed Total Chaos UCAs in the process. We show the non-cutting way to press them out and press in the Total Chaos special sleeve afterward. Video coming out very soon.

Here's the video we made. At play time 13:17, we start with the UBJ removal.


<iframe width="560" height="315" src="https://www.youtube.com/embed/yXjioXyZa_M?list=PLPMpPriBUyJDltxfqbrYHUmrKeRrLeLXM" frameborder="0" allowfullscreen></iframe>
 
Used the O'Reilly's BJ removal tools listed in the 1st post, and used my electric impact to tighten the clamp. Worked.likena charm. Took longer to get the press and adapters in place than anything.

Huge thanks to the OP for posting this!
 
Yep, that is what made me hesitant to use these parts... I am in the process of doing this today just came back to this thread as I am about to start with the upper ball joints.


I am using the sway bar links, struts, inner/ outer tie rod ends, and upper ball joints from this kit. I will keep a close eye on these components but they are A LOT less likely to cause a catastrophic accident than the lower ball joints, I will be ordering oem lower ball joints. FWIW the components seem to be of decent quality as far as fit and feel go, we will see with time how they wear. Like I said I will be keeping a close eye on them.
4 months out, how are they doing?

I just pulled my wheels to do the LBJs with oem parts and found the stabilizer links, tie rod end boots and inner boots, and upper ball joints are all shredded.

Before finding your post I found the same Detroit Axle kit on Amazon and wondered about using everything from it except the LBJs.

My dad has used their parts on his Hondas without a problem but you just can't find much else of a review for them anywhere.


Sent from my SM-G900V using Tapatalk
 
Hello all new here.... I'm surprised I haven't seen this trick mentioned in dealing with pressing in new UBJ's, etc...

Yes thoroughly clean the pressing surface. grease it. Get the ball joint out of the freezer where you've had it the past 20 minutes!! It makes life a bit easier. Works excellent pressing in bearings as well.

Just my 2 cents ;)
 
Used this method to change my ball joints over the weekend. Worked flawlessly, hardest part of the job was the get the snap ring back on (no snap ring pliers). I also agree with using a flat piece of metal instead of the "C" adapter.
 
First post here. I just replaced UBJs, LBJs, outer tie rods and stabilizer bar links on my '02 SR5. The UBJs were the only difficult job and I wanted to thank [MENTION=30225]yosh2000[/MENTION] and the rest of the commenters here for sharing what they'd learned. Super useful.

The UBJs were really stuck in there good, I had no luck with the 3 jaw puller, so I picked up a GearWrench 3916D Universal Ball Joint Separator ( https://www.amazon.com/gp/product/B003YVWHOE/ref=oh_aui_detailpage_o00_s00?ie=UTF8&psc=1 ) which popped them out in no time. Definitely recommend this tool. It worked great on the LBJs too. At first it doesn't seem like it will fit but it is wide enough, you just need to hammer it in there to push under the rubber dust covers.

I also agree that using a piece of flat metal underneath the UBJ when pressing it in kept it nice and straight.

My local dealer didn't have the UBJs in stock and I was in a rush so purchased the Valuecraft aftermarket parts. They didn't fit. Returned them and waited for genuine OEM parts as I should have done in the first place. Nice to have the peace of mind that comes with a quality part where safety is a concern.

Thanks again all.
 
Last edited:
Used this method to change my ball joints over the weekend. Worked flawlessly, hardest part of the job was the get the snap ring back on (no snap ring pliers). I also agree with using a flat piece of metal instead of the "C" adapter.

buy a cheap pair from o-rileys or something. it makes taking them on and off a breeze.

i want to thank the OP for this write up. i was able to do this with the two press kits in the OP. these were available at my local o'rileys. 211 for the rental tool (you get it all back if you return it within 48 hours). even though the rental tool was absolutely hammered it did its job. i got one side done on a friday night after work, and the second side the following saturday morning. of course, once you do the first side, the second side is an absolute breeze.

i was able to fit the press inside the wheel well. i used a 7/8 wrench with a cheater bar to get the BJs out. there was no way a breaker bar with a socket would have fit.

i havent read this thread from beginning to end, but i installed total chaos UCAs. i was doing this on my own with no help so i had to figure out a way to hold the 4 washers per side on each UCA that the total chaos arms utilize while fishing in the super long bolt through the engine bay. here is my tip:

i just recently lifted my 4runner with a toy tec lift. the kit came with diff spacers that utilized longer bolts. i kept the stock bolts. the stock bolts are what make this so easy. the shank diameter is the same as the UCA bolt, but about half the overall length length (which is perfect for what we need it to do).

feed the OEM diff bolt through the backside of the UCA, threading in the two rear spacers as well (left side on the attached pic). it is only long enough to reach the middle of the tube on the frame that holds the UCA in place. this is just enough for it to hold the back two spacers in place and orient the UCA in a way that you can thread the long bolt through the front side of the UCA all by yourself. i used packing tape on the bottom to hold the front two washers and it worked like a charm. once everything is in place, all you need to do is push the long UCA bolt into its final resting place, and this will knock out the OEM diff bolt in the rear while still holding the arm and all of the washers in place.

hopefully this makes sense. ive attached a pic of me doing this trick on the passenger side. front OEM diff bolts on left, UCA bolt on right. even though this is a total chaos arm, you can still utilize this trick with other arms or even OEM ones.

 

Attachments

  • UCAInstallTrick.jpg
    UCAInstallTrick.jpg
    141.4 KB · Views: 1,136

Members online

Forum statistics

Threads
278,316
Messages
3,554,112
Members
248,016
Latest member
Advally Service

Trending content

Back
Top