3VZE Head Gasket DIY advice

bomhour

New member
Hi,

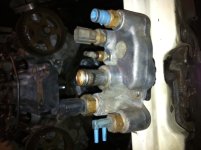
I am all the way into a head gasket replacement. A little background before I begin...I bought a 93 4funner for 500 bucks. It was missing a back window and was blowing smoke (smoke appeared as he was driving the twelve miles home from the auction where he purchased the truck). So the previous owner tried to do the head gasket repair on his own. the result is pictured below
ar3CS8


I cut off the timing belt as it was shredded. the fan & shroud were out along with some other misselaneous items.

My plan is to pick up where he left off and repair the head gasket. complete with the following repairs: machine the head, replace the busted fuel injector, toyota factory gasket and seal set, idler pulleys, New head bolts from engnblder.com, new timing belt from yota and new knock sensor.

the water pump looks and feels like its in good shape.

so, this brings me to my question. I have read a ton of posts and I am having a hard time finding a few little bits of information. I have the chiltons and the free online manuals.

1. what is supposed to fill the threaded hole pictured here?
ar6iej
it is right behind the fuel rail on the passenger side and is part of the water bypass outlet. there was nothing there when I bought the truck.

2. does anyone see any red flags with the cylinder or block pictured here?
ar3Dot
or here?
ar6isu

I have never been this deep in an engine before so I dont know what to look for.

3. is there a rule of thumb that I could follow regarding sealant and gasket builders for the various connections? I see blue around the water pump, orange around the various air inlets and silver on the old head gasket. Just look for a bit of clarity to simplify that decision making process?

4. there seems to be quite a lot of oil around the bottom the bell housing. Is it possible that this vehicle did not blow a head gasket but instead needs a rear main seal?

thanks for you advice.
 
Register to hide this ad
Don't be penny stupid, change the water pump... unless you want to do it along with the timing belt again in a few months. Make sure you get the whole timing belt replacement kit and replace everything that comes in it. It would be really silly to have the tensioner pulley seize up or the fitting passing through it to start leaking not long after you finish the job. Make sure you get the correct kit, they sell one for hydraulic tensioners and one for spring tensioners.
 
I believe you are missing the two-pronged vacuum tee on the end of the outlet. I forgot exactly where the vacuum lines run to, one goes to the drivers side around the throttle body, and the other goes toward the passenger side in the back. I will check when I get home and let you know exactly where to route them.
 

Attachments

  • 3VZE-Water Outlet.JPG
    3VZE-Water Outlet.JPG
    98.6 KB · Views: 21,000
As for the block being good, can't really tell from looking at it. About the only thing you can do is to examine pistons and cylinder walls for obvious damage. Failing that, you would need a micrometer to check for wear, and that is above me.

As for sealant, none on the cylinder heads, don't even think about it. RTV blue for water outlets, high tack for misc. intake gaskets, Throttle body, etc..., thread sealant on just about any bolt that may come loose. That's my take on it, some may see it differently.

Oil may and/or may not be from rear main seal, remember that these motors can leak badly from the rear of the valve covers, very poor design.

As an aside, if you need the timing belt kit with wp, belt, idler and hydraulic tensioner, send me a PM. I bought the wrong kit when redoing mine and neglected to return in a timely fashion. Kind of screwed the pooch, also have a new pigtail for the knock sensor.

Good Luck
 
Don't be penny stupid, change the water pump... unless you want to do it along with the timing belt again in a few months. Make sure you get the whole timing belt replacement kit and replace everything that comes in it. It would be really silly to have the tensioner pulley seize up or the fitting passing through it to start leaking not long after you finish the job. Make sure you get the correct kit, they sell one for hydraulic tensioners and one for spring tensioners.

I will add that to the list. thanks
 
I believe you are missing the two-pronged vacuum tee on the end of the outlet. I forgot exactly where the vacuum lines run to, one goes to the drivers side around the throttle body, and the other goes toward the passenger side in the back. I will check when I get home and let you know exactly where to route them.

thanks! that picture is the missing link. The hoses were there but the blue F shaped object was not.
 
As for the block being good, can't really tell from looking at it. About the only thing you can do is to examine pistons and cylinder walls for obvious damage. Failing that, you would need a micrometer to check for wear, and that is above me.

As for sealant, none on the cylinder heads, don't even think about it. RTV blue for water outlets, high tack for misc. intake gaskets, Throttle body, etc..., thread sealant on just about any bolt that may come loose. That's my take on it, some may see it differently.

Oil may and/or may not be from rear main seal, remember that these motors can leak badly from the rear of the valve covers, very poor design.

As an aside, if you need the timing belt kit with wp, belt, idler and hydraulic tensioner, send me a PM. I bought the wrong kit when redoing mine and neglected to return in a timely fashion. Kind of screwed the pooch, also have a new pigtail for the knock sensor.

Good Luck

Thanks for all that info. the heads are at the machine shop right now being tested for cracks and leaks. if they come back with bad news then I may go with a used engine. I will PM you regardind the kit you have. thanks, again. BTW when I removed the old head gasket there was silver sealant or gasket maker all over it:nono: I'm glad you mentioned that!!!
 
Well .. some of us aren't as "successful" as other, I suppose.

Maybe he's right. Stuff will never be cheaper then it is today...inflation and all. I've been debating the water and oil pump because, the water pump looks new and most folks on these forums don't seem so hard lined on the oil pump. The blue sealant around the edge of the water pump is still bright blue and there is no play or noise when operated. Maybe thats a false assumption, I don't know. Either way, I understand his comment. I need a vehicle that will last at least 3 years, 20,000 rocky mountain miles, so 100 extra is well spent peace of mind. At the end of the day...500 for a 93 4funner, 1100 parts and service...good for the price. I looked around and could not find a vehicle with solid engine for 1600 and less than or equal to 200,000 miles. I'm fortunate enough to be employed and be able to afford it so, he right, I will do the wp irregardless of the maybe factor. thanks for your comments. I've been on both side of that fence.:redbrick:
 
Last edited:
BVSV / Valve Clearances / FSM

That blue F shaped object that you are missing is called the BVSV - Bi-metal Vacuum Switched Valve. It sends fuel vapors from the charcoal canister/fuel tank to the engine while it is warming up. When I did the HGs on my 94, I snapped off the lower port when I tried to twist the hose off. Around $60.

Assuming your heads check out o.k., I recommend checking/adjusting your valve clearances while you have easy access with the heads on the bench, or at least before the timing belt is installed. Manual says to check clearances every 60K anyway and its a real PITA to replace the adjusting shims with the engine assembled. The shims are about $10 from Toyota, cheaper online. The exhaust clearances on mine were way under spec and #6 was scary tight. (#6 gets extra hot on this engine because of the f-ing crossover pipe and probably where and why your HG let go). For an unknown engine with that much mileage I'd also lap and inspect the valves. I replaced three exhaust valves that had badly pitted faces. (Mine had 140k on the clock). At $12 a valve, and since you already have the heads off, its a no brainer.

Good Luck!
 
Last edited:
Idler pulley #1 washer

I have hit a bit of a road block during reassembly of the timing belt. the idler pulley #1 is missing the washer that goes on the block side of the bolt. I have tried every washer that I have but nothing is holding the belt tension. My question is, is that washer a specific design that I need oem for or do i have another issue? BTW i think i ruined my new idler pulley by torquing the darn thing too tight with the wrong size washer. I cant figure out if I'm looking for a washer to clear the bolt of bear on the bolt? thanks for your help.

P.S. can anyone tell me where this goes? http://flic.kr/p/atAQNG (see link)

thanks
 
Last edited:
I have hit a bit of a road block during reassembly of the timing belt. the idler pulley #1 is missing the washer that goes on the block side of the bolt. I have tried every washer that I have but nothing is holding the belt tension. My question is, is that washer a specific design that I need oem for or do i have another issue? BTW i think i ruined my new idler pulley by torquing the darn thing too tight with the wrong size washer. I cant figure out if I'm looking for a washer to clear the bolt of bear on the bolt? thanks for your help.

P.S. can anyone tell me where this goes? where does this go? | Flickr - Photo Sharing! (see link)

thanks

I think I have this part figured out...I picked up a bunch of hardware store washers. The winning washer looks like it fits snug to the threads and is wide enough to sit between the bolt/pulley housing and the block. As I understand from the FSM manual, the housing is supposed to move freely up and down. This is a part that is incorrectly described in some to the DIY's out there. Previously, I was under the impression that the pulley was supposed to be wedged up against the timing belt to remove the slack simulataneously tightening the 10mm hex bolt...wrong!!! I think?

According to FSM, you just install the pulley and let is rest freely on the notch provided on the head. After install the pulley will be able to rotate slightly on the stud/bolt. This still leaves the question...how do you get the belt tight? Tonight I will play with the belt to see if I can bet equal slack on both sides.
 
I have hit a bit of a road block during reassembly of the timing belt. the idler pulley #1 is missing the washer that goes on the block side of the bolt. I have tried every washer that I have but nothing is holding the belt tension. My question is, is that washer a specific design that I need oem for or do i have another issue? BTW i think i ruined my new idler pulley by torquing the darn thing too tight with the wrong size washer. I cant figure out if I'm looking for a washer to clear the bolt of bear on the bolt? thanks for your help.

P.S. can anyone tell me where this goes? where does this go? | Flickr - Photo Sharing! (see link)

thanks

Adam,
This should be valve-gas, no.1
One end goes into the three pronged what looks like a vacuum valve in the upper manifold to the left of the cold start injector. You have to trace the other end by the attached diagram. goes into one of those valves under the mess of spaghetti under the fuse box area.
 

Attachments

3vze timing belt - a set on Flickr

I cannot get this timing belt tensioned. Here are some photos of the issue I'm having. Everything is torqued and the belt is all lined up with the markings set to TDC etc... Please check out the linked photos. The belt is way too loose. I hand crank the shaft a couple of times and the belt is slipping (as you can see in one of the photos). As stated in my first post, this vehicle did not run when I bought it ($500) and the belt was shredded. The variables are; belt is too long(not too likely because all the markings are hitting), water pump is wrong design(not too likely, matches existing and bolts all fit, pulley spins ok), tensioner is the wrong type(that was also on the vehicle when i purchased it but the belt was shredded). Does anyone know how I can figure out exactly what type of tensioner to use?
 
Last edited:
Adam,
This should be valve-gas, no.1
One end goes into the three pronged what looks like a vacuum valve in the upper manifold to the left of the cold start injector. You have to trace the other end by the attached diagram. goes into one of those valves under the mess of spaghetti under the fuse box area.


Thanks Mike, the diagram was very helpful. BTW, how did you figure out that your vehicle needed the spring tensioner and not the hydrolic, as was factory? I'm having a heck of a time with the same tensioner that was on the vehicle when I bought it. Cant get tension.
 
Its a 93, so he should have the hydraulic tensioner.

Mine is a 93. According to the parts guy in 93 they changed over at some point from spring to hydraulic. I had to actually look at the tensioner before I bought the kit...
 
Mine is a 93. According to the parts guy in 93 they changed over at some point from spring to hydraulic. I had to actually look at the tensioner before I bought the kit...

I called the parts shop tonight. They gave me a toyota part number based on my model and year...spring tensioner part number 13505 ( if memory serves). Not sure who did the last repair or how this vehicle was ever mobile, but the tensioner on there was a hydrolic (as shown in the pictures above). I will get back to the forum on Sunday when I have the new part and time to install.
 

Members online

Forum statistics

Threads
278,312
Messages
3,554,085
Members
248,016
Latest member
Advally Service

Trending content

Back
Top