
You are using an out of date browser. It may not display this or other websites correctly.
You should upgrade or use an alternative browser.
You should upgrade or use an alternative browser.
4RunAmok
- Thread starter 4RunAmok
- Start date


4RunAmok
New member
Great looking build...You have good taste in your add-ons! I suppose we'll have to wait and find out, but are you planning on mounting the awning in between the site lights?
Thanks! Coming from a 3rd Gen, I had a pretty good idea of the direction I wanted to take this one.
Yes. Directly to the rack. Due to the nature of the awning, I have to use a spacer.
It's designed to mount on the flat surface of a Westy's topper, but it adapts easily.

vincentshumai
New member
Holy crap, thats the nicest looking drawer system Ive seen so far. But just checked out their site, $$$$$$ but looks so damn good. Decisions...
4RunAmok
New member
Holy crap, thats the nicest looking drawer system Ive seen so far. But just checked out their site, $$$$$$ but looks so damn good. Decisions...
The prices aren't that bad when compared to other purchased solutions, like Adventure Trailers, or ARB drawers, and those two brands weigh A LOT more than the Goose Gear stuff.
Comparing a similar sized setup from Adventure Trailers, was almost the same price, but not made the same, and weighted more. The decision was easy! Added bonus is later being added to their team! I do all their wire work.

4RunAmok
New member
Ham Radio install is coming along. The TR pack is installed in the storage compartment in the back, the head and speaker will be mounted in the front somewhere. I'm thinking of making a custom hood bracket mount to hold the antenna. Design in progress.
Cellphone booster install started, low-profile antenna already installed.
Photos will follow shortly. Oddly, posting updates here keeps me excited to do the work and check things off my list.
Immediate items on my list/stuff I already have parts for are:
Shadyboy Awning
Puma Air compressor
Cell booster / ham radio
camping lights / rock lights
cellphone Ram X-mount and Panavise bracket
Just a short list, haha
Cellphone booster install started, low-profile antenna already installed.
Photos will follow shortly. Oddly, posting updates here keeps me excited to do the work and check things off my list.
Immediate items on my list/stuff I already have parts for are:
Shadyboy Awning
Puma Air compressor
Cell booster / ham radio
camping lights / rock lights
cellphone Ram X-mount and Panavise bracket
Just a short list, haha
Last edited:
SAC-CA-Runner
New member
Love this build. Definitely going to be looking into that rack, that tent, and that storage solution. Can they build one just like yours?  What ladder is that? Did it come with the tent?
Just need to get my darn Triumph restored first. Then the 4R gets the treatment!
What ladder is that? Did it come with the tent?Just need to get my darn Triumph restored first. Then the 4R gets the treatment!
4RunAmok
New member
Love this build. Definitely going to be looking into that rack, that tent, and that storage solution. Can they build one just like yours?
Just need to get my darn Triumph restored first. Then the 4R gets the treatment!
Sorry I haven't updated in awhile.
The ladder came with the tent, it's from CVT.
We can do custom boxes, but they wouldn't be exactly like this one, we don't build using that hardware anymore, its all better stronger stuff now, but it limits construction options. This one could be for sale for the right offer
I haven't updated in awhile, for a better idea what I'm up to and what she looks like lately, follow my instagram [MENTION=67786]4RunAmok[/MENTION]
SAC-CA-Runner
New member
Sorry I haven't updated in awhile.
The ladder came with the tent, it's from CVT.
We can do custom boxes, but they wouldn't be exactly like this one, we don't build using that hardware anymore, its all better stronger stuff now, but it limits construction options. This one could be for sale for the right offer
I haven't updated in awhile, for a better idea what I'm up to and what she looks like lately, follow my instagram [MENTION=67786]4RunAmok[/MENTION]
HAHA...no worries. My 4R has transformed since this post as well. Box system might have to wait for now. And I have a fridge so not sure it would fit on top with a slide.
4RunAmok
New member
HAHA...no worries. My 4R has transformed since this post as well. Box system might have to wait for now. And I have a fridge so not sure it would fit on top with a slide.
We make fridge slides/cabinets too
SAC-CA-Runner
New member
We make fridge slides/cabinets too
Oh I know. I've checked them out and see plenty on Jon Burtt's IG page. I go back to the S4 days with that guy.

Offcamber
New member
Well, you know there is a local guy who is interested when you are ready to sell. :thumb:This one could be for sale for the right offer

rickashay
New member
Awesome build and a surprisingly similar amount of components that I have on order for my 4th Gen Build. Great minds think alike 
I wish you guys were closer, I've got a couple really cool ideas for my storage platform but I do not have the skills needed to make them reality! haha
I wish you guys were closer, I've got a couple really cool ideas for my storage platform but I do not have the skills needed to make them reality! haha
4RunAmok
New member
Oh I know. I've checked them out and see plenty on Jon Burtt's IG page. I go back to the S4 days with that guy.
John Burtt is in town right now, camping with him tomorrow night in Anza Borrego with a few other Goose Gear folks.
therealmattryun
New member
First off, I love your build! Looks like a very well-built rig. My question is, how likely do you think the guys over at Goose Gear would be to build another drawer system like you built? I like that one a lot more than some of the others they offer.
4RunAmok
New member
First off, I love your build! Looks like a very well-built rig. My question is, how likely do you think the guys over at Goose Gear would be to build another drawer system like you built? I like that one a lot more than some of the others they offer.
No idea. I know this one was in the $1700 price range, and it's of the 1st Generation Variety. Their new drawers are much lighter and stronger.
But their new system makes it impossible to have a three drawer unit like mine.
4RunAmok
New member
Re-wire!
I'm about to start a complete removal of the existing auxiliary electrical in my 4Runner.
There are a number of reasons why, the primary one I can't reveal just yet, secondary reasons include; It was done a little hastily without foresight, new additions were 'added on top of' instead of 'included into' existing wiring. I'm not sure if that makes sense, but it didn't look as good as it could and should.
Being that I started a Mobile Wiring/Accessory installation compamy (http://www.adventurewired.com), my own vehicle should serve as an example of my work. And prior to this re-do, I've had to make excuses for how it looks, and it's time to correct that.
Additionally, I have plenty of projects that have been put off simply because when the existing system is not set up cleanly, correctly, and without malfunction, even adding a new accessory is a pain in the butt. It's time to correct that as well.
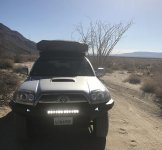
On the flipside, there are plenty of items I feel I did correctly, with the same care and concern I provide when I work on a customer's vehicle. Installs like my rack lights, lightbar, battery install (Not happy with the Artec mount, switching that to Pelfrey).
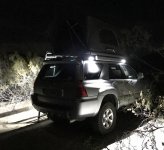
I'm really happy to finally get around to some projects that I purchased a long time ago but never installed because of the aforementioned reasons.
To begin this project will require the removal of the Switch Pros. There are a number of reasons why, but the primary reason is that it's a defective design. By that I mean it doesn't work the way the later models of the Switch Pros work, and upon being made aware of it, they chose to fix the issues in their next model, but nothing was done to address the issues in mine. Main key issue that makes it unusable is exiting the bluetooth app on the phone shuts down power to all outputs. In my case that meant using the app to turn on the camp lights (shown above) then turning them off and closing the app, and my fridge would lose power.
The second step will be the removal of all existing wiring/harnesses, and replacing them with harnesses that follow the same color-coding practices I use in my customer installs.
Once the wiring is completed, I'll be installing the new SPOD, and connecting the devices to that, as well as getting power to the constant powered devices.
I've partnered with a few pretty amazing companies, their products will make the installs cleaner and easier.
I'm about to start a complete removal of the existing auxiliary electrical in my 4Runner.
There are a number of reasons why, the primary one I can't reveal just yet, secondary reasons include; It was done a little hastily without foresight, new additions were 'added on top of' instead of 'included into' existing wiring. I'm not sure if that makes sense, but it didn't look as good as it could and should.
Being that I started a Mobile Wiring/Accessory installation compamy (http://www.adventurewired.com), my own vehicle should serve as an example of my work. And prior to this re-do, I've had to make excuses for how it looks, and it's time to correct that.
Additionally, I have plenty of projects that have been put off simply because when the existing system is not set up cleanly, correctly, and without malfunction, even adding a new accessory is a pain in the butt. It's time to correct that as well.
On the flipside, there are plenty of items I feel I did correctly, with the same care and concern I provide when I work on a customer's vehicle. Installs like my rack lights, lightbar, battery install (Not happy with the Artec mount, switching that to Pelfrey).
I'm really happy to finally get around to some projects that I purchased a long time ago but never installed because of the aforementioned reasons.
- Rock Lights
- Hatch Deck Lights
- Interior Charging Ports
- And more...
To begin this project will require the removal of the Switch Pros. There are a number of reasons why, but the primary reason is that it's a defective design. By that I mean it doesn't work the way the later models of the Switch Pros work, and upon being made aware of it, they chose to fix the issues in their next model, but nothing was done to address the issues in mine. Main key issue that makes it unusable is exiting the bluetooth app on the phone shuts down power to all outputs. In my case that meant using the app to turn on the camp lights (shown above) then turning them off and closing the app, and my fridge would lose power.
The second step will be the removal of all existing wiring/harnesses, and replacing them with harnesses that follow the same color-coding practices I use in my customer installs.
Once the wiring is completed, I'll be installing the new SPOD, and connecting the devices to that, as well as getting power to the constant powered devices.
I've partnered with a few pretty amazing companies, their products will make the installs cleaner and easier.
Attachments



Last edited:
4RunAmok
New member
It's been a crazy couple days...
It began with tearing out the wiring for every accessory in the truck...
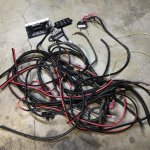
It left a lot of scrap wire! As well as the essentially useless Switch Pros.
Once that was out, the Ham Radio and Cell booster were removed to await placement in their new home in the front compartment of the Goose Gear drawer system. This was originally supposed to be a sort of hidden compartment to store a gun or two, but turns out the door is somewhat hard to open with the Fridge mounted in front of the drawer box, even with a decent gap between the two. So it will become home to those items.
Now that all the internal components have been removed, and the messy wiring out, it was time to start on getting some of the new stuff installed.
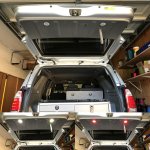
I chose to get to the Hatch lighting first, because it was a simple install that wasn't going to be part of the auxiliary electrical system. They are powered by a constant hot circuit in the factory harness within the hatch. The LED lights are from Lumitec, they're two color (White/Red), and came with a Police K9 Kennel kit that I used to install at my old job. I tapped the factory harness by crimping in a positive lead and a negative lead, put in a 5 amp inline fuse, and used a simple SPDT ON-OFF-ON switch allowing me to use one switch for both colors. It came out pretty good.
With that out of the way, it was time to move on to making the harnesses. There are two, one to go through the Driver firewall grommet, and the other to go through the Passenger firewall grommet.
Passenger Side Harness includes
Driver Side Harness includes
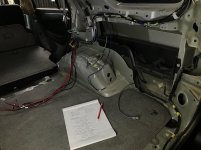
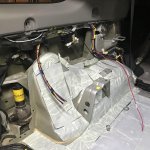
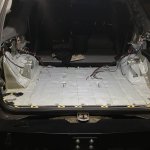
I also took the opportunity to lay down some sound absorbing material, Peel and Seal from Home Depot. Not the perfect stuff to use for this, but it's lighter than regular sound deadening material, goes on easier, and will do a "good enough" job for my liking.
It began with tearing out the wiring for every accessory in the truck...
- Right side and left side camp lights on the rack
- Cell Booster (Wilson Electronics 801201)
- Ham Radio (Yaesu 8800, for now, want FTM-100D)
- Water pump (Living Overland Scepter MWC kit)
- USB port
- fuse box that was in the rear storage compartment that provided power to the Fridge, Ham Radio, the water pump, cell booster, and a USB port
- Center console USB port
- Switch Pros
- Some miscellaneous underhood items
It left a lot of scrap wire! As well as the essentially useless Switch Pros.
Once that was out, the Ham Radio and Cell booster were removed to await placement in their new home in the front compartment of the Goose Gear drawer system. This was originally supposed to be a sort of hidden compartment to store a gun or two, but turns out the door is somewhat hard to open with the Fridge mounted in front of the drawer box, even with a decent gap between the two. So it will become home to those items.
Now that all the internal components have been removed, and the messy wiring out, it was time to start on getting some of the new stuff installed.
I chose to get to the Hatch lighting first, because it was a simple install that wasn't going to be part of the auxiliary electrical system. They are powered by a constant hot circuit in the factory harness within the hatch. The LED lights are from Lumitec, they're two color (White/Red), and came with a Police K9 Kennel kit that I used to install at my old job. I tapped the factory harness by crimping in a positive lead and a negative lead, put in a 5 amp inline fuse, and used a simple SPDT ON-OFF-ON switch allowing me to use one switch for both colors. It came out pretty good.
With that out of the way, it was time to move on to making the harnesses. There are two, one to go through the Driver firewall grommet, and the other to go through the Passenger firewall grommet.
Passenger Side Harness includes
- Center Console USB Port Power+Ground
- Ham Radio Power+Ground
- Cell Phone Booster Power+Ground
- Spare Power+Ground
- Water Pump Power+Ground
- USB Port Power+Ground
- Right Roof Rack Camp Light Power+Ground
- Left Roof Rack Camp Light Power+Ground
- CAT5 Cable for Rear SPOD Control Head (Not included with the SPOD)
Driver Side Harness includes
- SPOD Control Head Cable (CAT5, provided by SPOD)
- Dome Light Sense wire (will be talked about later)
- Fridge Power+Ground
- USB Port Power+Ground (x2)
- CLA (Cigarette Lighter Adapter) Power+Ground
- Spare Power+Ground
- Rear Four Rock Lights Power+Ground
I also took the opportunity to lay down some sound absorbing material, Peel and Seal from Home Depot. Not the perfect stuff to use for this, but it's lighter than regular sound deadening material, goes on easier, and will do a "good enough" job for my liking.
Attachments





Last edited:
4RunAmok
New member
Instead of running the power for the rock lights entirely under the vehicle, I chained the rear four lights together and came up through a grommet in the floor in the left corner of the 4Runner, and connected the + and - to the wire provided in the driver side harness. The front four lights are chained together the same way and will follow the factory harness to where the SPOD is mounted where they'll tie in with the rear power wires.
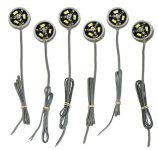
The Rock Lights I chose are made by Off Road Only, called LiteSPOT's. Their kit comes with 8 lights. I put four in the rear. Two of the four lights are mounted in front of the rear wheels, and the other two are mounted behind the rear wheels. I did the same in the front, giving complete light coverage underneath the 4Runner. These lights have a super strong magnet molded into them, which is cool if you need/want to move them around, but they also have a hole in the center for securing in place, and I chose to do that.
Photos of these will follow once they get tied to the SPOD.
The Rock Lights I chose are made by Off Road Only, called LiteSPOT's. Their kit comes with 8 lights. I put four in the rear. Two of the four lights are mounted in front of the rear wheels, and the other two are mounted behind the rear wheels. I did the same in the front, giving complete light coverage underneath the 4Runner. These lights have a super strong magnet molded into them, which is cool if you need/want to move them around, but they also have a hole in the center for securing in place, and I chose to do that.
Photos of these will follow once they get tied to the SPOD.
Attachments

Similar threads

- Replies
- 4
- Views
- 6K

- Replies
- 15
- Views
- 2K


