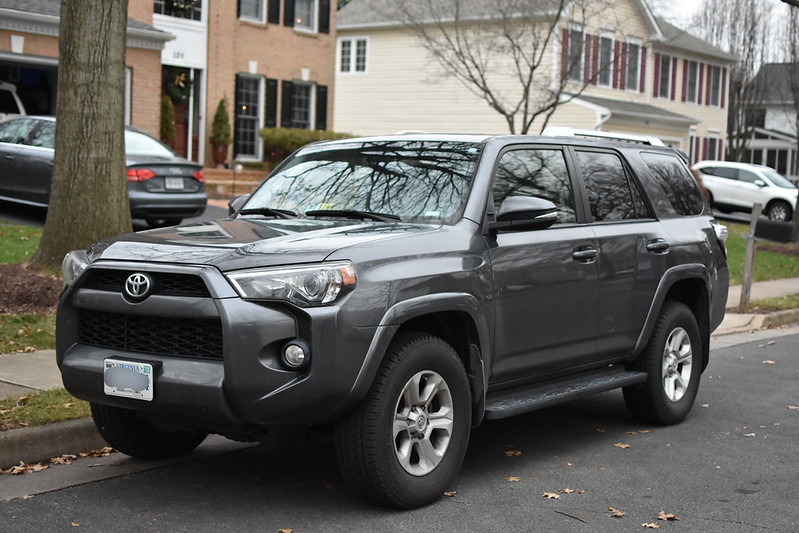
5th Gen Bumper cover issue (possible resolution)

So, I am actually having the exact same problem on mine. I was in an accident last year where a guy clipped my front end. Bumper was repainted... Didn't have problems until 6 months later. Now it looks like [MENTION=116305]Tisoy281[/MENTION] bumper pic...

I am going to be changing out my old light bar this week. So, I will take pics then.

That blows. My new bumper is slowly, but surely, getting back to the way the old bumper was. I'm going to take it back to Toyota before my 12 months is up on the certified pre-owned for sure and have them make it right. Might be a good opportunity to look at an aftermarket bumper... LOL
 
I have a 2016 sr5P and have been having this issue since I purchased it in Feb. as a certified used. I have been to the dealer 3 times now to get this issue resolved. The first time I think all they did was pop it back in place. The second time they said they removed the whole bumper and reset it. Low and behold it popped back out within a month. On the last visit they accused me of being in an accident and trying to make them fix it. Lucky for me I took pictures of the imperfections (bumper had been repainted all ready and scratch on headlight housing) with the window stickers on the runner before i purchased it!!! I proved them wrong and they agreed to replace the whole bumper cover and all associated hardware. I drove it home from the dealer and the runner sat for a week. I drove it 3 miles to work, and now the other side is popped out!!! I'm so sick of dealing with this. I called the dealer and got no response so I called and filed a claim with Toyota. Now they want me to bring it back again!!! I should have just bought a brand new one, but I got a great deal, now I know why. I just hope they can fix it this time if not I guess I'll try the lemon law route.
 
New won't help......they didn't design the retention anywhere near strong enough. Same set-up as a Civic but on an off-road truck....it needs mechanical retention and it has tiny little 'fingers'' that just won't allow for mis-alignment at all. I am tempted to just put a screw in it!
 
I have this issue and since I live a long way from a dealer I ended up trying to mitigate this issue best I could.

I realize this will be laughed at, sneered at, poked-fun of. Yes its kind of chicken shit especially for a 45k vehicle.

However there isn't an easy solution. The bumper cover and bracket will have to be redesigned. For folks who aren't master fabricators with tig machines, water jets, sheet metal benders, etc...this method can offer some help.

If you are a few miles from a dealer or dealers you are probably best working with them. However if you are frustrated with the progress, and don't want a crappy dealer paint job, this could help you as well.

Apologies for no pictures but I was in a huge hurry to get into this.

Here is what I am finding as the cause of this:

#1. The bumper cover has the smallest, paltry, "nubs" that snap into a larger bracket. These things would not hold the weight of a fly much less road force, vibration, and air flow.

#2. The bumper cover bracket issue 1...this part bolts to the head light and the quarter panel sheet metal. This thing flexes like crazy. not rigid at all.

The mounting bolt hole for the headlight is sandwiched between a sheet metal bracket and the bumper cover bracket. the bracket easily pops in and out of this position.

This creates the phenomenon where you can push on the corner of the bumper cover where it pops out of position and it snaps into place.

What is happening is-- the pushing force snaps the bracket back into its position inside the sheet metal.

#3. Bumper cover bracket issue #2. The bracket's mechanism that holds onto the "nubs" of the bumper cover are huge relative to the bumper cover nubs and won't hold anything.

The rest of the snap-in mechanism along the bumper cover to bumper cover bracket are very strong.

This area is way way under designed.

Repair attempt

I wanted to stiffen the bracket. I also needed to add to the retention of the bracket and bumper cover at the corners.

There isn't much to work with.

Overall: I used zip ties to increase stiffness of the bracket. I used black #11 zip ties. Its just what I had laying around.

To increase retention of the bracket and bumper cover: I squeezed copious amounts of grey rtv into the bracket area that corresponds to the bumper cover corner. Basically right where these two components snap together.

I add additional RTV to the backside of this joint. The sheet metal creates a small trough that I somewhat filled up.

This should dry and create additional surface area for the bracket and bumper cover to hold together.

For both sides, I used about 75% of a tube of silicone...


Steps

Overall--take out headlights, un snap from bumper cover from near the wheel well mounting area.

take off pins for radiator cover. I used a mechanics pick.

Take off the 'Toyota emblem' bumper component.
Used a flat tip screw driver to pry off pins. There are two small 10mm bolts near the latch. 1 upper 1 lower. The lower is a machine screw for some reason.

Once these are out the assembly pulls out of position directly towards front of vehicle. A little tugging un snaps the remaining retention.

Take off headlight.

Un bolt 2 visible bolts. There is a hidden bolt under the small cover that runs along the top of the quarter panel mounting from front of vehicle to back.

There is another hidden bolt in the bumper cover bracket. Its accessible when the cover is pried off.

Un plug the head light white connector and black connector.

Un snap and un bolt bumper cover near corners.

take off 5 wheel well bolts that are on the outer edges of the wheel well. The bolt that holds the bumper cover is different from the others. make note of this.

The bumper cover corner pulls off by prying it away from the bracket that is behind it. the best way to do this is to pull the area near its bolt hole out radially towards the tire. Then pull it out towards you. The rest unsnaps easily.

Finish removing headlight.

Take out the front most bolt for the head light.

Fish the headlight out of position and lay aside. The turn signal connectors have extra length to allow to move headlight out of way.

Bracket stiffening

Drill a small hole about 1/2" above headlight bolt. Make the hole about slightly less than the size of the zip tie.

Locate another hole down from the headlight bolt. Its down and slightly to left or right (drivers vs passenger's side).

strap the lower hole to bottom sheet metal using 1 zip tie. Make sure the buckle of the zip tie is not going to impede installation of headlight or bumper cover.

Then using your best judgement and zip tie McGuivering, utilize the drilled hole and zip ties to strap the upper bracket to the sheet metal.

I combined two zip ties and wrapped them around the sheet metal and pulled them tight.

it takes finesse because there isn't a natural anchoring point.

Once the zip ties are on firmly move on to the silicone.

Improved retention for bumper cover.

Get the RTV ready. Also have shop towels handy.

Locate the area on the bracket where the cover snaps into position at the corner. Its the upper 1.5-2" of the bracket.

Wipe off any major dirt and debris.

squeeze RTV into the bracket. I essentially "filled" up the bracket 'female' areas that correspond to the cover's retention nubs.

I then squeeze a large amount into the trough that is visible from the headlight space...its formed between the sheet metal and bracket.

I then applied a small amount to the bumper cover area where the corners snap into bracket. I applied it to the "top" and ' bottom" underside. Ai applied enough that I could barely see the nubs.

The goal here is that when it dries, it will create additional retention for the cover without gluing it.

Reassembly

Important!

1. Resintall the head light and remember the lower bolt. Do this while the RTV is drying.

Snap cover back into place.

Bolt up wheel well

Wipe off any excess RTV.

Reinstall everything else.

Important: I put a small ladder leaning on the front bumper cover corner while RTV was drying. I used a wad of shop rags to avoid scratching the paint. I let it sit for several hours while it dried. This is to help position the cover while the rtv dries.

I noticed that the cover would still pull out of position while drying.

Once it was dry it felt very very solid and there was no squishy motion like before.

I haven't road tested yet. I'll update more later.

 
Last edited:
Mine had this issue on the driver's side.

You can see it in this pic I took shortly after buying the truck:

43958331655_9cc799f2f4_c.jpg


I removed the bumper to install light bar behind grille, thought when I put the bumper back on I could resolve it. It didn't work so what I did was take a ~3 inch piece of 3m double sided tape and put it on the black bracket behind bumper, then when I installed the bumped I pressed it in on that spot and it fits flush now.

34176d1286829667-headlight-assembly-removal-picture-031.jpg


I stole this pic from someone else's thread to show the bracket.

Now whenever I remove the bumper (don't know why I would anymore) I will just use a new piece of 3m tape.
 
update: at about 2800 miles no issues. Drove down many rough roads. I did some adventuring in Northern Az. No issues. This includes a trip up the ridiculously washed out Schnebly hill in Sedona.
 
I have a 2018 Ltd 4Runner with the same problem with the front bumper popping out. In my case Toyota's solution is to epoxy it. Anyone else have this result from Toyota?
 
Last edited:
2018 limited. My driver side has had this issue since delivery. I pop it back in every so often. Good to know I am not the only one.
 
This is crazy! I thought this was only me, but the drivers side front bumper does the exact same thing. Weird.
 
2018 Limited 4Runner

I bought a brand new 4 Runner Limited Edition. Both side popping weeks after purchasing it. Till this day problem hasn’t been fix.
 
2019 Limited here. Manufactured 11/2018 purchased in March of this year. 7800 miles so far and just this week noticed same on mine of drivers side front corner only so far. Passenger side is good and secure. Can click the corner back in only to have it pop out again after driving or after the vehicle sits in the sun. As if the heat causes it to expand and give way. Next maintenance visit to dealer around November. Not going to make a 40 min trip to dealer just for this issue alone but will have it addressed then. Irritating for a $45k vehicle have this issue. Have read multiple posts from people who have experienced same issue. 2014’s and up. Some say Toyota is aware and admits of fault while others say they deny knowledge or issue. I’m about to find out myself.
 
Fixed

I have an ’18 Limited which had the same issue on both sides (never had a hint of this with the ’14 Limited). There were several trips to the dealer so that a Toyota engineer (FTS) could examine it. Based on my many trips to the dealer for this and the experience of others who have the same issue, Toyota has manufactured new, improved brackets for the front bumper. Initially they had them for one side only, which temporarily cured it, but then it popped out again. Then they made the one for the other side, which lasted a few days after installation (both sides out again). On this last trip, I was told that the FTS found some adjustability in the brackets. Since this repair, the corners have been locked in for 4 weeks, thru many miles and some significant temperature swings. This winter will be the true indicator as to whether it is a permanent fix. My only suggestion would be to insist on the new brackets and continue to follow up with your service manager until they get it right. It was an utterly frustrating experience, but worth the effort as it stands now.
 
My bumper does this on the passenger side. The problem showed up after I removed the bumper for the first time. Annoying, but I haven’t been able to fix the issue thus far. May try the 3m tape on the headlight bracket if I remove the bumper again.
 
As I have posted before, my 2016 Limited has it's bumper cover coming off in the corners. Started almost immediately from time of purchase.

I have been told that a New part (bumper cover) has been engineered addressing this issue. As of March 16, 2017.

Will let everyone know how the "repair" goes...
Same problems here,on both sides...2019 4 runner limited nightshade edition...My runner is now in body shop for second time for brand new front bumper, waited over a month for Toyota decision...First time they replaced some brackets and nothing...this is design flaw,i suspect...
 
Same problems here,on both sides...2019 4 runner limited nightshade edition...My runner is now in body shop for second time for brand new front bumper, waited over a month for Toyota decision...First time they replaced some brackets and nothing...this is design flaw,i suspect...
Just quick update: I picked up my Runner today after full 9 days in shop... Toyota regional rep.was there assisting for installation of brand new bumper...I drove home 5 miles,and guess what,same think, both sides are popping out...I called and have scheduled new appointment... Seriously...
 
2019 Limited Nightshade here with the issue

I bought the Limited a week ago and noticed the corners popping out when detailing it this weekend. Already had service scheduled for some scratches on the hood that were there before I drove off the lot. Mentioned this to the service tech, she spoke with her manager and he said they would look at it but the issue is that there is no bracket in that area that would hold the corners in... Trying not to rage at the moment (sitting in the service area VIP room).
 
I've had the back bumper pop out a bit, but that happened because I ran over a large stick in the middle of the road..never noticed anything out of place on the front, but this thread has me curious..
 
I have a 2017 Limited and I noticed the bumper issue over a year ago. Immediately brought it to the dealerships attention because I was still in warranty. After several months of them working with an "official" Toyota rep, I got approved to have new bumper clips installed. Held nice and tight until I drove it 2 miles to the grocery store and they popped out. Called them back from the grocery store parking lot. I have now been on their tail for months, and yesterday they finally came to the conclusion that they are going to epoxy underneath. It's super annoying to have a vehicle that costs this much and have to deal with this. I know it's supposed to be off road and all that, but I don't expect my bumper cover to be popping out from driving it to the grocery.
 

Members online

Forum statistics

Threads
278,309
Messages
3,554,075
Members
248,016
Latest member
Advally Service

Trending content

Back
Top