5th Gen Sliding cargo tray Install - Pics/Steps

I'm located in Denver but willing to drive a bit to meet with someone selling their sliding cargo tray. I can consider shipping, depending on how much it will be, thanks!
I'm in Thornton and will have my complete sliding tray for sale either this weekend or next weekend if I can finish my other projects. Its coming out of a 2011 trail.
 
I am in Longmont, CO and I'm interested in purchasing a tray from someone if any are available.


I just purchased a 2021 TRD Off road and hope to do a lot of car camping at trailheads. Figured I would try this route before going the platform route.
 
I am in Longmont, CO and I'm interested in purchasing a tray from someone if any are available.


I just purchased a 2021 TRD Off road and hope to do a lot of car camping at trailheads. Figured I would try this route before going the platform route.

Apparently they are very hard to find, it sucks that Toyota doesn't sell those separately.

I ended up building my own platform.
 
Apparently they are very hard to find, it sucks that Toyota doesn't sell those separately.

I ended up building my own platform.

Yeah the dealer couldn't find a single 2021 in the country with the tray already installed. I don't get why they screw up the level of the cargo area for an item that they don't even put in to the vehicles. And there's no option to add it via the dealership. Makes no sense to me.
 
3rd Row Question

Just managed to pick up a tray set-up to swap out my 3rd row. I was able to remove the third row and realized that I do not have tie down mounting points for the storage box. These guys:

237691d1486321760-5th-gen-sliding-cargo-tray-install-pics-steps-102-jpg


Does anyone know if this is a drill through the sheet metal situation? Are there weld on washers under the body? With removing the seats, I actually already have this hole:

238782d1486910457-5th-gen-sliding-cargo-tray-install-pics-steps-114-jpg


I'd much rather drill two template holes than 4 flying blind. Anyone have any experience here?
 
Looking for tray to buy/swap

I just purchased a new 21 venture edition. Would love to get a slide out tray. Interested in purchase/swap. Anyone have a whole setup that wants standard floor or just wants to sell. I'm interested!
 
Just tried installing my sliding cargo tray the other day. Drilling was a pain. I managed to damage the threads in the bolt holes. Any idea on how I can fix this? Should I get a tap and die set to fix the threads?


Sent from my iPhone using Tapatalk

So.. I damaged my threads as well. The sub-assembly holes didn't line up perfectly with the threaded holes underneath the sheet metal. Even using small drill bits I managed to instantly damage the threads.

How did you solve this? I imagine the right way to do it is to use a tap of the correct size, but I'm not sure what that size would be. The bolt on the Toyota website doesn't mention the size. Does anyone know how to figure out what tap to use for a bolt of unknown dimensions?
 
Last edited:
2021 swap to sliding cargo tray

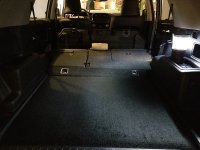
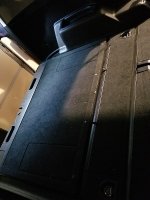
Thank you so much for making this guide! I bought all of the cargo tray parts from [MENTION=422636]JeuTheIdit[/MENTION] and [MENTION=636690]cjalexander[/MENTION] installed it for me over the weekend.

The whole process took less than 2 hours. Carefully drilling to expose the mounting points was the most time consuming step.

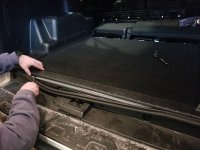
I thought I would point out one small difference we noticed for my 2021. The trim piece you lift to unclip the carpet cannot be fully removed, it is a one piece construction with the side hatch trim. cjalexander was still able to access the clips fairly easily. A picture is included.
 

Attachments

  • 20210228 1 before resized 600.jpg
    20210228 1 before resized 600.jpg
    99.6 KB · Views: 679
  • 20210228 5 trim resized 600.jpg
    20210228 5 trim resized 600.jpg
    102.1 KB · Views: 724
  • 20210228 25 finished tray resized 600.jpg
    20210228 25 finished tray resized 600.jpg
    97.6 KB · Views: 715
  • 20210228 26 tray dogs resized 600.jpg
    20210228 26 tray dogs resized 600.jpg
    100.6 KB · Views: 649
Thank you so much for making this guide! I bought all of the cargo tray parts from [MENTION=422636]JeuTheIdit[/MENTION] and [MENTION=636690]cjalexander[/MENTION] installed it for me over the weekend.

The whole process took less than 2 hours. Carefully drilling to expose the mounting points was the most time consuming step.

I thought I would point out one small difference we noticed for my 2021. The trim piece you lift to unclip the carpet cannot be fully removed, it is a one piece construction with the side hatch trim. cjalexander was still able to access the clips fairly easily. A picture is included.

Thanks for getting it out of my garage :laugh:

Looks great, and again glad the install went smoothly! Beautiful dogos also.
 
Do you have a full parts list and $?

I really want to do this since my wife and i are expecting another kiddo and she's taking over truck for safety reasons :preggers:


Thank you so much for making this guide! I bought all of the cargo tray parts from [MENTION=422636]JeuTheIdit[/MENTION] and [MENTION=636690]cjalexander[/MENTION] installed it for me over the weekend.

The whole process took less than 2 hours. Carefully drilling to expose the mounting points was the most time consuming step.

I thought I would point out one small difference we noticed for my 2021. The trim piece you lift to unclip the carpet cannot be fully removed, it is a one piece construction with the side hatch trim. cjalexander was still able to access the clips fairly easily. A picture is included.
 
Do you have a full parts list and $?

I really want to do this since my wife and i are expecting another kiddo and she's taking over truck for safety reasons :preggers:

[MENTION=636690]cjalexander[/MENTION] looked into buying all of the parts from Toyota and it is very expensive to go that route. I think the parts add up to at least $1000, someone can correct me on that. Your best bet is to buy one from someone who took theirs out, preferably someone who lives in your area. JeuTheIdit and I were able to work out shipping, but that can be very expensive as well (full price shipping from MN to IN would have been over $300). If you really want to buy all of the parts there might already be a list on the forum somewhere or maybe cjalexander can post the links.

ETA: I just found an old post with the parts from user NuclearN8 in 2016
Sliding Rear Deck Parts
Underneath the Visible Portion | Camelback Toyota Parts
58400-35010 Rail Sub-Assy, Floor Side, Inner 268.49
5845635010 Sliding Assy Mounting Bracket Right 22.28
5845735010 Sliding Assy Mounting Bracket Left 23
5824960020 Sliding Assy Support Bracket Right 12.94
5824960020 Sliding Assy Support Bracket Left 12.94
Visible Portion | Camelback Toyota Parts
5857035160C1 Sliding Deck Carpet 208.15
5841035020C2 Board Assy, Deck 690.03
5870335010C2 Sliding Deck Side Cover Right 56.65
5870435010C2 Sliding Deck Side Cover Left 56.65
Part in front of deck | Camelback Toyota Parts
5848035040C2 Floor Cover in front of deck 267.94
6472235010C0 Cover Plate with hook Left 28.32 optional
6472235010C0 Cover Plate with hook Right 28.32 optional

$1675.71

 
Last edited:
Well, I also managed to jack up the threads on one of my nuts so here I am....

Ugh. As another poster pointed out, the "pilot holes" on the sub-frame DO NOT necessarily line up with where the actual bolts are located underneath the body. Even though I drilled a very small bit directly into the middle of the hole on the sub-frame assembly, the drill bit immediately made contact with the nut's threads below and messed it up. My stubborn ass didn't stop there and kept trying to work with it.. but what I eventually determined is.. who the heck CAN do this without damaging the holes? I haven't tried to drill the other hole out yet, so advice is much appreciated!! The issue for me is that the threaded nut is just below the metal, so how in the heck do you manage to get a large enough drill bit in there, and all the way down through the nut below, without damaging the threads? My drill consistently "grabs" some metal which jams the bit and torques the angle.. at which point it immediately cuts into the threads below the body metal. There is such a small distance between the body metal and the threaded nut below, I cannot seem to drill the body metal at all without contacting the nuts threads.

And now, thoughts on fixing my ruined nut? The one I damaged is on the driver's side. I am REALLY hoping that I can access that nut from below if I remove my spare tire.. and if so the plan is to start a tap from that end and run it "up" through the nut, hopefully re-cutting the appropriate threads.

TIA for any advice... Cheers
 
Last edited:
Do you have a full parts list and $?

ETA: I just found an old post with the parts from user NuclearN8 in 2016
Sliding Rear Deck Parts
Underneath the Visible Portion | Camelback Toyota Parts
58400-35010 Rail Sub-Assy, Floor Side, Inner 268.49
5845635010 Sliding Assy Mounting Bracket Right 22.28
5845735010 Sliding Assy Mounting Bracket Left 23
5824960020 Sliding Assy Support Bracket Right 12.94
5824960020 Sliding Assy Support Bracket Left 12.94
Visible Portion | Camelback Toyota Parts
5857035160C1 Sliding Deck Carpet 208.15
5841035020C2 Board Assy, Deck 690.03
5870335010C2 Sliding Deck Side Cover Right 56.65
5870435010C2 Sliding Deck Side Cover Left 56.65
Part in front of deck | Camelback Toyota Parts
5848035040C2 Floor Cover in front of deck 267.94
6472235010C0 Cover Plate with hook Left 28.32 optional
6472235010C0 Cover Plate with hook Right 28.32 optional

$1675.71

That is the full parts list for the swap. Like hsteidinger said, it would definitely be worth it to try and find one from someone who doesn't want theirs anymore. Still baffles me that such an easy install is only available as a factory option (and not w/ KDSS!) They do seem to pop up from time to time on the forum for sale.
 
^ I dunno man. I've done many DIY installs on cars.. suspension, transmissions, motor swaps, etc. Drilling into those nuts without damaging them is no joke very difficult I think. I feel like they must have a special tool and or process that they use when installing these at the factory. Since you say it's an easy job, any tips for the drilling? Yes, every other aspect of the install is very easy.. but the drilling is pretty big, and for me, seemingly impossible! One idea I have, that I will try for my other drill hole, is to place a bolt into the nut from below and thread it fully until it contacts the body, then back it out just a smidge and leave it there so that the drill is unable to easily penetrate into where the nut and threads are. Hopefully "running into" that bolt below will keep the drill bit from torquing into the threads below.
 
Last edited:
^ I dunno man. I've done many DIY installs on cars.. suspension, transmissions, motor swaps, etc. Drilling into those nuts without damaging them is no joke very difficult I think. I feel like they must have a special tool and or process that they use when installing these at the factory. Since you say it's an easy job, any tips for the drilling? Yes, every other aspect of the install is very easy.. but the drilling is pretty big, and for me, seemingly impossible! One idea I have, that I will try for my other drill hole, is to place a bolt into the nut from below and thread it fully until it contacts the body, then back it out just a smidge and leave it there so that the drill is unable to easily penetrate into where the nut and threads are. Hopefully "running into" that bolt below will keep the drill bit from torquing into the threads below.

Yea, it's probably done by some special robot arm drill or something.
I like your idea of a bolt stop. After drilling the pilot hole, I switched to a bigger bit and got too much torque bite, so I backed down on the bit size to wallow it out. I did wish I had a grinder bit for the Dremel, I definitely would have used that instead.

I guess my tips would be to use some sort of small grinder wheel like a Dremel if you have it. Otherwise, using a smaller drill bit to grind around the edges of your hole while holding the drill so it doesn't reach down into the threads. Your bolt from below will definitely help with that aspect.
 
Last edited:

Members online

Forum statistics

Threads
278,312
Messages
3,554,089
Members
248,016
Latest member
Advally Service

Trending content

Back
Top