
You are using an out of date browser. It may not display this or other websites correctly.
You should upgrade or use an alternative browser.
You should upgrade or use an alternative browser.
98 SR5 - The "Dirt Duster" build
- Thread starter rickashay
- Start date


rickashay
New member
Hahaha I like all the feedback, thanks guys!
I could get the rig painted this year if I wanted, but spending more than half the price of the whole truck itself on paint, is ludicrous. It's probably way cheaper to get a quality paint job in the states, like everything else, but my quoted price of $7-$10,000 is rediculous - especially on ANY kind of truck. Now if this was my show car or something, that's a different story.
Yah, the paint is really bad. And it's black. You've all seen the trails I normally run on, it isn't like down south where you have so many 4x4 trails that are maintained for trucks. Most of my local stuff is quad trails, and I'm scrubbing branches down the side of the vehicle on a regular basis. Not saying there isn't this stuff down south but our 4x4'ing is not as sanctioned, organized, or as open up here in Canada and there are barely any 4x4 specific trails. Meaning most of them are tight as hell goat trails. Vinyl would work, but again, one snag from a branch and it's going to start peeling.
I hate the LX cladding. It's going, regardless. Even if I left the paint alone, there is going to need to be some kind of cover-up to cover those holes from the cladding and that $7-10K paint job isnt it. I'd way rather spend that paint money on say.... 37's, air lockers, gears, armor, etc. Hell I can even swap in a 2UZ for the price of a paint job!
No, the 80 isn't a buggy, and would take a ton of cutting to make it a "hardcore" trail rig. However, I do expect it to be more capable than how MY 4Runner was set up. Even on the Desert Dune 4Runner, I would labor for hours on the paint to try it keeping even half decent. This time around, I'm going more for function than form. It's not a buggy, like I said, but it is my dedicated trail/adventure rig. However you want to define that....
Thanks for the input guys, but the LX is getting textured! HA eep:
eep:
I can't wait until I make it look so badass, that you all start lining your 4Runners! hahaha
I could get the rig painted this year if I wanted, but spending more than half the price of the whole truck itself on paint, is ludicrous. It's probably way cheaper to get a quality paint job in the states, like everything else, but my quoted price of $7-$10,000 is rediculous - especially on ANY kind of truck. Now if this was my show car or something, that's a different story.
Yah, the paint is really bad. And it's black. You've all seen the trails I normally run on, it isn't like down south where you have so many 4x4 trails that are maintained for trucks. Most of my local stuff is quad trails, and I'm scrubbing branches down the side of the vehicle on a regular basis. Not saying there isn't this stuff down south but our 4x4'ing is not as sanctioned, organized, or as open up here in Canada and there are barely any 4x4 specific trails. Meaning most of them are tight as hell goat trails. Vinyl would work, but again, one snag from a branch and it's going to start peeling.
I hate the LX cladding. It's going, regardless. Even if I left the paint alone, there is going to need to be some kind of cover-up to cover those holes from the cladding and that $7-10K paint job isnt it. I'd way rather spend that paint money on say.... 37's, air lockers, gears, armor, etc. Hell I can even swap in a 2UZ for the price of a paint job!
No, the 80 isn't a buggy, and would take a ton of cutting to make it a "hardcore" trail rig. However, I do expect it to be more capable than how MY 4Runner was set up. Even on the Desert Dune 4Runner, I would labor for hours on the paint to try it keeping even half decent. This time around, I'm going more for function than form. It's not a buggy, like I said, but it is my dedicated trail/adventure rig. However you want to define that....
Thanks for the input guys, but the LX is getting textured! HA
eep:I can't wait until I make it look so badass, that you all start lining your 4Runners! hahaha
rickashay
New member
Don't do it! This thing needs to be clean! just like your 3rd gen. Bedliner is not clean... you can't polish it. It sucks for anything but a trail only rig.
My advice is leave the paint as it is and save up for a decent paint job. In 3 years or so, you could easily get your dream paint job.
Oh, and Connor, my dream paint job on my truck is one that I don't have to polish! haha

xdannyschuetzx
New member
dang man! so sick. forsure when of the better looking runners on here!

4Running Daily
New member
Oh, and Connor, my dream paint job on my truck is one that I don't have to polish! haha
Drive down to SoCal, get a decent paint job for $3000 and call it a day

TCMach
New member
Oh, and Connor, my dream paint job on my truck is one that I don't have to polish! haha
This right here is awesome. I for one love the idea. If I had a trail only/adventure rig it would be covered in bedliner. Oh and you know you want big tires. How about some 375/65r16 MTZs? Could be a little wide but I'm a sucker for a fat tire.

fightman80
New member
Just checked in...... the "Tom Cruiser" looks good man! Sounds like you have some great plans for this thing!
As for the cladding... I'd leave it.... but that's just me. At the very least, I'd leave the flares on.... protect those body panels a little, from road rash.
Definitely run the 37's..... it will look bad ass with that setup! There's a guy here locally who had an 80 Series... ran that size with some black rockcrawler steelies... looked pretty sweet man!
As for the cladding... I'd leave it.... but that's just me. At the very least, I'd leave the flares on.... protect those body panels a little, from road rash.
Definitely run the 37's..... it will look bad ass with that setup! There's a guy here locally who had an 80 Series... ran that size with some black rockcrawler steelies... looked pretty sweet man!
rickashay
New member
This right here is awesome. I for one love the idea. If I had a trail only/adventure rig it would be covered in bedliner. Oh and you know you want big tires. How about some 375/65r16 MTZs? Could be a little wide but I'm a sucker for a fat tire.
Yah those are sweet but I just wish they were taller!! Badass tire though.
Just checked in...... the "Tom Cruiser" looks good man! Sounds like you have some great plans for this thing!
As for the cladding... I'd leave it.... but that's just me. At the very least, I'd leave the flares on.... protect those body panels a little, from road rash.
Definitely run the 37's..... it will look bad ass with that setup! There's a guy here locally who had an 80 Series... ran that size with some black rockcrawler steelies... looked pretty sweet man!
Thanks for stopping by! Yah the flares and cladding are gone, I'm past the point of no return, it's headed to the welder on Saturday. The lineX will protect it from any road rash I might get from having lack-of-flares. Going against the grain on this one! haha
I'm almost positive I'm going with 315/75/16 MT/R Kevlars as they are a "true" 35. I plan on going 37's at some point but I have way to many other things to tackle first... I cant afford to re-gear right now with all the other stuff that needs sorting out to make it trail worthy. 37's will have to wait until next time, and by then, I'll be re-geared and ready for them.
Update
Not anything big and crazy yet... still tyring to sort out some of the smaller details with a complete lack of time off of work to accomodate.
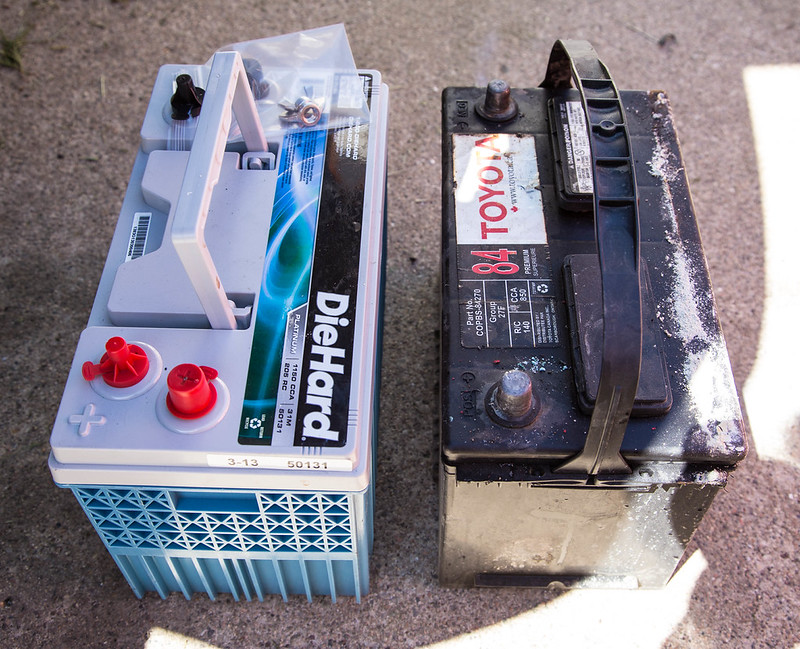
My girlfriend was down in Spokane a couple weeks ago shopping, and it just so happened that Sears had a battery sale going on. I ordered one online and had my gf "import" the box of electrons and deliver it to my door. I opted for the Group 31 as I don't plan on running duals.
Old vs. New
20120629-IMG_1656.jpg by RickaShay24, on Flickr
Instead of trimming the fins on the battery itself, I trimmed a small corner of the battery box:
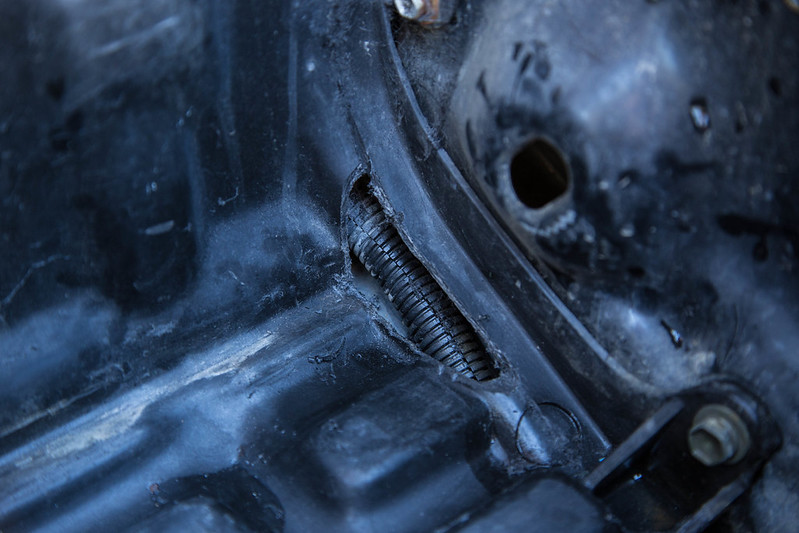
20120629-IMG_1658.jpg by RickaShay24, on Flickr
With the above modification, I used the factory (or at least the PO's) J-screws and a piece of "L-channel" I had lying around. I plan on removing the factory battery box in the near future and having a real battery box fabbed up.
New home in the engine bay:
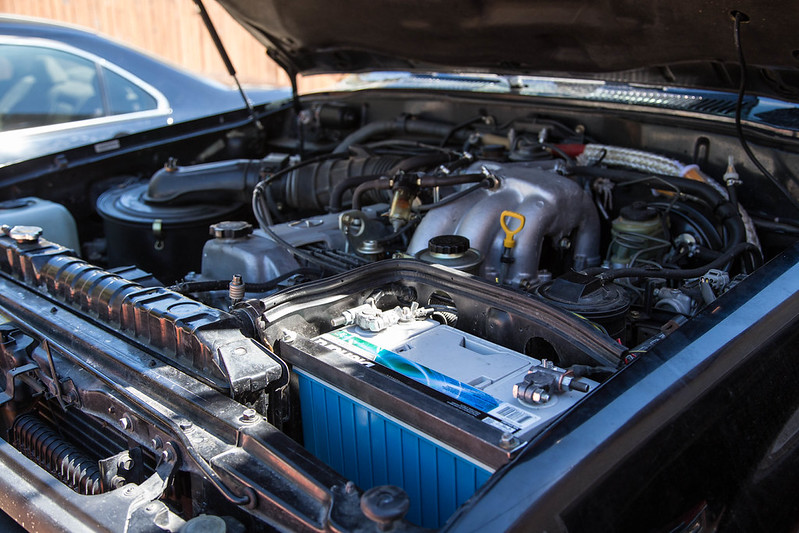
20120629-IMG_1661.jpg by RickaShay24, on Flickr
I pulled the skid plates and sliders off, and finished removing all of the lower cladding. Truck is headed to the welder next week to have the holes filled and should be LineX'd by the end of the month.
rickashay
New member
As promised in [MENTION=12063]SCRunner[/MENTION]'s thread:
I want everyone to know the significance of this post, seriously.

Alright Addison, open WIIIIIIIIDE, because I'm going to spoon feed you some info.
Earlier this week, I was considering buying a S/C I found on my local Craigslist, so I had to do all of this research to figure out whether or not it was worth my money/time. If you're curious, here's the ad for the S/C I was looking at:
1996-2004 Toyota Tacoma Supercharger
I drove an hour each way to check it out and found it was missing some hard to find parts, and needed a thorough re-build before I would even consider running it on of my own vehicles. I offered the guy $450 and he passed on the offer.
Before you consider moving forward, I would recommend that you start by reading the installation manual for the S/C, which is available for download here:
Tech Knowledgebase - Installation Manual for TRD 3.4L V6 Supercharger
Familiarize yourself with the process, and study the parts list. It will reveal everything that you need to install the S/C, and help you to ask the right questions as you try to figure out whether or not it's worth an 8 hour drive.
Now let's dig into that parts list a little bit. I've copied the ESSENTIAL items that you will need below:
Parts List:
1 Supercharger
1 Supercharger Belt
1 Gasket, 3.4 S/C (Between Factory Throttle Body and TRD Supercharger)
1 Template for cutting timing belt cover (Link to a copy of the template > https://docs.google.com/file/d/0ByJ...MxYy00OWQ2LTk4NTAtMTlkZmE2YzI3YWRk/edit?pli=1 )
Dynamic Tensioner
1 Assembly, Tensioner Plate and Pully (dynamic tensioner & mounting bracket)
1 Bolt, 10 x 1.25 x 70mm Flat Head (Used to attach the tensioner bracket)
1 Bolt, 10 x 1.25 x 135mm Hex Head (Used to attach the tensioner & bracket)
1 Washer, 10mm Flat bolt
1 Wire Loom Relocation Bracket
1 Dipstick Relocation Bracket
1 6 X 1.0 X 12mm Bolt, Flange Head (for dipstick relocation bracket)
1 6mm Flat Washer (for dipstick relocation bracket)
Hose, Connector and Hardware Kit
1 1/8” Vacuum Plug 2001 and newer Tacoma only w/Drive by wire throttle body
1 3/8” Vacuum Plug Intake Silencer Plug
1 Vacuum Hose – ½” X 34” long Connects Air Tube to Cam cover
1 Vacuum Hose - 3mm x 9" long Connects Vacuum Throttle Opener to Intake Manifold
1 Vacuum Hose - 3mm x 5" long Connects Vacuum Throttle Opener to Intake Manifold
2 Hose Clips, Black Plastic Retains Evaporative Canister Hose to Throttle Cable
1 Vacuum Adaptor Tee- 4WD only See Hose Routing Schematic Figure B
1 Valve, IAC Check, Installed near IAC Valve
1 Spacer, Manifold Support Bracket, Installed between manifold & factory support bracket, driver side
1 Bolt, 8 X 1.25 X 35mm Flange Head, Used to Secure factory support bracket thru spacer to S/C Manifold
1 Bolt, Hex, 8 x 1.25 x 170 w/10mm Wrench Flat, Installed through the top of supercharger to the Factory manifold
4 Socket Head Cap Screws, 8 x 1.25 x 65mm Attaches Throttle Body to TRD S/C Manifold
4 Washer, 8mm Flat 1 per Socket Head Cap Screw Used to attach Throttle Body to TRD S/C Manifold
1 Bracket, Accelerator and Transmission Cable Used on all applications except 4WD, Manual-Transmission Tacoma
1 Bracket, Accelerator Cable 4WD MT Tacoma Only Used on 4WD, Manual-Transmission Tacoma only
1 Bracket, Throttle Cable 2001 and newer 4Runner only w/Drive by Wire Throttle Body
2 Bolt, Hex, 6 x 1.0 x 12mm Used to attach Throttle Cable Brackets to S/C Manifold
2 Washer, Flat, 6mm Used with bolts to attach Throttle Cable Brackets to S/C Manifold
The items listed in RED will be difficult or impossible to find at your local hardware store. Especially the two tensioner bolts, the 8x1.25x170mm bolt, the manifold support bracket, and the 3 brackets listed near the bottom. There are 3 brackets included in the kit because different ones are used for different applications. The bracket used on a '98 will not be the same as the bracket used on an '01, so TRD includes all three. If you buy the S/C second hand it may not include the correct bracket for your application. These brackets are used to secure your throttle/trans kickdown cables to the S/C.
Now, you could fabricate the bracket that you need along with the spacer and the Dipstick/Wire Loom relocation brackets, with some time & experimentation... unless you have another vehicle that has those parts installed for reference, then it would go quickly.
In the event that you want to buy the necessary items new, you can find them for sale via the following links, at the following costs... plus shipping. At minimum you'll want a new belt, and order two so that you have one for a trail spare.
Dynamic Tensioner Kit $260, Part No. PTR29-60032 (this includes the tensioner, along with the bracket and the two bolts needed for install... this is the only route you can take to buy the two (70mm/135mm) bolts and the relocation brackets through Toyota)
TRD DYNAMIC TENSIONER 3.4 SC PTR29-60032
OR... Try this guy on TTORA, sells the bracket/bolts for $75 shipped
Dynamic tensioner bracket and bolts 3.4 tacoma - TTORA Forum
Then buy the tensioner separately for $50, Part No. PTR30-35041, and fab the relocation brackets
TRD Supercharger DYNAMIC TENSION W/ PULLEY PTR30-35041
Belt $11, Part No. PTR30-35040
TRD Supercharger Belt - V6 3.4L PTR30-35040
IAC Check Valve $6.50, Part No. PTR26-35042
TRD Replacement Check Valve - One Way (3.4 V6 S/C) PTR26-35042
TB to S/C Gasket $8, Part No. PTR29-60030
Replacement Throttle Body Gasket TRD PTR29-60030
S/C Install Kit $166, Part No. PTR29-60020 (This includes the IAC check valve, the 170mm bolt, the spacer, vacuum caps & lines, and the three brackets... You'll still be missing the hose clips, 35mm bolt, cap screws & washers, and 6mm bolt and washer listed in the "Hose, Connector and Hardware Kit" sectin of the list) Also, note that under the picture of the kit on the RH side, there is a link labeled "Installation PDF"... this will download the S/C install manual.
Supercharger Service Parts 3.4L Install Kit PTR29-60020
If the nose cone is leaking oil, you'll want to replace it. It's much easier to replace the whole nose cone assembly than it is to try and press a new bearing/seal into the old nose cone.
Here's a writeup on that > 3.4 Supercharger Nose-Drive Replacement - CustomTacos.com Forum
Nose Cone Kit $228, Part No. PTR29-35042
3.4 4TH Gen Nose Cone Kit PTR29-35042
If you feel like saving some money and you want to rebuild the nose cone yourself, here is a thread that covers a COMPLETE rebuild of the 2nd gen Black TRD S/C:
3.4l TRD Supercharger rebuild - Tacoma World Forums
In the end, the biggest risk I see is the 16 hours of your time it would take to drive there and back to check it out. If you get there and it's not what you thought it was, that's alot of wasted time. I'd say that you need to ask quite a few more questions of the seller before you spend the time driving down there to check it out.
With 120K miles on it, there is a high probability that the nose cone will be leaking, and even if it's not you may want to replace it as preventative maintenance. I believe the recommended interval on those is about 100K. At the bare minimum, you'll need to change the oil on the nose cone.
Oil change kit, Part No. PTR29-35043 > TRD Oil Change Kit 3.4L V6 supercharger (black) PTR29-35043
Without actually hearing the S/C operate on a running engine, it will be very difficult to assess the condition of the bearings in the nose cone and at the rear of the S/C. You can give the pulley a spin and see if it feels smooth, but thats about it. If the rotors have a good seal on them, you should actually hear, and be able to feel with your bare hand, the S/C pump air out of the outlet ports.
Let me know if you have other questions.
PS > The real cost that you should be worried about is the rabbit hole of add-ons that you're going to want to buy once you get the S/C on your 4Runner. URD 7th, IPT VB, Headers, 2.2 Pulley, instrumentation, tuning equipment, etc, etc. That's the part that really adds up. It's like Pizza....
$8 for a large cheese pizza. $2 per topping. By the time you add Pepperoni, Sausage, Green Chile, Mushrooms, Olives, Anchovies, and Bell Peppers, you've got a $22 pizza.
I'm hungry now.
I want everyone to know the significance of this post, seriously.
rickashay
New member
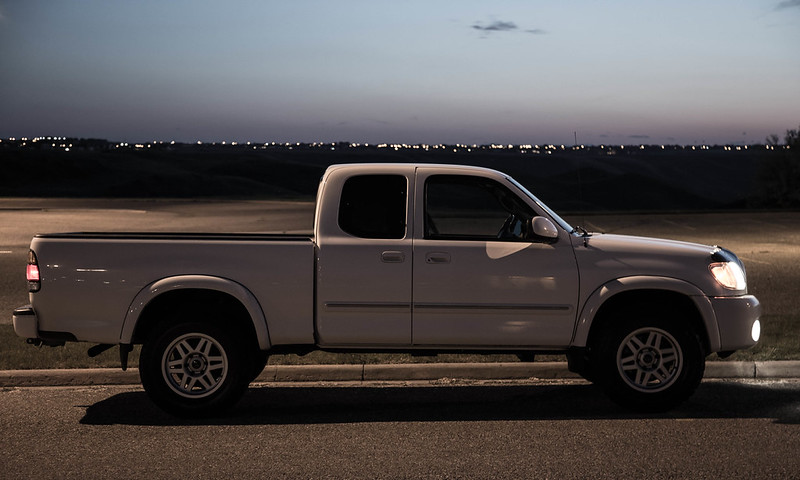
The Tundra got some lovin' while Tom Cruiser is away at the welder:
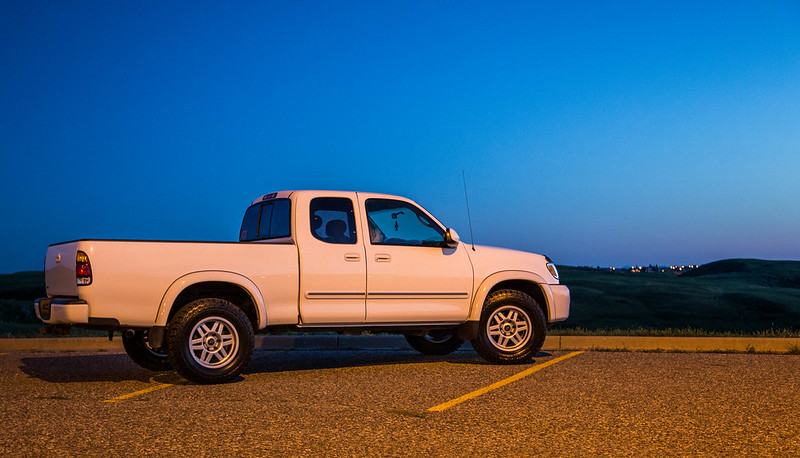
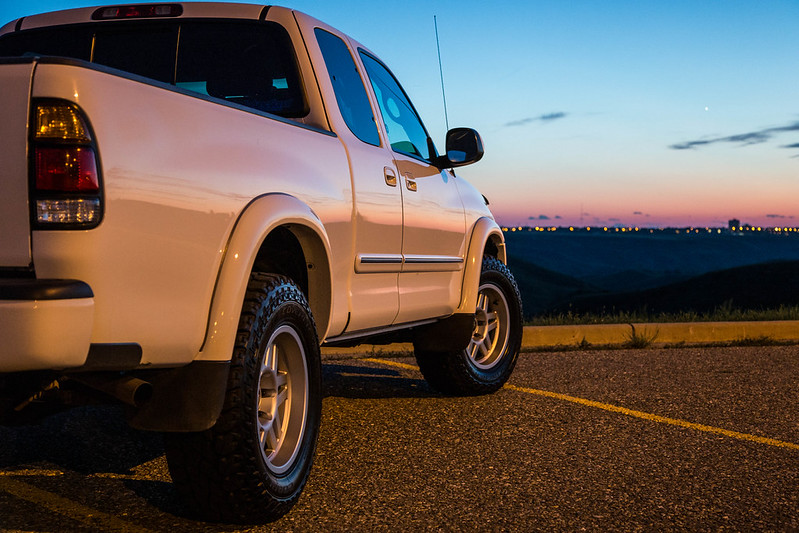
SCS Stealth 6 in Matte Silver - limited edition wheel and wanted to stray away from black wheels for my DD and do something "different". 265/70/17 Cooper ST Maxx tires. The tires cleared fine with the stock wheels but as soon as the SCS's went on they rubbed like a mofo on the pinch welds due to the more agressive wheel offset. I cut a lot of the pinch weld off, and now it's good to go! I've already logged about 4-5000kms on the tires and they have been great in the muddy leases at full psi and are surprisingly quiet on the highway. Super happy with them so far... Oh and I de-badged the Tundra somewhere along the line.
20120708-IMG_1675.jpg by RickaShay24, on Flickr
20120708-IMG_1669.jpg by RickaShay24, on Flickr
20120708-IMG_1667.jpg by RickaShay24, on Flickr
SCS Stealth 6 in Matte Silver - limited edition wheel and wanted to stray away from black wheels for my DD and do something "different". 265/70/17 Cooper ST Maxx tires. The tires cleared fine with the stock wheels but as soon as the SCS's went on they rubbed like a mofo on the pinch welds due to the more agressive wheel offset. I cut a lot of the pinch weld off, and now it's good to go! I've already logged about 4-5000kms on the tires and they have been great in the muddy leases at full psi and are surprisingly quiet on the highway. Super happy with them so far... Oh and I de-badged the Tundra somewhere along the line.
20120708-IMG_1675.jpg by RickaShay24, on Flickr
20120708-IMG_1669.jpg by RickaShay24, on Flickr
20120708-IMG_1667.jpg by RickaShay24, on Flickr
rickashay
New member
Can you post the build link of your new truck. The LC
Thanks
Sorry, I thought I already had! I've been keeping all of the updates up in this 4Runner thread, but here is the link to the ih8mud original: *Rickashay's 97' LX450* - "Tom Cruiser"

smkd13
New member
How do you like the Aussie in the rear for DDing? I wanna lock the rear end on my 4runner so bad but I'm making myself hold out and do an e-locker retrofit.
I have a LockRight (Same thing honestly) and I DD it. It works fine honestly. You get a pop here and there but other than that no real issues. I don't mind beig locked all the time, some people like the open open for DD. wrap all preference. If you want to know a little more about them. Head to my build thread and there is a link to my super intensive LockRight install and explanation.

mcaz5
New member
I have a LockRight (Same thing honestly) and I DD it. It works fine honestly. You get a pop here and there but other than that no real issues. I don't mind beig locked all the time, some people like the open open for DD. wrap all preference. If you want to know a little more about them. Head to my build thread and there is a link to my super intensive LockRight install and explanation.
Thanks for the reply. I've read through your build numerous times and the install process is very detailed. Will definitely be a go to thread if I end up going with that style locker.
rickashay
New member
How do you like the Aussie in the rear for DDing? I wanna lock the rear end on my 4runner so bad but I'm making myself hold out and do an e-locker retrofit.
Lol, I wish I could even make a valuable comment here but I can't...
I've driven the LX450 for a grand total of about 15 minutes since I've owned it. The Tundra is my DD...
4Running Daily
New member
i've driven the lx450 for a grand total of about 15 minutes since i've owned it.

Attachments

rickashay
New member
A small update on the Cruiser for those keeping track. I havent been posting much here, I apologize, but still trolling quite regularly. Lots of more recents builds evolving... great to see!
I picked up a few goodies for the Cruiser yesterday and had some time to install some of them. I didn't have quite enough time as I wanted to turn wrenches and install parts, but I figured I could grab some photos of the truck in it's current form:
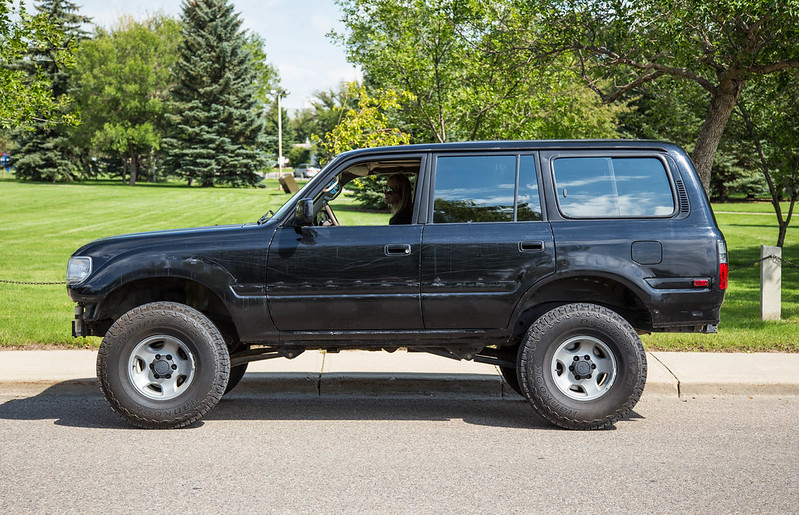
LX450 holes filled and ready for LineX - yah, the paint is in terrible shape. Going to do a proper detail once the LineX is done.
IMG_1753.jpg by RickaShay24, on Flickr
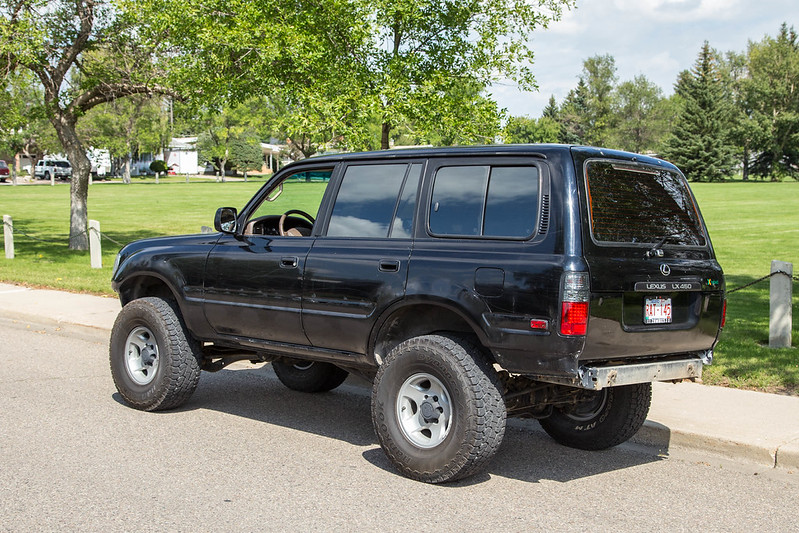
New LED tailights:
IMG_1752.jpg by RickaShay24, on Flickr
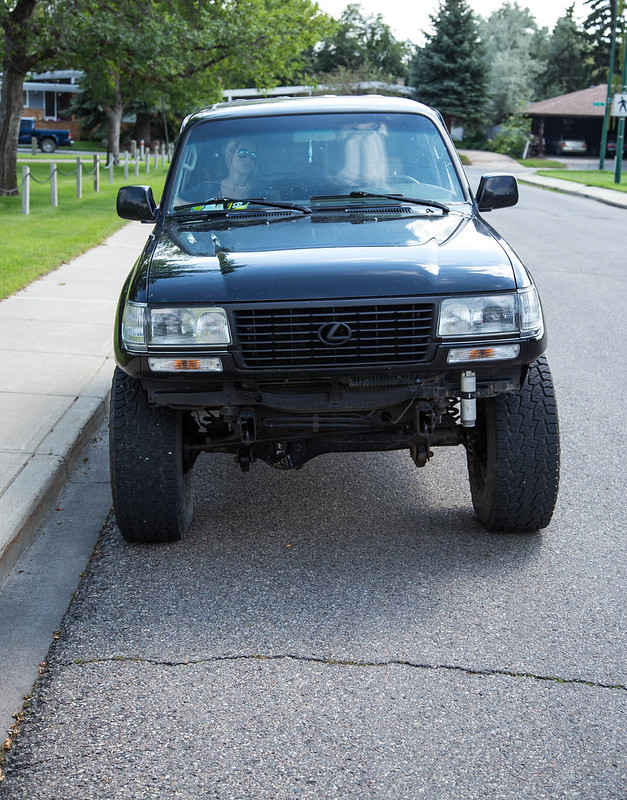
New clear corners and marker lights: (once I get the LC grille, I'll be doing those Depos and I'll get my retrofit going..)
IMG_1759.jpg by RickaShay24, on Flickr
Started working on getting my new speakers in, I ordered a pair of Rockford T-165S for the front and T-165 for the rears. I got the door panels trimmed for the 6.5" rears. I had to run a small spacer to clear the power window arm but they should bolt in nicely now. Hoping the fronts are going to fit without issue....
Placed an order from ARB as well, on the way:
- CKMTA12 Dual compressor
- Tire Inflation kit and guage
- Safari Snorkel
- Recovery Strap and Snatch Block
- Front 850J-springs
Also bought a set of 2012 OEM FJ Cruiser wheels which are the same as the 5th Gen 4Runner Trail Edition wheels. I just needed a set of 17's to run until my SCS wheels land and are sent to OMF for a beadlock conversion. I've liked these wheels ever since they came out, so I'm excited to get them on the Cruiser as well as some new tires!
I picked up a few goodies for the Cruiser yesterday and had some time to install some of them. I didn't have quite enough time as I wanted to turn wrenches and install parts, but I figured I could grab some photos of the truck in it's current form:
LX450 holes filled and ready for LineX - yah, the paint is in terrible shape. Going to do a proper detail once the LineX is done.
IMG_1753.jpg by RickaShay24, on Flickr
New LED tailights:
IMG_1752.jpg by RickaShay24, on Flickr
New clear corners and marker lights: (once I get the LC grille, I'll be doing those Depos and I'll get my retrofit going..)
IMG_1759.jpg by RickaShay24, on Flickr
Started working on getting my new speakers in, I ordered a pair of Rockford T-165S for the front and T-165 for the rears. I got the door panels trimmed for the 6.5" rears. I had to run a small spacer to clear the power window arm but they should bolt in nicely now. Hoping the fronts are going to fit without issue....
Placed an order from ARB as well, on the way:
- CKMTA12 Dual compressor
- Tire Inflation kit and guage
- Safari Snorkel
- Recovery Strap and Snatch Block
- Front 850J-springs
Also bought a set of 2012 OEM FJ Cruiser wheels which are the same as the 5th Gen 4Runner Trail Edition wheels. I just needed a set of 17's to run until my SCS wheels land and are sent to OMF for a beadlock conversion. I've liked these wheels ever since they came out, so I'm excited to get them on the Cruiser as well as some new tires!

Similar threads

- Replies
- 2
- Views
- 2K


- Replies
- 13
- Views
- 3K


- Replies
- 2
- Views
- 3K
- Replies
- 4
- Views
- 722
- Replies
- 2
- Views
- 10K

