99 Limited rear driver side seat delete

Baughb

Member
I want to remove just the driver side rear seat in a '99 Limited.

The seat bottom came out just fine. The seat back has had its carpet cut at the joining seam of the rear cargo carpet.

What I can't find is how to remove just the single seat back and still keep the passenger side seat intact. The center bracket for the seats doesn't have a way to separate so that just one seat comes out... as far as I can tell. I'll tug on it more when I get a free day on Monday but, a link to a video or some assurance/tips/actual knowledge from someone with more experience would be great too.

Thank you
 
Register to hide this ad
I want to remove just the driver side rear seat in a '99 Limited.

The seat bottom came out just fine. The seat back has had its carpet cut at the joining seam of the rear cargo carpet.

What I can't find is how to remove just the single seat back and still keep the passenger side seat intact. The center bracket for the seats doesn't have a way to separate so that just one seat comes out... as far as I can tell. I'll tug on it more when I get a free day on Monday but, a link to a video or some assurance/tips/actual knowledge from someone with more experience would be great too.

Thank you

if you take a look at my old build thread and scroooolll way down 2nd last pic.

once you have the seat back off you should be able to unbolt the seat back from the hinges. yes the center hinge in one big hinge so you will always have that unless you modify it.

you can use a seam ripper (sewing thing) to separate the carpet pieces on the seat back/rear section.

be careful on the seat back it's only hardboard and the nasty white plastic connectors are stubborn mofo's.

https://www.toyota-4runner.org/2851263-post14.html
 
"Proof of concept"

Thanks for the links!

I think I was just being squeamish but when I started, it began to make sense. I like the re upholstering on the back of the seat back that was outlined in your pictures.

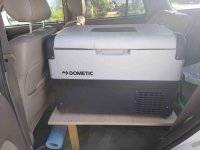
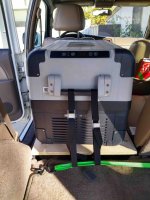
I mocked up Version 1.0 by bolting the 3/4 ply to the seat back brackets (will be shimming it level) and just sticking some legs on the "front".

An acquaintance of mine is going to make bracket supports that attach to the rear seat brackets that will attach to the fridge deck from underneath leaving the entire backseat foot area available for my solar auxiliary battery box. That supplies the power for the fridge will allowing it to DC to DC charge as well as solar charge.

Vers. 1.1 will be with brackets, leveled, and Spray decked of some sort.

A rear deck is slated for the cargo area to which will be attached some sort of tie down ring track to secure the fridge and other cargo.
 

Attachments

  • CFX50.01.jpg
    CFX50.01.jpg
    120.6 KB · Views: 1,116
  • CFX50.02.jpg
    CFX50.02.jpg
    135.7 KB · Views: 1,474

Members online

No members online now.

Forum statistics

Threads
278,316
Messages
3,554,111
Members
248,016
Latest member
Advally Service

Trending content

Back
Top