So I just bought an 05 Limited V8 4WD 4Runner with about 215,000 miles. Got it for a decently low price, due to paintwork and the need for an A/C Compressor replacement. Called a few shops, most were $700 and up for the repair, I did not have that extra cash.
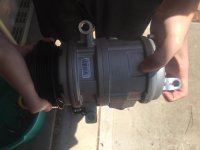
I then researched and researched everything about the whole thing. I ordered this compressor off of amazon.
A simple O-Ring box for any size for job and future, being as hoses are different sizes.
And a new Reciever Drier with Dessicant Element
Tools also used.
14mm socket, with 3/8 ratchet
Serpentine Belt Tool (Rent from AutoZone, $30, Get your money back)
2 Ton Jack Stands, used bottle jack from trunk
12mm socket (1 Bolt)
Universal joint socket (For hard to reach angles)
Ratchet Extensions
Penetrating Spray, WD40 or Acetone and Automatic Transmission Fluid mix
As always, elbow grease
GET VEHICLE DRAINED OF REFRIGERANT PRIOR TO ANY OF THIS, IT IS HARMFUL TO YOU AND THE ENVIRONMENT, YOU WANT ALL YOUR FINGERS AND HANDS.
Steps
1. Jack car up, place jack stands, get tire off
2. remove ground wire holding piping in, push it out the way
3. Open hood, using diagram on hood, find Serpentine belt tensioner, turn to the left with rented tool, slip belt off only the compressor.
4. Remove High side and low side hoses from compressor, place paper towel inside the hose itself to not contaminate
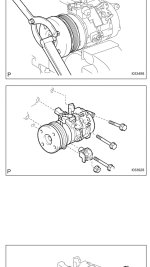
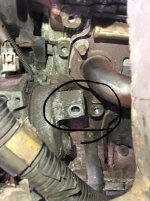
5. Remove bolts (3 BOLTS) with the logo on the almost like an "8" on them also shown in the picture below. Dont forget bracket nut below, this is key as it wont come out unless it loosened, around oil filter area under vehicle.
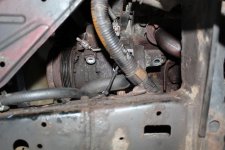
6. It SHOULD be loose and able to be moved around and just slide it out of the wheel well. If not, you forgot a step, check diagram again.
7.Put new O Rings on hoses and on left side of radiator use large size allen (mine dont have sizes so I dont know, my apologies) to open up and replace the dessicant element, just slide the new one in.
8. Next feed new compressor in and position into place on the bracket for a slight hold to hand tighten the bolts in just to sit. then if you have a torque wrench, do it to 14Ft-lbs, but if not just tighten.
9. Remove paper towels, and put hoses back on, they are different sizes so they only go in one of them, use washer and nut provided from kit to keep tight.
10. Put Serpentine belt back on using the opposite of the removal of it. Best to do with two people.
11. Refill refrigerant (find out how much on your hood) yourself, or pay a shop to do it. I did not do this myself.
Extra Note - If you get a bad mildew smell when you turn your A/C on. Turn A/C on high and turn off Recirculate air and spray lysol dissifectant spray into the front vents UNDER HOOD for like 30 seconds and then repeat 10 mins later just to fully cycle through system.
Hope I saved you as much as I did myself.
I then researched and researched everything about the whole thing. I ordered this compressor off of amazon.
A simple O-Ring box for any size for job and future, being as hoses are different sizes.
And a new Reciever Drier with Dessicant Element
Tools also used.
14mm socket, with 3/8 ratchet
Serpentine Belt Tool (Rent from AutoZone, $30, Get your money back)
2 Ton Jack Stands, used bottle jack from trunk
12mm socket (1 Bolt)
Universal joint socket (For hard to reach angles)
Ratchet Extensions
Penetrating Spray, WD40 or Acetone and Automatic Transmission Fluid mix
As always, elbow grease
GET VEHICLE DRAINED OF REFRIGERANT PRIOR TO ANY OF THIS, IT IS HARMFUL TO YOU AND THE ENVIRONMENT, YOU WANT ALL YOUR FINGERS AND HANDS.
Steps
1. Jack car up, place jack stands, get tire off
2. remove ground wire holding piping in, push it out the way
3. Open hood, using diagram on hood, find Serpentine belt tensioner, turn to the left with rented tool, slip belt off only the compressor.
4. Remove High side and low side hoses from compressor, place paper towel inside the hose itself to not contaminate
5. Remove bolts (3 BOLTS) with the logo on the almost like an "8" on them also shown in the picture below. Dont forget bracket nut below, this is key as it wont come out unless it loosened, around oil filter area under vehicle.
6. It SHOULD be loose and able to be moved around and just slide it out of the wheel well. If not, you forgot a step, check diagram again.
7.Put new O Rings on hoses and on left side of radiator use large size allen (mine dont have sizes so I dont know, my apologies) to open up and replace the dessicant element, just slide the new one in.
8. Next feed new compressor in and position into place on the bracket for a slight hold to hand tighten the bolts in just to sit. then if you have a torque wrench, do it to 14Ft-lbs, but if not just tighten.
9. Remove paper towels, and put hoses back on, they are different sizes so they only go in one of them, use washer and nut provided from kit to keep tight.
10. Put Serpentine belt back on using the opposite of the removal of it. Best to do with two people.
11. Refill refrigerant (find out how much on your hood) yourself, or pay a shop to do it. I did not do this myself.
Extra Note - If you get a bad mildew smell when you turn your A/C on. Turn A/C on high and turn off Recirculate air and spray lysol dissifectant spray into the front vents UNDER HOOD for like 30 seconds and then repeat 10 mins later just to fully cycle through system.
Hope I saved you as much as I did myself.