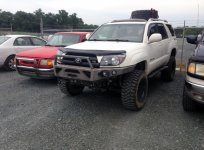
A-Ha's Build.

I'm tossing a few paint scheme ideas around in my head, I've liked the look of color matched as well as a mat black. The options are endless though I can paint the thing lime green if i wanted to lol. I have a buddy with connections to automotive paint and a spray gun so it'll get painted whatever color I end up liking the most.

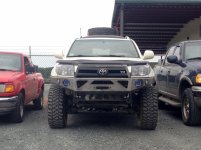
I think it would look really really good color matched. I see everyone with these matte black custom/aftermarket bumpers and I think that painting it would make your truck stand out while preserving some of the original look. I love that white and I think that it would look really "in place" - just my opinion though. I've been toying with the idea of color matching a rear bumper since mine is all f'd up anyway.
 
I think it would look really really good color matched. I see everyone with these matte black custom/aftermarket bumpers and I think that painting it would make your truck stand out while preserving some of the original look. I love that white and I think that it would look really "in place" - just my opinion though. I've been toying with the idea of color matching a rear bumper since mine is all f'd up anyway.

yeah I'll likely do a color match white with some black in places (like the lower cut out expanded metal) and if I get the TJM stealth winch I can put expanded metal over the upper cutouts and paint that exapanded metal black to so it kinda keeps the factory "bumper grill black section" look we'll see how it all turns out I get more and more ideas every minute haha. I'm definitely happy i ordered bare steel giving me the ability to change and add whatever i want without worrying about powder coat or anything like that. I'll just have to leave some space in the right and left upper cutouts to allow for a high lift jack point. I'll probably start the paint with a black primer and then just color match the front face of the plating leaving all the inside blacked out.
 
Last edited:
yeah I'll likely do a color match white with some black in places (like the lower cut out expanded metal) and if I get the TJM stealth winch I can put expanded metal over the upper cutouts and paint that exapanded metal black to so it kinda keeps the factory "bumper grill black section" look we'll see how it all turns out I get more and more ideas every minute haha. I'm definitely happy i ordered bare steel giving me the ability to change and add whatever i want without worrying about powder coat or anything like that. I'll just have to leave some space in the right and left upper cutouts to allow for a high lift jack point. I'll probably start the paint with a black primer and then just color match the front face of the plating leaving all the inside blacked out.

That sounds awesome. you're making me want a bumper lol.

Maybe photoshop a few ideas?
 
Looks great!!

Man I want a bumper so bad, it seems like everyone is getting one.

How are you gonna coat it?
Thanks yo!

just a simple primer coat and paint. I don't really want to pay someone to powder coat it then drive over rocks lol. They definitely change the attitude of the truck for sure. It was interesting to hear the increase in compliments or acknowledgements of the truck.

when it was just lifted you'd hear every once in a while hey man nice truck what all have you got done to it.

now it's every gas station stop.. Damn that's a bad ass 4runner and it's not even painted yet haha.
 
Yep, the bumper brings all the girls to the yard.

I really meant what color? For some reason I thought I saw you say you were doing something special somewhere.

If I were to get a bumper I'd get it just like yours, uncoated and no brush guard. I don't think I'd want it black though, still unsure what I'd do about that.
 
Yep, the bumper brings all the girls to the yard.

I really meant what color? For some reason I thought I saw you say you were doing something special somewhere.

If I were to get a bumper I'd get it just like yours, uncoated and no brush guard. I don't think I'd want it black though, still unsure what I'd do about that.

I think I'm pretty set on doing a color match. That duplicolor toyota white match paint blends really well with everything I've touched up. Just not quite confident in how well it will hold up. I'm either going to do an automotive black primer base or a bed liner base then color match the outside of the plates. I'll leave the expanded metal behind the lower cutouts black, and if I add expanded metal to the upper cutouts They will remain black as well. I'll definitely be using a spray gun it won't get rattle canned. So I'm sourcing my paint options. I have a few buddies in the autobody world that may be able to hook me up with toyota white single stage paint that will be a little more durable than the duplicolor.

My wife and PD voted I paint it black lol I haven't really been a fan of the black either. I don't want it all white though so I'm gonna try to keep the black and white contrast like i had with the factory bumper. I planned on adding a brush guard or hoop just for the added protection of keeping road kill from potentially coming up over the hood in a collision situation. But I haven't come up with anything in my head that really jumps out as a good looking hoop configuration. I want to keep it clean looking but I'd enjoy the extra protection from a good center bar so still comtemplating my fab options there

Also planning to make a custom front skid that attaches to bolt points on the bumper (keeping the bolt heads away from rock damage) then extending the skid plate back to the transmission skid. Unfortunately my company's plasma table is offline right now because we're installing a new CNC controller to it (making 1984 hardware talk to 2013 software yeah right lol) so it will be a while before I actually get to put paint on the bumper. Also saving up for a TJM stealth winch. So I've got some time to research and dream up some paint/fab schemes.
 
Last edited:
I'm surprised to hear that about the duplicolor, it didn't work very well for me.

I use automotivetouchup.com and it works better. You should check it out if you're looking. They sell it in rattle can and by the gallon I believe so you can use a sprayer. It's more expensive than the duplicolor but looks better in my opinion.

edit- btw that's a great idea about leaving the black parts. There is an SW on a Univ. of Ala 4R in town that is color matched and it's a little too white.
 
Last edited:
Looks great Austin! Now I'm sold on a CBI bumper with no hoops! DO was ahead but those pics changed my mind! Can't wait to see what you come up with for fab work. Keep it up!

Edit: could you please post up some side shots?
 
Last edited:
I'm surprised to hear that about the duplicolor, it didn't work very well for me.

I use automotivetouchup.com and it works better. You should check it out if you're looking. They sell it in rattle can and by the gallon I believe so you can use a sprayer. It's more expensive than the duplicolor but looks better in my opinion.

edit- btw that's a great idea about leaving the black parts. There is an SW on a Univ. of Ala 4R in town that is color matched and it's a little too white.

I've used it to clean up the chips on the little trim pieces under the headlights and it's blended great there. I'm not sure how it would fair on the main panels without perhaps buffing and fading it in so to say. But yea I'm not planning to use it on the bumper just the first "color match" option that came to mind. I'll definitely be purchasing a more automotive "body shop" paint to match.
Duplicolor rattlecan wasn't even close for me.

well when you keep your truck shinning like a diamond no paint would match your wax jobs lol.

Looks great Austin! Now I'm sold on a CBI bumper with no hoops! DO was ahead but those pics changed my mind! Can't wait to see what you come up with for fab work. Keep it up!

Edit: could you please post up some side shots?

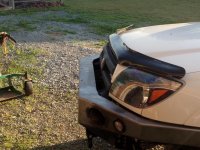
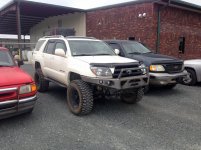
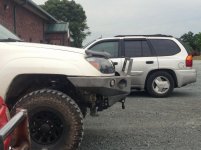
Thanks man! yeah I'm really happy with it. Here is one side shot I got of it to show the gaps. (note that an 06 style grill or newer will fill in the gap better)

IMG_2681 (1024x768).jpg


Also just to keep the thread updated. The standard turn signal size they use for the 03-05 bumpers is a 2 inch recessed grommet mount LED which is offered in amber or clear lense with amber bulbs.

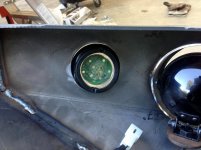
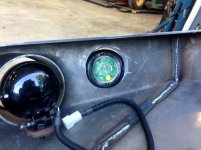
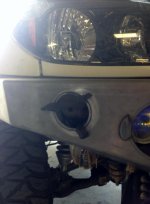
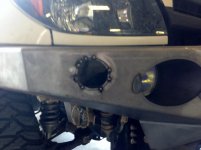
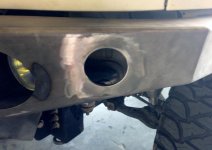
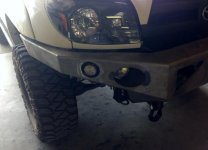
I requested just a slightly larger turn signal as i felt it tied in better than the smaller two inch lights and purchased the same style of turn signal just 2.5 inches instead. CBI was happy to take care of this for me an picked up the different style lights and attempted to enlarge the standard hole to fit the new size lights. The attempt failed when there fabricator grabbed to large of a hole saw and cut the openings at 3.125" instead of 2.75" to fit the turn signals. So this is what my problem became when I mounted the bumper up for mock up purposes.

IMG_2678 (1024x768).jpg

IMG_2679 (1024x768).jpg

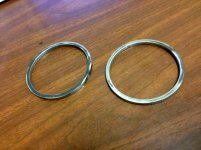
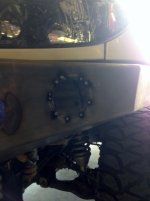
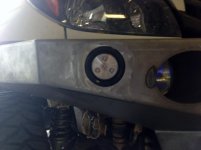
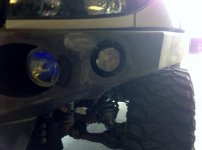
I called Nathan at CBI and he was happy to help trouble shoot the issue. They came up with ideas such as cutting the hole larger to except the next size up light which was a 4" turn signal (not really what i had in mind) As well as cutting two plates for me with button head bolts to bolt a right size hole up to the face of the bumper (I wasn't really cool with that idea either). As well shipping the bumper back to them would neither help me or them effectively. So I came up with the idea of just cutting a filler plate and filling in the holes then re-drilling the proper size hole for the lights. Nathan offered to pay any costs to me by a local fab shop to have this done. But this is what I came up with to resize the holes. Made them with a milling machine here at work.
IMG_2686 (1024x768).jpg

I told Nathan that I would be the local fab shop lol as my company is a custom fabrication shop for farm equipment and that the cost would just be my labor. Nathan was insistent in being apologetic for the mishap and if there was anything I could think of to reimburse me to let him know. I told him "well I do plan to purchase a TJM stealth winch and the cheapest I've found is 650.00 online free shipping." Without question he came back with I'll sell it to you at cost free shipping from Idaho to NC. $500.00 even. saving me close to $250.00 can't beat that at all! Now i just have to weld these little rings into the holes and smooth out the welds I'll be good to go!
 

Attachments

  • IMG_2681 (1024x768).jpg
    IMG_2681 (1024x768).jpg
    140 KB · Views: 692
  • IMG_2678 (1024x768).jpg
    IMG_2678 (1024x768).jpg
    92.3 KB · Views: 714
  • IMG_2679 (1024x768).jpg
    IMG_2679 (1024x768).jpg
    96.7 KB · Views: 661
  • IMG_2686 (1024x768).jpg
    IMG_2686 (1024x768).jpg
    114.3 KB · Views: 694
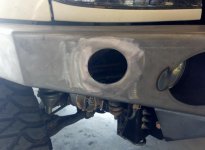
Just spent a little bit of lunch time and it's as if the hole size issue never happened :)

Just use a couple magnets to hold the rings in place
IMG_2688 (1024x768).jpg

Tack welded moving from side to side to keep the heat down
IMG_2689 (1024x768).jpg

IMG_2687 (1024x768).jpg

Welded a few small bead welds alternating sides only laying about a 1inch section each pass. then used a 40 grit flap disk sanding wheel angle grinder to make it invisible. I have some air tools at the house I can use to smooth out the rings the 40 grit leaves behind.
IMG_2690 (1024x768).jpg

IMG_2691 (1024x768).jpg

IMG_2692 (1024x768).jpg

IMG_2693 (1024x768).jpg

IMG_2694 (1024x768).jpg

and now back to another 4 hours of work lol.
 

Attachments

  • IMG_2688 (1024x768).jpg
    IMG_2688 (1024x768).jpg
    53.1 KB · Views: 675
  • IMG_2689 (1024x768).jpg
    IMG_2689 (1024x768).jpg
    58.8 KB · Views: 661
  • IMG_2687 (1024x768).jpg
    IMG_2687 (1024x768).jpg
    49.4 KB · Views: 646
  • IMG_2690 (1024x768).jpg
    IMG_2690 (1024x768).jpg
    61.1 KB · Views: 652
  • IMG_2691 (1024x768).jpg
    IMG_2691 (1024x768).jpg
    54 KB · Views: 699
  • IMG_2692 (1024x768).jpg
    IMG_2692 (1024x768).jpg
    57 KB · Views: 656
  • IMG_2693 (1024x768).jpg
    IMG_2693 (1024x768).jpg
    49.1 KB · Views: 682
  • IMG_2694 (1024x768).jpg
    IMG_2694 (1024x768).jpg
    44.7 KB · Views: 718
So it turns out it's a really slow day here at the shop lol so I took advantage of some free time away from the desk and bugged my fab shop guys while putting together a center "hoop". I like it, kept it shorter than the rest, it'll still fit a 20" light bar in it as I had planned to mount on the front, and I like how the square tubing and mitered joints tie into the angles of the bumper and grill.
IMG_2695 (1024x768).jpg

IMG_2696 (1024x768).jpg

IMG_2697 (1024x768).jpg

IMG_2698 (1024x768).jpg

just trying to get everything welded up as soon as i can that I'd like to weld on it's starting to show a little oxidation lol. I'll likely have to oil it to keep it from rusting before I can set it up for paint.
 

Attachments

  • IMG_2695 (1024x768).jpg
    IMG_2695 (1024x768).jpg
    115.1 KB · Views: 658
  • IMG_2696 (1024x768).jpg
    IMG_2696 (1024x768).jpg
    97.8 KB · Views: 676
  • IMG_2697 (1024x768).jpg
    IMG_2697 (1024x768).jpg
    136.9 KB · Views: 646
  • IMG_2698 (1024x768).jpg
    IMG_2698 (1024x768).jpg
    97.4 KB · Views: 707

Members online

Forum statistics

Threads
278,310
Messages
3,554,078
Members
248,016
Latest member
Advally Service

Trending content

Back
Top