
AC hose broken screw - Help needed

dthlo

New member
98 4runner limited.

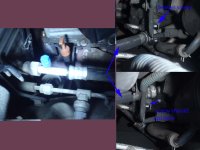
The H side hose connection at the Compressor has broken off (see attached picture). I believe a screw connecting the H hose to the Compressor broke. Can you please recommend some ways to carefully remove the broken screw? In addition, what is the size/threadform of the broken screw as I will need to replace it? How much torque do I apply to the screw? Once this new screw is inserted, am I all set to fill the system with R134a?

I am not very familiar with the engine compartment of this 4runner, so I don't exactly know this connection. But I do have a vacuum and manifold gauge to test pressure.
 
Last edited:
Register to hide this ad
photo uploaded
 

Attachments

  • 12-0726_ac2.jpg
    12-0726_ac2.jpg
    110.5 KB · Views: 1,148
I would replace the ac compressor manifold for a junk yard one. You could E-bay a compressor for $70
 
is the manifold held in place by 4 bolts? I'm not sure how I can access these bolts in such small a space. the power steering fluid and airbox are sitting right above.


and if i can't get the manifold off, any tips on getting that broken screw/bolt out? again, the working space is quite small.
 
Last edited:
Yes, the manifold is held on by 4 bolts from the top. Its likely you dont have the room there to extract the bolt with the compressor installed. You run a good chance of destroying the threads in the manifold. Your best bet may be to pull the compressor to do the repair.
 
The following steps are what i found online as to how to remove the compressor.

Do i need to move the PS pump and PS belt out of the way? I guess all I really need to do is loosen the compressor so that I can get a better angle on that broken bolt/screw. Can I skip some steps and just remove the compressor belt and remove the compressor bolts? Wondering what's the best way to access the compressor bolts (from above or below)...

When putting back together, any tips on getting belt tension right?

1) Evacuate Freon by a qualified shop then remove airbox.
2) Remove PS pump by first disconnecting the AC return hoses to the compressor to get adequate room to work. Then loosen the pulley that holds the PS belt. Remove this belt. Then remove the PS pump with 3 bolts. Slide PS pump out of the way.
3) Reduce tension in AC compressor idler pulley. Turn counterclockwise to relieve tension (you will need to be under the truck to do this but do not need to raise the truck as it is easily accesible once you have the skid plate removed. Remove AC belt.
4) Remove AC compressor by removing 4 bolts. Some are hard to get to but make sure you have a good fit and a long wrench b/c they may be on there very tight and you do not want to risk stripping the bolt.
5) Wiggle AC compressor out from top.
6) Reverse procedure for installation. (double check that your new compressor does not make any noise when you spin the pulley by hand, you'd hate to find out it's faulty after you fill it with Freon).
7) Tighten pulley tension for all belts
8) Have a repair shop vacuum AC system for debris and then recharge Freon. Mine used 2 lbs of freon and blew ice cold AC afterwards.
 
Last edited:

Members online

Forum statistics

Threads
278,309
Messages
3,554,070
Members
248,016
Latest member
Advally Service

Trending content

Back
Top