Advice requested from those of you who have mounted tires & balanced wheels at home

Status
Not open for further replies.
just an FYI.
you mentioned a couple times
So, while most tires will go into place whether or not you lower the top bead into the drop center, some will NEVER go on the rim unless you do so.

oh, they did go into the drop center, otherwise they NEVER would have got mounted. there just physically is not enough room. that is THE purpose for the drop center.

just to be clear, this is for EVERY(conventional) tire, and EVERY bead. those few that you didn't have to manually do it, had already dropped into place correctly. that will be the case for most tires. but, as you found out sometimes it doesn't work out that way, and they need a bit more help.
 
We use torque charts to check specific torque on vehicles, there's quite a few manufacturers that use the same specs across the board, so you end up learning what's what after a few months.
I completely understand what you are saying, which is that you consult a chart at first, and then, after a while, you get a feel for the general relationships for what torques to use.

I guess we all do that; but in my case, they get the torque wrong all the time.

Dunno if it's the alloy wheels and the lug bolts (versus nuts) but they generally have their torque set to closer to 100 foot pounds when I ask than to 84 where it belongs.

The manufacturer specifies these values for a reason and being 16 foot pounds too high is 1/5th (19%) more torque than the manufacturer specified.

oh, they did go into the drop center, otherwise they NEVER would have got mounted. there just physically is not enough room. that is THE purpose for the drop center.

Thank you very much for explaining that detail, which I have studied over the past day to realize you are completely correct. That steel ring is NEVER going to stretch, even though it seems like it is being stretched. It is not. (Is that correct?)

So, the fact that all the previous tires' last (top) bead went on easily simply means they must have had the diametric edge of the bead in the drop center.

Also thank you for letting me know the sole purpose of the drop center was to get that last (top) bead on the rim. I wasn't sure what the purpose of the drop center was since it can have lots of purposes and still be useful for mounting - so it's nice that you state that it's the only purpose of the drop center.
232287d1482792785-advice-requested-those-you-who-have-mounted-tires-balanced-wheels-home-clipboard.jpg

just to be clear, this is for EVERY(conventional) tire, and EVERY bead. those few that you didn't have to manually do it, had already dropped into place correctly. that will be the case for most tires. but, as you found out sometimes it doesn't work out that way, and they need a bit more help.

I think what you're saying above is that there is no way I mounted any of those tires without the diametric bead being in the drop center (whether I knew it at the time or not).

If that is the case, I believe you. It's not intuitive, since all but one went on so easily I didn't have to think about the problem. But that last one was so extremely difficult when I did NOT have the diametric edge of the bead in the drop center that it made a believer out of me. There was NO WAY that tire was going on the rim until I stepped on the diametrically opposed side.

Then it went in like a fork through butter. So, there is MAGIC in that drop center indeed!

What I love about this thread is that it is filled with these engineering tidbits which will help the next person who tries to mount and dismount tires and balance wheels at home.

To further the information, and to ensure that more engineering knowledge is imparted, I will post in the next post how I repaired a half dozen tires with puncture wounds.
 
Last edited:
correct, the steel bead is not being stretched.

and yes, for the tires that worked, you just got lucky, and the bead dropped into place correctly, without you knowing it.
 
correct, the steel bead is not being stretched.

and yes, for the tires that worked, you just got lucky, and the bead dropped into place correctly, without you knowing it.
Thanks for confirming.
It's amazing how little one needs to know when everything works out ok (by luck), compared to the little things we need to know when things don't work out by luck.
I'm a believer that, even though that bead looks like it's being stretched, it isn't being stretched one bit!

To further help the few of you who haven't yet unmounted, inspected, patched, mounted, and balanced tires at home, I practiced patching a half dozen tires that a friend and I had lying around which had been punctured and replaced.

Please ignore the tread wear, as these are practice tires, but everything else is fair game for comment.

Other than tread wear, please do comment on what is done well and what can be done better, since the entire purpose of this thread is to learn, and this post is posted to learn about how to best patch tires at home.

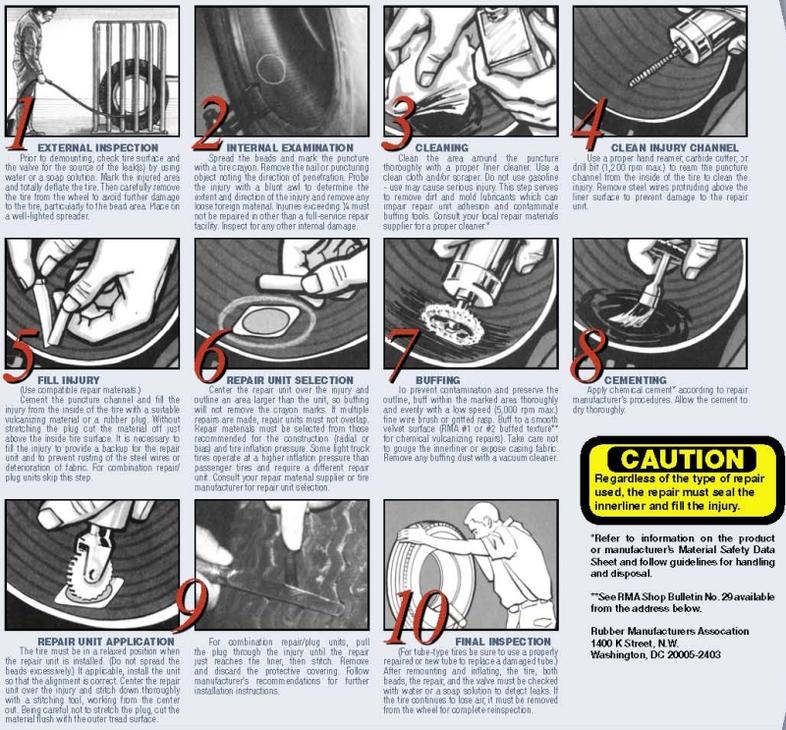
I first read up on the REMA suggested method of patching tires:
231943d1482457372-advice-requested-those-you-who-have-mounted-tires-balanced-wheels-home-basic_steps_of_tire_repair.jpg


One trick I quickly learned that I'll impart to others is that a "workbench" can be made with a few tires lying on their faces, with the tire being worked on perpendicular to them, which gives a reasonably stable platform to work on outside.

The best patch is apparently a one-piece patchplug because it seals the hole and the damage on the inside:
232389d1482882711-advice-requested-those-you-who-have-mounted-tires-balanced-wheels-home-one_piece_patch_plug.jpg


Second best is an inside patch over a purpose built vulcanizable rubber plug that has a wire for you to pull it through the hole from the inside out, where third best is a patch over yarn covered with vulcanizable rubber for the plug which is inserted from the outside (last, and certainly least best, is just the yarn-covered-with-rubber plugged from the outside).

Since these were test tires, I used the cheap yarn covered with goopy vulcanizable rubber inserted from the outside with a patch on the inside.

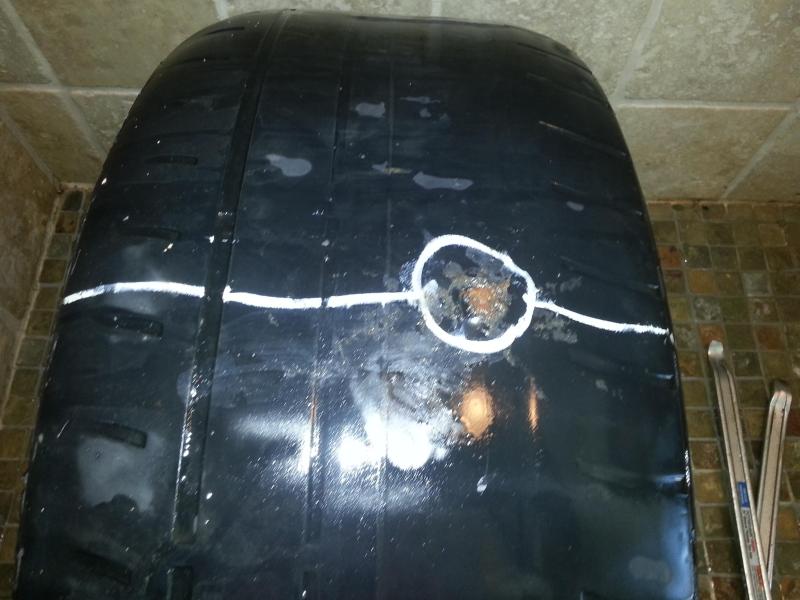
Here is the outside view of one of the patched tires:
232275d1482785941-advice-requested-those-you-who-have-mounted-tires-balanced-wheels-home-04_bead_shower.jpg


And here is the inside view of that same tire:
231970d1482460542-advice-requested-those-you-who-have-mounted-tires-balanced-wheels-home-b02_small_patch.jpg


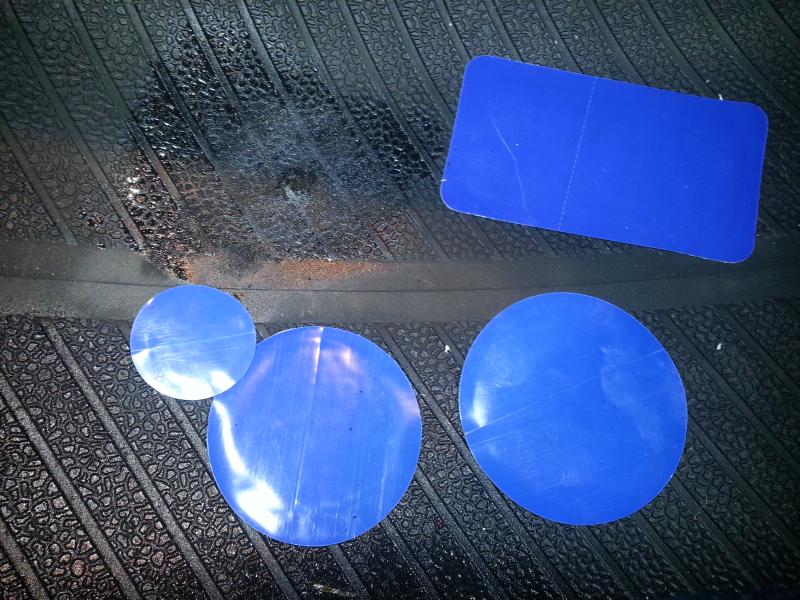
I found that patch was too small, and I wasn't yet good at cutting and buffing the inside flush, so, I opted for larger patches for the rest of the experimental tires:
231969d1482460537-advice-requested-those-you-who-have-mounted-tires-balanced-wheels-home-b01_patch_sizes.jpg


I found the larger patch seemed to feel better, and is what I'd use in the future.
231971d1482460546-advice-requested-those-you-who-have-mounted-tires-balanced-wheels-home-b03_larger_patch.jpg
 
Last edited:
To help others and to solicit improvements to the process, here are the steps I used (where the steps & tools are fair game for comment).

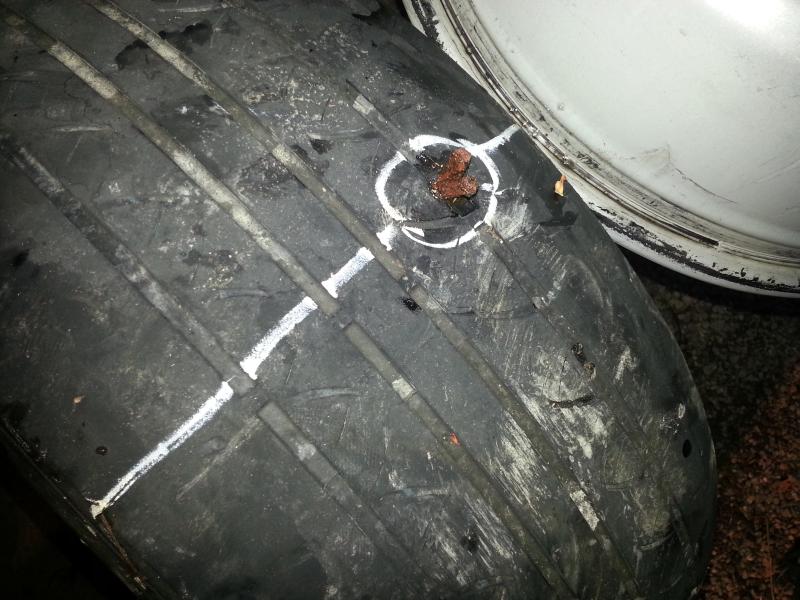
The first thing I did was remove the offending object which had punctured the tire.
231972d1482460737-advice-requested-those-you-who-have-mounted-tires-balanced-wheels-home-b00_remove_nail.jpg


Then I grabbed this tire reamer tool which is apparently designed to be slightly less than 1/4 inch (about 1/16th or 1/8th smaller than a quarter of an inch in diameter).
231955d1482459201-advice-requested-those-you-who-have-mounted-tires-balanced-wheels-home-a02_ream_hole.jpg


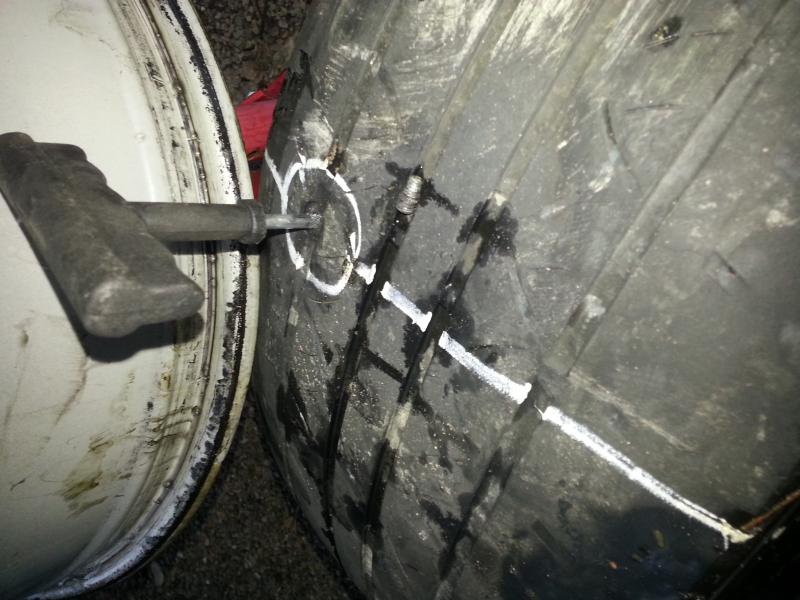
While reaming the hole, I took note of the direction of the hole, which, in this case, seems to have been from a blunt bolt that wedged between the treads and eventually worked its way straight through the carcass:
231956d1482459210-advice-requested-those-you-who-have-mounted-tires-balanced-wheels-home-a03_aim_reamer.jpg


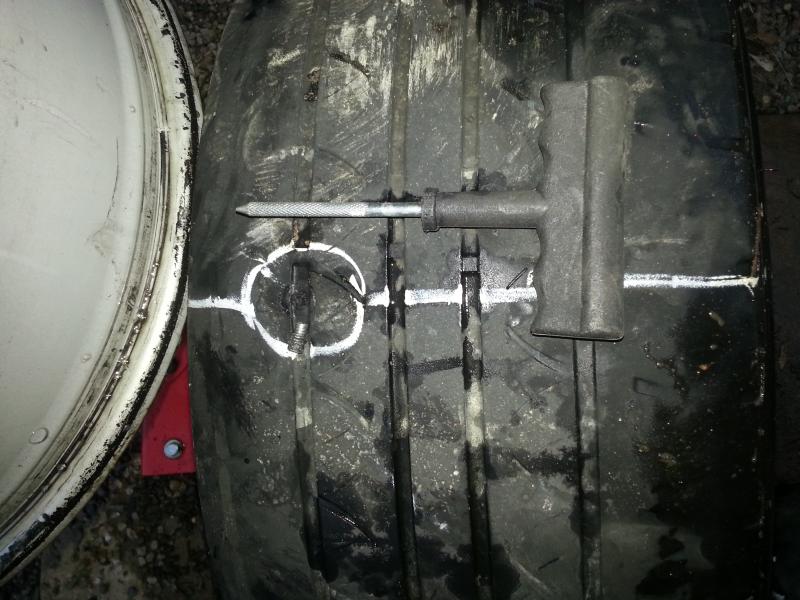
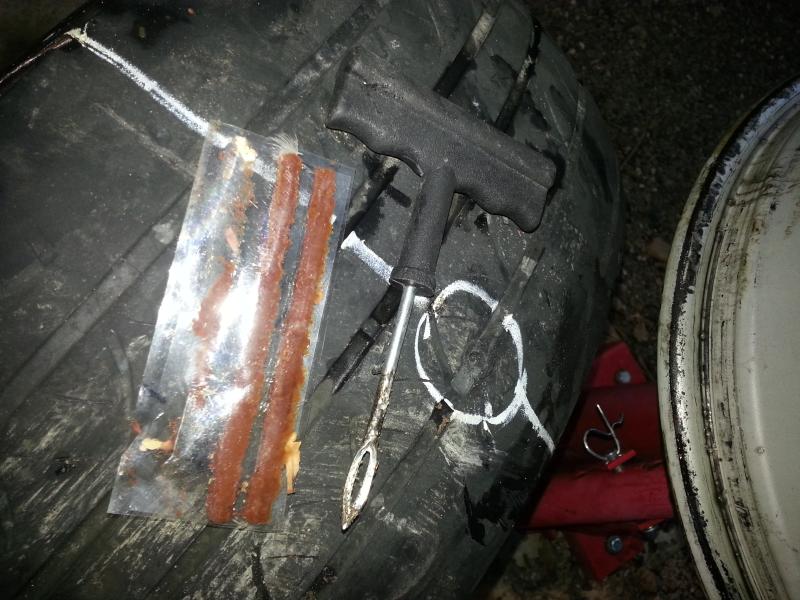
Then I slathered the vulcanizing cement on the yarn covered with vulcanizable goopy rubber and inserted it into the hole from the outside, twisted, and pulled the tool out:
231957d1482459215-advice-requested-those-you-who-have-mounted-tires-balanced-wheels-home-a04_prepare_plugs.jpg


Since that plug went on soaking wet with the vulcanizing cement, I let it set for about a quarter of an hour.
231958d1482459220-advice-requested-those-you-who-have-mounted-tires-balanced-wheels-home-a05_plug_protruding_outside.jpg


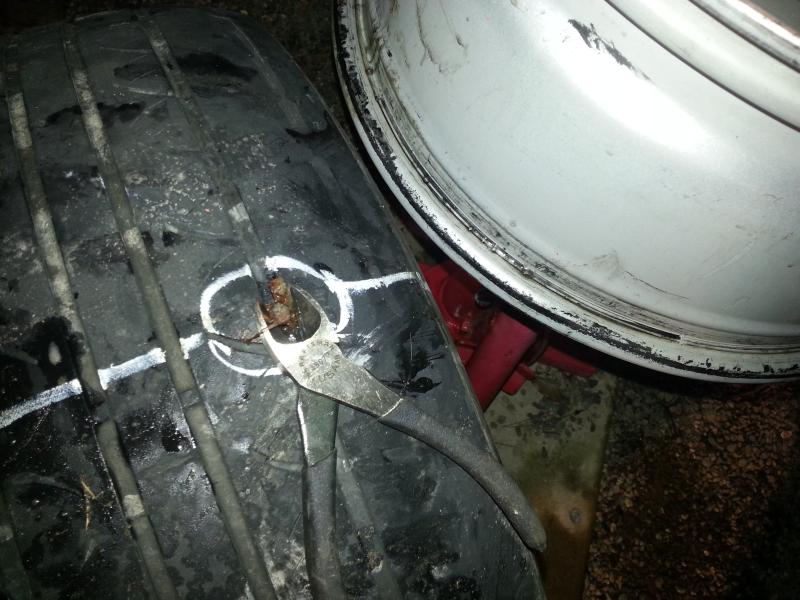
After the external plug set, I tried to cut off the excess with diagonal pliers, but there was no way that was going to work:
231961d1482459255-advice-requested-those-you-who-have-mounted-tires-balanced-wheels-home-a08_cant_cut_plug_with_dykes.jpg


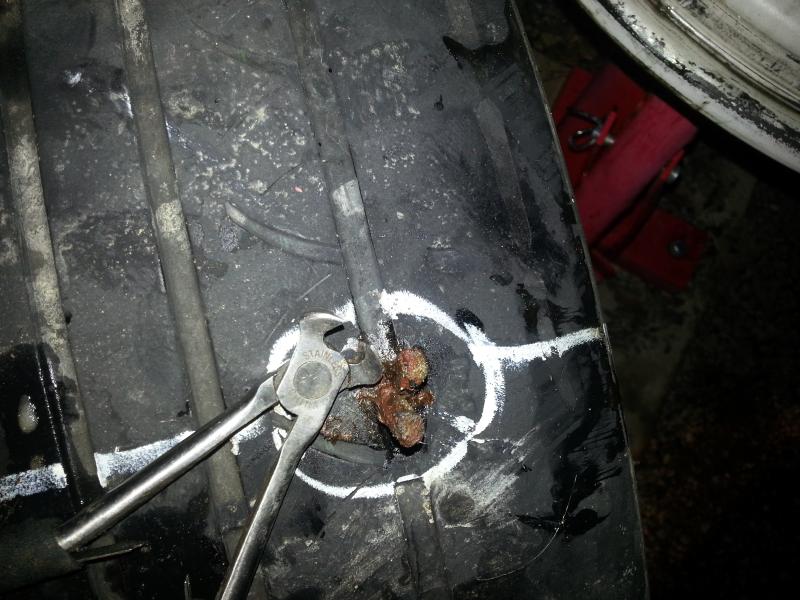
I grabbed every tool in my toolbox, but none would cut that goopy thing flush other than a utility knife:
231963d1482459886-advice-requested-those-you-who-have-mounted-tires-balanced-wheels-home-a09_dykes_dont_work.jpg


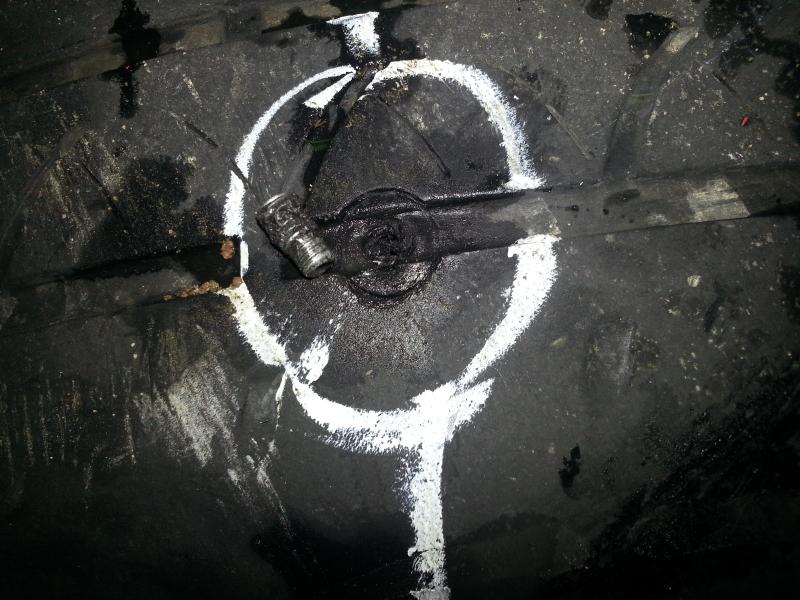
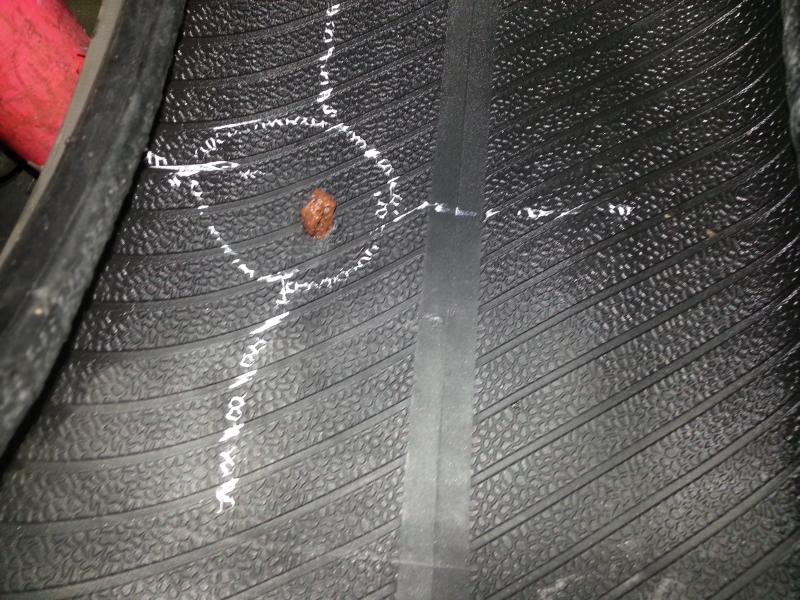
Here is what the inside of the carcass looks like after letting the vulcanizing plug set for a while:
231959d1482459227-advice-requested-those-you-who-have-mounted-tires-balanced-wheels-home-a06_plug_protruding_inside.jpg


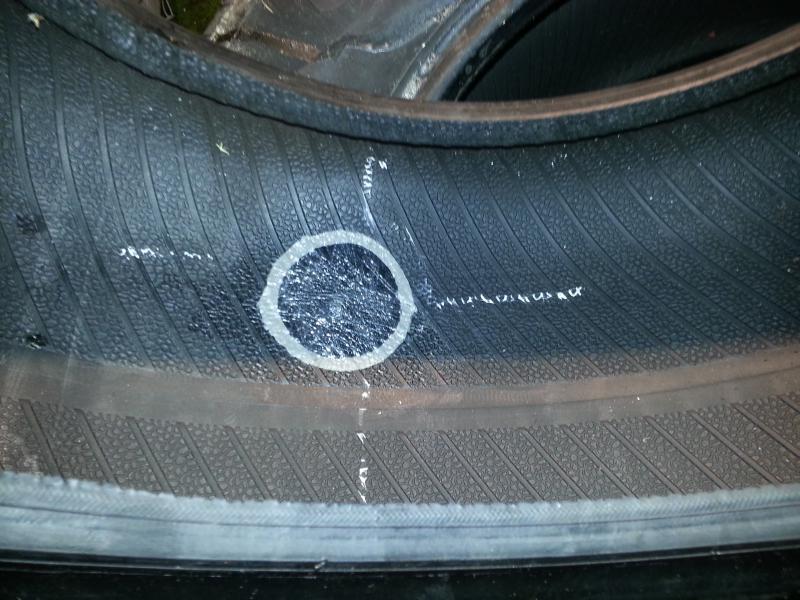
I then clearly marked a circle and cross that was greater than the buffing area:
231960d1482459244-advice-requested-those-you-who-have-mounted-tires-balanced-wheels-home-a07_marking_inside.jpg


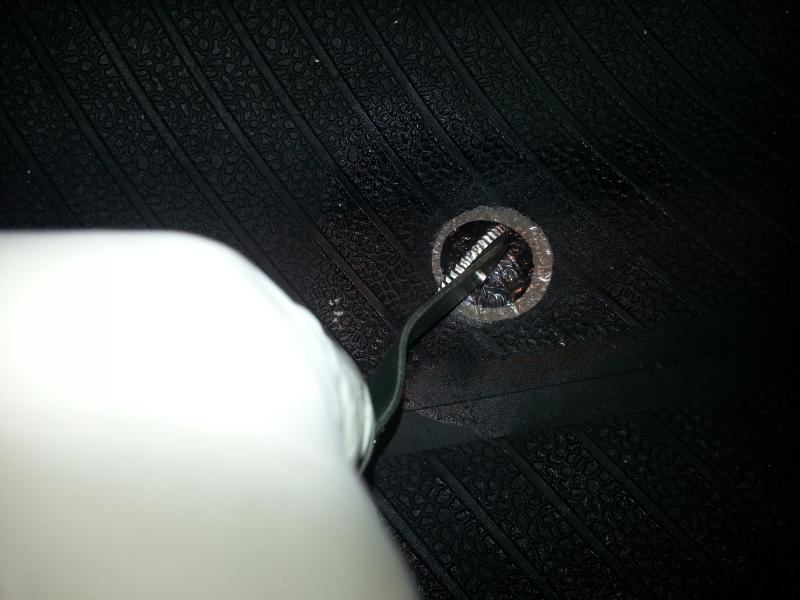
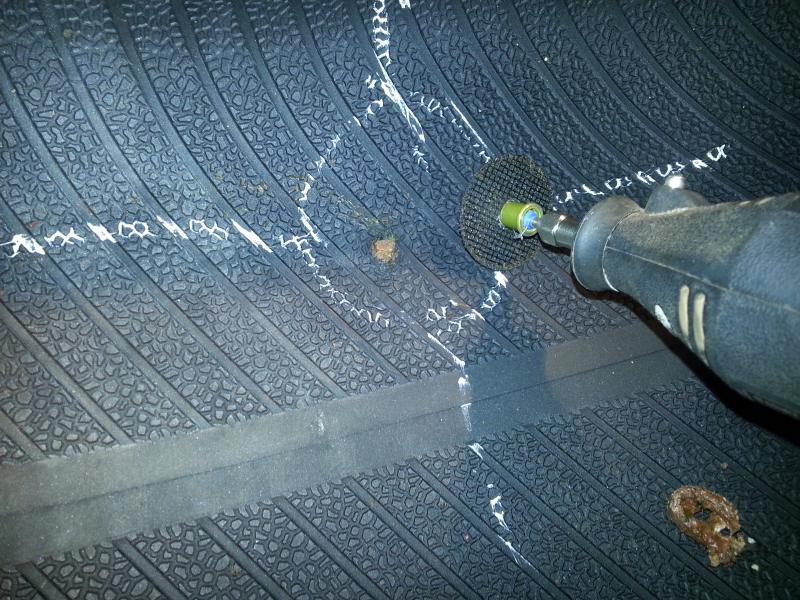
On the inside of the carcass, it's much more critical to cut the protruding part of the plug flush so I got out the Dremel tool,. which worked well enough (but if you have better ideas for a common tool in a typical garage other than a utility knife or Dremel tool, let me know).
231964d1482459984-advice-requested-those-you-who-have-mounted-tires-balanced-wheels-home-a10_dremel_tool_works.jpg


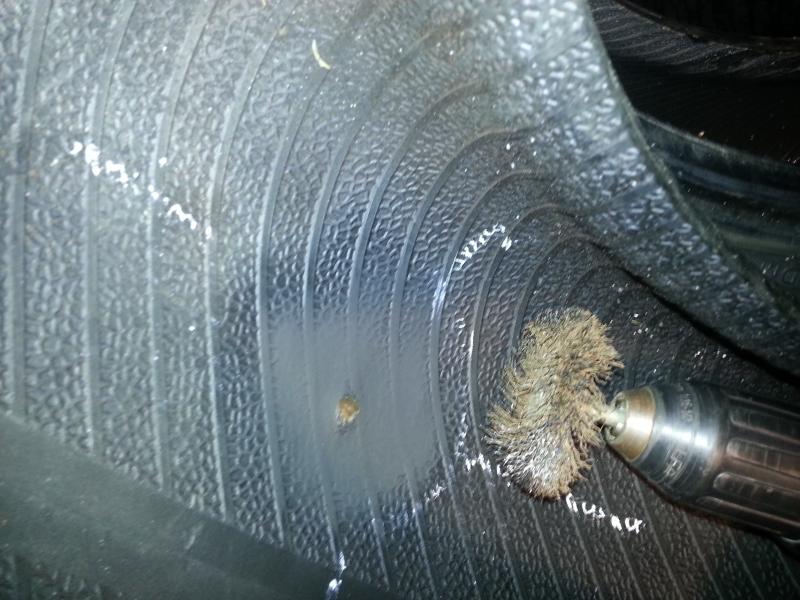
The stitching tool has a scraper end, but it would take forever to scrape that carcass using that tool so I resorted to power tools, spun at below 1,200 RPM.
They make a specially shaped buffing cone but I didn't have one so a wire brush sufficed as a poor man's buffing cone:
231965d1482460030-advice-requested-those-you-who-have-mounted-tires-balanced-wheels-home-a11_wire_brush_cone_buffer.jpg


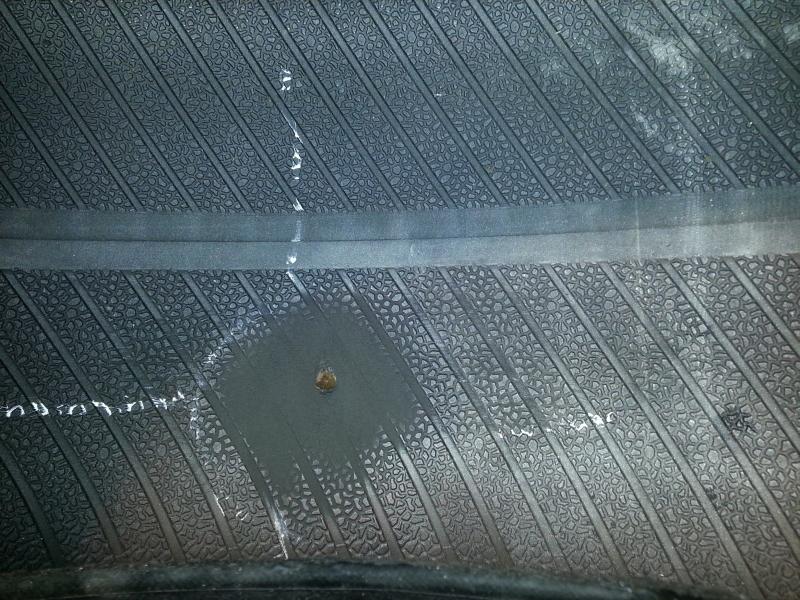
I then vacuumed out the debris in preparation for slathering on the vulcanizing cement and then letting that cement try to a tacky state over about five or ten minutes time:
231966d1482460060-advice-requested-those-you-who-have-mounted-tires-balanced-wheels-home-a12_inside_buffed.jpg


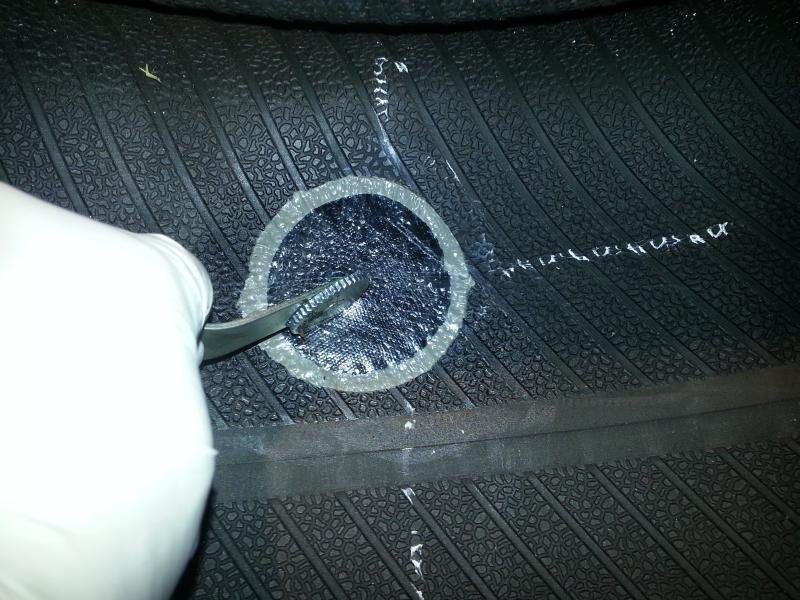
I then stitched the patch down, using short half-diameter radial strokes from the center outward and let the patch sit for about an hour before mounting.
231967d1482460114-advice-requested-those-you-who-have-mounted-tires-balanced-wheels-home-a13_stitching_down_patch.jpg


Here is what the repair looks like from the inside after everything set for about an hour:
231968d1482460151-advice-requested-those-you-who-have-mounted-tires-balanced-wheels-home-a14_patch_stitched.jpg


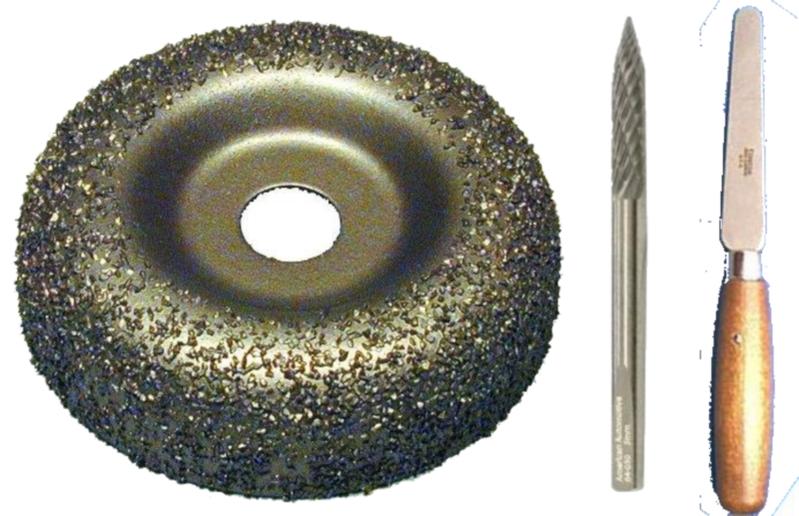
In hindsight, these are 3 tools that aren't critical, but which would have made the job easier and more fun:
  1. Carbide drill bit (which cuts the steel belt and body cables flush)
  2. Cone grinder bit (which has a better shape than a wire brush)
  3. Flexible knife (which is better than the dremel disc cutter)
231975d1482463710-advice-requested-those-you-who-have-mounted-tires-balanced-wheels-home-necessary_tools.jpg


One lesson learned is that it's generally easy to ream the hole, but one of the holes was made by a staple-sized nail, which was nearly impossible to ream with the hand tool, simply because it wouldn't penetrate the thick rubber. For that hole, I just patched it from the inside; but in 20/20 hindsight, a reamer bit on a 1,200 RPM drill would have been what is needed for such a tiny hole if a plug was also to be used (which should be the case in all repairs).

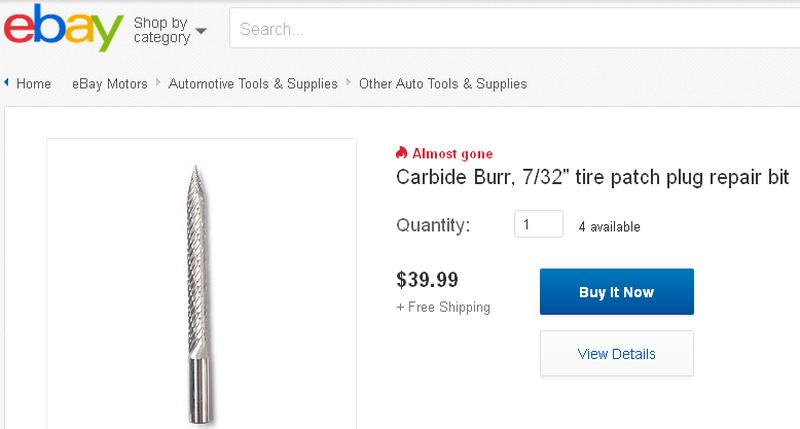
These reamer bits are surprisingly expensive (often thirty and forty bucks each), compared to what a drill bit would cost, for example, so there must be some reason for that unknown to me at the moment for the expensive ones:
232394d1482887677-advice-requested-those-you-who-have-mounted-tires-balanced-wheels-home-forty_dollra_reamer.jpg

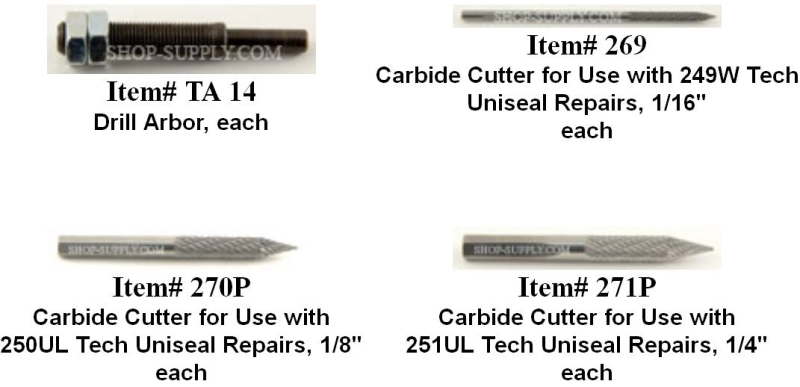
But I can also find cheap bits for about five or ten bucks (dunno how different they are though) where it seems you may need these four different sizes (just a smidgen under 1/16th inch, a smidgen under 1/8th inch, and a smidgen under 1/4 inch):

232395d1482887714-advice-requested-those-you-who-have-mounted-tires-balanced-wheels-home-carbide_bit_sizes.jpg
 
Last edited:
Status
Not open for further replies.

Members online

Forum statistics

Threads
278,315
Messages
3,554,125
Members
248,016
Latest member
Advally Service

Trending content

Back
Top