AELarson TRD Pro OEM+ Update/Mod/Build/Adventure Thread

Is it difficult to get to stick up in teh open side. You know, to wrap/stick on those edges?

Also would a 1' x5' do both rails... like this...
https://www.amazon.com/Black-Matte-...sr=8-2&keywords=Vvivid+Vinyl+matte+black+wrap

It's finicky, but can be done. I applied a lot of heat and used a bent a paper clip to lay it down over the inside edge.

I paid the few dollars extra and went 3' x 5' just to play it safe. You might be able to get it done with 1', but don't quote me on it!
 
Happy Halloween Fellow 4Runners!!

:tea:
 

Attachments

  • AC073809-1636-4DEB-8498-A171636BC0D4.jpg
    AC073809-1636-4DEB-8498-A171636BC0D4.jpg
    114.3 KB · Views: 1,461
Rola Roof Rack (REMOVED, Upgraded to Prinsu Rack)

This is an exciting one because I have always wanted a roof rack on one of my 4Runners! Man, it looks great and really adds some badassery to the truck!

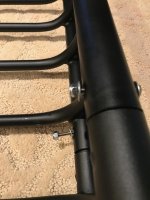
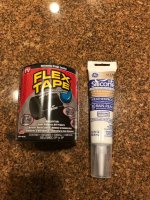
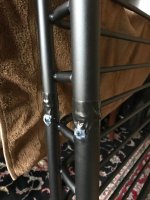
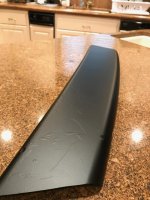
For the most part I used this thread for purchasing the products used, so I need to thank the OP! But, I want to do a small write up of the install, and what I did to the rack beforehand. I started by throwing away the self tapping screws they expect you to use, drilled out the connecting holes, and replaced the screws with stainless nuts and bolts. The little engineer deep down in my soul told me that the screws were pretty crappy. Then I taped up the rack, and painted the nuts and bolts, just for insurance. Next, I used silicone caulk and sealed every hole and seam on the rack. Luckily, it seems that all of the welds on my rack were pretty solid, so I didn't need to work on those. Then, I used Flex Tape (as seen on TV!) to top off all of the seams. Lastly, I wrapped the front wind deflector to make it matte black (after I screwed up painting the whole thing and realized I had extra wrap laying around. Now you can see the horrible paint job under the wrap. Why didn't I sand it after the crap paint job?...I don't know. This was the biggest brain fart of the week. Live and learn). Then, I installed the mounting hardware, and lifted the rack up on the truck. I used some thickly folded moving blankets placed on the roof to ensure I didn't drop it. Tightened everything down, and bam, I was done!

Overall, I think it turned out pretty well for $150 rack (Other than my disgraceful paint/wrap job on the front wind deflector)! Now hopefully the Minnesota winter doesn't eat this thing alive. :crybaby:
 

Attachments

  • IMG_2693.jpg
    IMG_2693.jpg
    147.7 KB · Views: 1,469
  • IMG_2669.jpg
    IMG_2669.jpg
    126.7 KB · Views: 1,464
  • IMG_2682.jpg
    IMG_2682.jpg
    120 KB · Views: 1,442
  • IMG_2683.jpg
    IMG_2683.jpg
    147.4 KB · Views: 1,435
  • IMG_2690.jpg
    IMG_2690.jpg
    126.1 KB · Views: 1,433
  • IMG_2680.jpg
    IMG_2680.jpg
    134.3 KB · Views: 1,431
Last edited:
Beaver Step

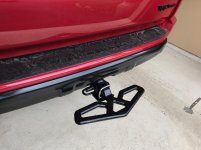
Bought a Beaver step, a hitch tightener and a locking pin for the hitch. This serves as a nice step for accessing the roof rack, a good device to hook a tow strap up to, and some bumper protection for small fender benders.

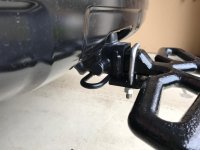
I originally just bought the step and the pin, but once I received it in the mail and put it in the hitch, I instantly realized that it is way too loose, so I next day shipped the hitch tightener on Amazon. Seems pretty heavy duty, and should do its job!
 

Attachments

  • IMG_2700.jpg
    IMG_2700.jpg
    136.3 KB · Views: 1,386
  • IMG_2701.jpg
    IMG_2701.jpg
    119.9 KB · Views: 1,363
Last edited:
Ellis Precision Shift Knobs

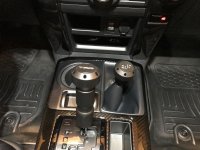
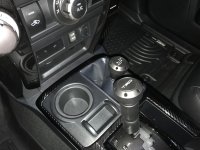
After waiting a couple months for these beauties, they finally arrived! Man they are sexy.Very big upgrade over the OEM transmission lever, minimal upgrade for the transfer case lever (the OEM transfer case shifter is very nice actually).

Overall, the product fits better in my hands, looks nicer, and has a nice heavy feel over the OEM knobs. These are not a gimmicky bologna modification. They are the real deal. I thought they were a little excessive when I first saw them here, but I was wrong. Great purchase, would 10/10 recommend to anyone looking for a little interior boost!
 

Attachments

  • IMG_2705.jpg
    IMG_2705.jpg
    136.4 KB · Views: 1,393
  • IMG_2704.jpg
    IMG_2704.jpg
    128.7 KB · Views: 1,400
Last edited:
Mod #13: Beaver Step


Bought a Beaver step, a hitch tightener and a locking pin for the hitch. This serves as a nice step for accessing the roof rack, a good device to hook a tow strap up to, and some bumper protection for small fender benders.


I originally just bought the step and the pin, but once I received it in the mail and put it in the hitch, I instantly realized that it is way too loose, so I next day shipped the hitch tightener on Amazon. Seems pretty heavy duty, and should do its job!


I have the exact same set up on your hitch, but I added the some grip tape to avoid slipping especially in the winter.

And btw... nice 4runner and build so far.


Sent from my iPhone using Tapatalk
 
Mod #13: Beaver Step

Bought a Beaver step, a hitch tightener and a locking pin for the hitch. This serves as a nice step for accessing the roof rack, a good device to hook a tow strap up to, and some bumper protection for small fender benders.

I originally just bought the step and the pin, but once I received it in the mail and put it in the hitch, I instantly realized that it is way too loose, so I next day shipped the hitch tightener on Amazon. Seems pretty heavy duty, and should do its job!


Ummm...you're gonna paint that hitch tightener, right?
 
Mod #14: Ellis Precision Shift Knobs

After waiting a couple months for these beauties, they finally arrived! Man they are sexy.Very big upgrade over the OEM transmission lever, minimal upgrade for the transfer case lever (the OEM transfer case shifter is very nice actually).

Overall, the product fits better in my hands, looks nicer, and has a nice heavy feel over the OEM knobs. These are not a gimmicky bologna modification. They are the real deal. I thought they were a little excessive when I first saw them here, but I was wrong. Great purchase, would 10/10 recommend to anyone looking for a little interior boost!

Nice! Love the look of those knobs. Clean
 
I have the exact same set up on your hitch, but I added the some grip tape to avoid slipping especially in the winter.

And btw... nice 4runner and build so far.


Sent from my iPhone using Tapatalk

That’s a great idea, might have to copy you on that one. Thank you, I appreciate it!
 
Ummm...you're gonna paint that hitch tightener, right?

Hahahahaha yes, that’s the plan. It’s been so cold in MN recently, haven’t been motivated enough to paint it up! I was also anxious to get it on, so waiting for paint to dry was not an option :rofl:
 
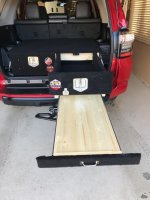
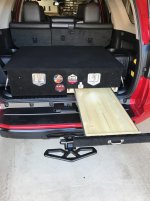
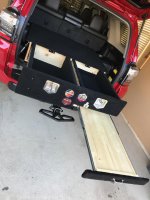
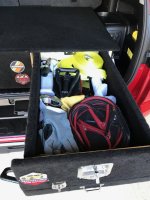
Rear Drawer System:

This is more of a build update, but whatever. Mods, builds, additions, dealies, thing-a-ma-jiggers....all the same to me.

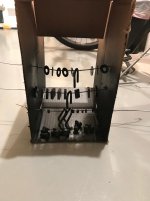
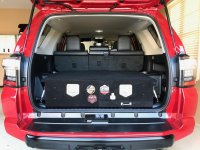
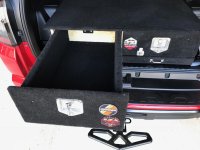
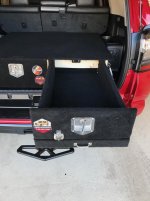
Anyway, here is something I have always wanted but did not want to fork over $2,000+ for a quality system, so I built my own. The outcome is perfect in my eyes, and I have everything that I wanted in a drawer system, including some features not found in the expensive pre-build systems. While this is "home built" (For the majority of the woodwork, I rented out a small woodworking shop in the Minneapolis area because I don't have table saws, chop saws, a warm shop, etc. etc.), it was constructed with quality materials, and I spent roughly 20 hours getting it to this stage. No easy task, but it turned out great for a weekend warrior handy guy. It still needs a little paint, some sanding here and there, installation of the top tie down system, and a rubber mat, but thats for another weekend.

The structure is simple. Simple frame, simple drawer structure, simple slides, simple tie down method. Nothing too fancy. But all of the materials are top notch, and it is solid as a rock. I think it weighs as much as a rock too...time for some airbags?

I will let the pictures do the talking now:
 

Attachments

  • IMG_2735.jpg
    IMG_2735.jpg
    140.5 KB · Views: 1,270
  • IMG_2736.jpg
    IMG_2736.jpg
    137 KB · Views: 1,289
  • IMG_2737.jpg
    IMG_2737.jpg
    137 KB · Views: 1,273
  • IMG_2738.jpg
    IMG_2738.jpg
    131.3 KB · Views: 1,276
  • IMG_2739.jpg
    IMG_2739.jpg
    137.6 KB · Views: 1,269
  • IMG_2740.jpg
    IMG_2740.jpg
    136.9 KB · Views: 1,279
  • IMG_2741.jpg
    IMG_2741.jpg
    142.6 KB · Views: 1,278
Last edited:
Mod 15: Rear Drawer System

This is more of a build update, but whatever. Mods, builds....all the same to me.

Anyway, here is something I have always wanted but did not want to fork over $2,000+ for a quality system, so I built my own. The outcome is perfect in my eyes, and I have everything that I wanted in a drawer system, including some features not found in the expensive pre-build systems. While this is "home built" (For the majority of the woodwork, I rented out a small woodworking shop in the Minneapolis area because I don't have table saws, chop saws, a warm shop, etc. etc.), it was constructed with quality materials, and I spent roughly 20 hours getting it to this stage. No easy task, but it turned out great for a weekend warrior handy guy. It still needs a little paint, some sanding here and there, installation of the top tie down system, and a rubber mat, but thats for another weekend.

The structure is simple. Simple frame, simple drawer structure, simple slides, simple tie down method. Nothing too fancy. But all of the materials are top notch, and it is solid as a rock. I think it weighs as much as a rock too...time for some airbags?

I will let the pictures do the talking now:

Dang dude that’s sweet. How much to build me a set?
 
Last edited:

Members online

No members online now.

Forum statistics

Threads
278,312
Messages
3,554,083
Members
248,016
Latest member
Advally Service

Trending content

Back
Top