Aftermarket black headlights - review and lots of pics

Unfortunately, these new lights are not OEM quality. I had to trim the driverside turn signal socket because the pattern on the housing is backwards. Also, on both headlight housings, they left out part of the casting that securely locks in the hi-beam bulb behind the socket. I added a short screw to help hold the bulb in place.

I had the same experience as well. Prior to installation, I ran a bead of clear RTV silicone around the seals, trimmed the turn signal socket, but didn't mess with the loose high beam sockets. I've been running around Florida in high humidity and rain for over a month now with no sign of moisture inside the housings as of yet...
 
Last edited:
So I bought the same one as everyone else but I could help but notice the projector was extremely crooked. Anyone else have this issue?

Yes! Mine looked exactly like yours. Both L/R projectors appeared to be off-center, but symmetrical, so I paid it no mind. The cutoff is good and sharp, but friends riding ahead of me at night have commented on a "rainbow effect", which I assume is due to some light refraction going on in the lenses and not the "off-center" projectors.

Also, I discovered that a good place for adjusting headlights is at a loading bay behind a big box store at dusk. The ground is level, there is enough room, and there is a nice flat wall/door with horizontal lines to take measurements on. The place I used even had seams in the pavement so that I could make sure the vehicle was perfectly straight and perpendicular to the wall. I would suggest asking for permission first though.
 
Last edited:
I had the same experience as well. Prior to installation, I ran a bead of clear RTV silicone around the seals, trimmed the turn signal socket, but didn't mess with the loose high beam sockets. I've been running around Florida in high humidity and rain for over a month now with no sign of moisture inside the housings as of yet...

I also ran a bead of clear RTV around the seals just in case.

Yes! Mine looked exactly like yours. Both L/R projectors appeared to be off-center, but symmetrical, so I paid it no mind. The cutoff is good and sharp, but friends riding ahead of me at night have commented on a "rainbow effect", which I assume is due to some light refraction going on in the lenses and not the "off-center" projectors.

Also, I discovered that a good place for adjusting headlights is at a loading bay behind a big box store at dusk. The ground is level, there is enough room, and there is a nice flat wall/door with horizontal lines to take measurements on. The place I used even had seams in the pavement so that I could make sure the vehicle was perfectly straight and perpendicular to the wall. I would suggest asking for permission first though.

The driver side projector and hi beam reflector were also like this on my set. Before removing the OEM headlights, I had marked the light pattern for both low and high beam on the garage wall from 10' away and up close as well as tire placement on the floor. When I first turned on the lights with the new housings, I noticed the driver side was really low and the passenger side was right on the money. After adjusting the driver side up to where the cutoff should be, the projector and high beam reflector look much more centered. I would guess the projector is only off center by a hair more than 1/16th of an inch. Not bad for ebay lights.

I also notice the slight "rainbow" at the top of the cutoff. My 2014 TE headlights cutoffdon't look like that but I can't remember if the OEM 4th gen lights did that or not (it's been a long time since those lights projected a clear cutoff).
 
Yes! Mine looked exactly like yours. Both L/R projectors appeared to be off-center, but symmetrical, so I paid it no mind. The cutoff is good and sharp, but friends riding ahead of me at night have commented on a "rainbow effect", which I assume is due to some light refraction going on in the lenses and not the "off-center" projectors.

CORRECTING OFFSET PROJECTORS:

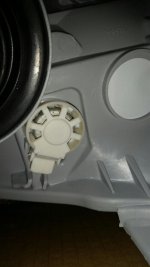
There are two adjustment knobs on the back of the headlights. One does up/down of the projector and the other does left/right. The left/right knob is under a white cover that you can pop off (see picture below). Once the cover is removed it looks just like the other adjustment knob. It takes more turns than you might think but I was able to get the projector back to center using the knob. Depending on which side you are adjusting, turning clockwise/counterclockwise will move the projector inward or outward.

Now I feel bad about *****ing the guy out over email and making him send me a new set haha. In my defense I did ask him if there was a way to correct left/right and he never mentioned a second adjustment screw and one of the projectors did have a defect in the lense causing some refraction :)

Hopefully this helps other people having the same issue.

*you will likely have to take the headlights out to get to the other adjustment site, especially on the driver's side. You might be able to get to it with the battery removed but not sure as I did it with them off the vehicle.
 

Attachments

  • 2015-06-09 08.48.52.jpg
    2015-06-09 08.48.52.jpg
    29.2 KB · Views: 2,321
Last edited:
CORRECTING OFFSET PROJECTORS:

There are two adjustment knobs on the back of the headlights. One does up/down of the projector and the other does left/right. The left/right knob is under a white cover that you can pop off (see picture below). Once the cover is removed it looks just like the other adjustment knob. It takes more turns than you might think but I was able to get the projector back to center using the knob. Depending on which side you are adjusting, turning clockwise/counterclockwise will move the projector inward or outward.

Now I feel bad about *****ing the guy out over email and making him send me a new set haha. In my defense I did ask him if there was a way to correct left/right and he never mentioned a second adjustment screw and one of the projectors did have a defect in the lense causing some refraction :)

Hopefully this helps other people having the same issue.

*you will likely have to take the headlights out to get to the other adjustment site, especially on the driver's side. You might be able to get to it with the battery removed but not sure as I did it with them off the vehicle.

I would caution adjusting the projector too much toward the driverside though. It may center the projector and look better but end up blinding on-coming traffic.

just dont strip it when adjusting, take the time and do it right at 25ft 3inch drop is best.

I also recommend this way. I just need to find a semi-dark, level place to do this that I can put some temporary marks on the wall and not get in trouble.

Driving with the new lights just before dawn yesterday I could tell they were a bit too high so I re-adjusted. Hopefully, they will be right on this morning.
 
I also found this on candlepower's website on how to aim different types of lights. I believe these headlights are marked VOL.

How to Aim Vehicle Lamps

just use blue tape or black duct tape.
vol mean left and vor is right.
just center the truck and mark the wall, center of projector, and then measure the distance from left and right and transfer to wall, then back the truck to adjust height using the buttom step cutoff at 3 inch down from actual height of projector on truck, then line up the left and right.
 
just use blue tape or black duct tape.
vol mean left and vor is right.
just center the truck and mark the wall, center of projector, and then measure the distance from left and right and transfer to wall, then back the truck to adjust height using the buttom step cutoff at 3 inch down from actual height of projector on truck, then line up the left and right.

Gotcha. Makes sense, I only looked at the left headlight and seen the VOL.
 
I would caution adjusting the projector too much toward the driverside though. It may center the projector and look better but end up blinding on-coming traffic.

I definitely get what you are saying. Using the Left/right knob only moved the projector away from the housing so that it was centered and only barely widened to throw of light--only about a half inch which is how far off the projector was in the housing. It doesn't actually change the throw of light outward or inward, in other works, the angle is unchanged---I should have used different terminology. Without them centered in the housing light was actually coming through the side and scattering light everywhere. I'll be sure and test them and make sure they are not dangerous for other drivers on the road.


am running them, some other folks here are using them too. throw in 5k/6k hid bulbs and you are good to go.

cons:
1. cutoff isnt sharp and light is a bit scattered , adjusting and aiming helps --- intend to try that soon and see if there is much difference
2. halo/angeleyes are weak...not visible on a bright day, only pronounced at night/dusk/dawn/v clowdy days

pros:
1.build is excellent, no yellowing or cracking 1 yr after
2. vastly improves the look of the truck 3x
 
So I bought the same one as everyone else but I could help but notice the projector was extremely crooked. Anyone else have this issue?].
I do have the same issue. I returned it and got a replacement. The new set is much better but one of the light still slightly crooked.
 
I have had the black housing lights in my 06 for about a month now. They look nice with no leaking so far.

The have however started to melt and crack below the projector lenses. One side cracked and the other is melting. They have regular headlight bulbs in them from my factory lights. No HIDs or high watt bulbs.

I contacted the eBay seller oemassive on eBay and they offered to send me a new pair. Today I received another message that they did not have any of the lights in stock and could offer me a partial refund of $40. They still have current auctions for the same lights though :rolleyes:. I let them know they were still selling the lights on current auctions so we will see what happens.

<a data-flickr-embed="true" href="https://www.flickr.com/photos/97994710@N07/19504109204/in/photostream/" title="20150722_202510"><img src="https://farm4.staticflickr.com/3761/19504109204_13b9403aa3_z.jpg" width="640" height="360" alt="20150722_202510"></a><script async src="//embedr.flickr.com/assets/client-code.js" charset="utf-8"></script>

<a data-flickr-embed="true" href="https://www.flickr.com/photos/97994710@N07/19504107974/in/photostream/" title="20150722_202521"><img src="https://farm4.staticflickr.com/3698/19504107974_16b29dfecb_z.jpg" width="640" height="360" alt="20150722_202521"></a><script async src="//embedr.flickr.com/assets/client-code.js" charset="utf-8"></script>
 
I wish someone would just sell replacement clear lens. You really cannot beat OEM headlights in terms of quality and fitment.

This ^^^

The light pattern for both low and high beams are better with the OEM lights. I would've been happy with just replacing the clear lens and painting the housing. The ebay lights are ok but the light pattern is a biit distorted. Still, it's better than light trying to get through really pitted and yellowed lenses.
 
Why Toyota deviated from glass lenses like the 3rd Gen has, is just dumbfounding. The Tacoma from the same year as my 3rd Gen 4Runner had plastic lenses that were more opaque than clear! You would think Toyota would have learned from those mistakes.

As much as I want something done about my clouding 4th Gen lenses, there just seems to be too many problems with the ebay housings, and comes with the usual problems dealing with ebay sellers as well.

I'll be waiting for a better solution I guess. Maybe buy a set of these, bake the lens off, throw the housing in the trash, and put the new clear lenses on my old Toyota housings.
 
Last edited:

Members online

No members online now.

Forum statistics

Threads
278,315
Messages
3,554,130
Members
248,016
Latest member
Advally Service

Trending content

Back
Top