AllPro CV boots

42s on u

New member
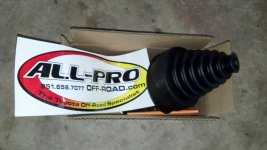
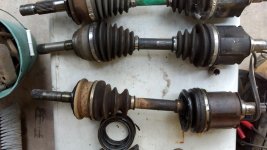
Anyone have any experience with CV boots from All pro? I bought a set and put one on and it's huge. The diameter on the big end is way bigger than the cv. The old one fits inside the one from all pro. Anyone have this issue?

I am running manual hub cv's, not sure if that makes a difference or not.
 

Attachments

  • IMG_20130924_163410_789.jpg
    IMG_20130924_163410_789.jpg
    72.1 KB · Views: 2,006
  • IMG_20130924_163545_006.jpg
    IMG_20130924_163545_006.jpg
    84.1 KB · Views: 2,188
Register to hide this ad
Just installed these. Maybe I just made up what they were supposed to do but i cut the base of my old stock ones, and glued them to the inside of the All-Pro boots. Fits like a glove and banded down tightly.

Sorry I didn't snap any good photos of the boot hack job before they went in the truck.
 
I'd PM mudaddict over on Marlin or Pirate. He works for AllPro, he might have used those boots on his taco before his SAS.
 
Just installed these. Maybe I just made up what they were supposed to do but i cut the base of my old stock ones, and glued them to the inside of the All-Pro boots. Fits like a glove and banded down tightly.

Sorry I didn't snap any good photos of the boot hack job before they went in the truck.

Interesting, didn't think about that. Sounds like a good idea.

I'd PM mudaddict over on Marlin or Pirate. He works for AllPro, he might have used those boots on his taco before his SAS.

I'll try and track him down over on Pirate. Thanks
 
Alot of these aftermarket CV boots are just a universal fit that is larger than most CVs. I think all you need to do is trim the wide end to the correct size.

Edit: On the inner CV, you cannot use a universal CV due to the non-circular fitment. I have found that EMPI makes an exact replacement CV that will contour over the CV perfectly. The suggestion to cut the base of the OEM CV and just wrap the new boot on top isn't the proper way, but I suppose it could work too.
 
Last edited:
I've got new OEM inner boots, I bought the AllPro's to get the extra travel hoping to not break them out wheeling. But the diameter is so much bigger I didn't know if this was normal or what is a good remedy for it.
 
I thought about trimming them, but it didn't seem to have a good purchase where it got narrower.

Plus my method keeps the whole giant a$$ boot in one piece, meaning maximum length, meaning maximum travel hopefully. Anyway, i might have rigged it wrong, but it makes sense to me.

Also, looking at it after install, at full droop, without the diff drop installed, they seemed a lot happier than the OEM ones.

edit: i had OE boots and they were in one piece, but not brand spankin new. maybe try stretching your new OE boots, and when they crap the bed install the All-Pros?

edit #2: i think more than the fact that they were too big, the thing that made me think to install the old boot inside the new boot was that the factory CV (maybe replacements too) have a three concaves (i.e. it's not round and the allpro boot was meant for a round base. my method takes up the space perfectly, as it utilizes the oem "seating" for the boot. i'd be really surprised if this isn't exactly what All-Pro intended; it just worked too damned well

 
Last edited:
So I contacted mudaddict over on another board and this was his response.

Oh and he works at AllPro:hat:


I don't mind at all. I didn't run them on my truck before i solid axled it. But with that on the large side you retain part of your old boot and then slip our boot over it so it still steals correctly.

i have attached directions hopefully they help explain a bit better. This is for the inner but its the same for both sides of those axle shafts.
Any questions let me know you can also call here at the shop 951-928-4777 - Thanks Kurtis

Thank you for purchasing our High Angle CV Boot Kit!
Notice to customer: This High Angle CV Boot Kit is designed to reduce CV boot wear in high angle situations. This part is not designed to fit in the same manner as the OEM CV boot. Special fitting is required for this product to function properly. It is the sole responsibility of the installer to ensure the CV boot fits and functions properly. By installing this product the customer accepts these terms.
Read and understand these instructions before beginning installation. The use of a tensioning tool for “band-it” type CV boot clamps is required for installation.
1. Drain the front differential and remove the axle assembly per manufacturer’s instructions.

2. Remove both clamps from the inner CV joint. Slide the CV boot toward the outside of the axle shaft.

3. Remove the axle shaft from the inner CV joint per manufacturer’s instructions. Remove any spring clips or snap rings. Remove the inner CV boot from the axle shaft. Do not discard.

4. Replace/service the outer CV joint if applicable at this time.

5. Carefully clean the inner CV joint and related parts.

6. Slide the new high angle CV boot over the axle shaft.

7. If the inner CV joint case is not round but “tulip” shape, perform this step. Cut the inner flange from the original CV boot. This is the part that the larger clamp was placed over. Slide this section of the boot over the CV joint case. The high angle CV boot will install directly on top of this piece where the clamp is installed.

8. Assemble the CV joint per manufacturer’s instructions, be sure that all snap rings and spring clips are in their proper location. Use one pack of grease in the joint and another in the boot. It is very important to keep the larger sealing surface of the boot and CV joint case clean and dry.

9. With the CV joint extended to it’s middle position, slide the high angle CV boot over the inner joint case and place directly on top of the section of original CV boot. Slide the outer flange (small) of the high angle boot over the axle shaft until it rests in its appropriate machined landing in the axle shaft.

10. Slide the inner (larger) flange of the high angle boot along the inner CV joint case until the boot rests at a neutral position. Using a tensioning tool, install the provided CV boot clamps on each end of the high angle CV boot. Once each clamp is tensioned, stake the center of the hole with a hammer and punch and fold the clamp back over itself. Cut off the excess material.

11. Ensure that the CV boot will hold firmly in position.

12. Install the axle per manufacturer’s instructions and fill the differential with the proper lubricant.
 

Members online

Forum statistics

Threads
278,307
Messages
3,554,049
Members
248,016
Latest member
Advally Service

Trending content

Back
Top