ANTMAN'S Thread

Thanks!

1. Soldering is always a better, more permanent connection.

2. Spade connectors have a way of coming loose sometimes and then you have to figure out which one went where, lol.

3. Spades would have made the install depth even deeper.

4. I like to solder.


Nothing wrong with the crimp-on spades, they work. Whenever I use them I always squeeze the connector together with needle-nosed pliers first so they fit tighter.

PS- I just knew you couldn't stay away from a new switch post...


You are correct, soldering always gives you a stronger connection. I still like having the ability to take things apart without having to cut wires - so I went for some push connectors. If you ever do any more OTRATTW switches, these are literally a perfect fit for the spades on the back of the switches. They are very tight and I guarantee they won't be coming off anytime soon. But you can still remove them if necessary (takes a little effort, but they'll pop off again).

100% agree on the space saving though!
 
I still like having the ability to take things apart without having to cut wires

I hate cutting wires too! You don't necessarily have to cut wires, just heat up the terminal enough to soften the solder and pull the wire off. Butane soldering irons, perfect and portable for that type of work. :) I hate crimping anything, too many failures, all my fault of course, if I solder I know it will stick.
 
I hate cutting wires too! You don't necessarily have to cut wires, just heat up the terminal enough to soften the solder and pull the wire off. Butane soldering irons, perfect and portable for that type of work. :) I hate crimping anything, too many failures, all my fault of course, if I solder I know it will stick.

Honestly, there won't be anything to cut.

The ground is a ring terminal that can be unbolted. The other 3 wires- Ignition power, Aux battery (+), and 12v(+ out) to the solenoid can all be fitted with quick disconnects. The wires soldered to the switch can remain intact when the switch is removed.
 
Thanks!

1. Soldering is always a better, more permanent connection.

2. Spade connectors have a way of coming loose sometimes and then you have to figure out which one went where, lol.

3. Spades would have made the install depth even deeper.

4. I like to solder.


Nothing wrong with the crimp-on spades, they work. Whenever I use them I always squeeze the connector together with needle-nosed pliers first so they fit tighter.

PS- I just knew you couldn't stay away from a new switch post...

I agree with all your points, but just thought I should share my experiences for those of you reading this and planning to solder directly to the switch terminals (I swear I'm not trying to even remotely suggest that you're doing it wrong Jeff, lol). Just wanted other's to learn from my mistakes :)

For those new to soldering, be very very careful about applying too much heat to the terminals when making your connection! It does not take much heat at all to melt the internals of the switch, so solder with as little heat as necessary to fuse the joint. Pre-tinning the wire and terminals with a bit of solder also helps to cut down the heat exposure. :cheers:
 
I see ten terminals and all those wires with you guys discussing soldering versus clips as I sit and figure out how I'm going to wire a set of rigid dually's which are basically dummy proof with three connectors.

Oh well I wouldn't be doing that without the inspiration from you guys, awesome work as always Antman!
 
I agree with all your points, but just thought I should share my experiences for those of you reading this and planning to solder directly to the switch terminals (I swear I'm not trying to even remotely suggest that you're doing it wrong Jeff, lol). Just wanted other's to learn from my mistakes :)

For those new to soldering, be very very careful about applying too much heat to the terminals when making your connection! It does not take much heat at all to melt the internals of the switch, so solder with as little heat as necessary to fuse the joint. Pre-tinning the wire and terminals with a bit of solder also helps to cut down the heat exposure. :cheers:

You are correct Eddie!

Pre-tin the wires and the terminals first, AND it's very important to have a clean soldering iron that is fully up to temperature and tinned.

I always clamp the soldering iron in a vise situated at an angle that allows me to keep both hands free. One hand for the part I'm soldering, and one to feed the solder.

With practice it's easy!
 
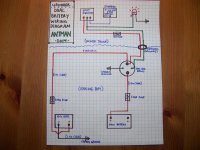
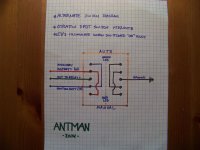
As promised, I drew up a quick wiring diagram for the dual battery setup.

To keep it simple, I have one diagram showing a simple SPDT switch controlling the relay, and an LED indicator lamp.

The second diagram shows the wiring for the OTRATTW DPDT switch I used in case someone wants to use that one.

I'll add these to the original writeup too!


100_4305.jpg

100_4311.jpg
 

Attachments

  • 100_4305.jpg
    100_4305.jpg
    131.4 KB · Views: 2,540
  • 100_4311.jpg
    100_4311.jpg
    124.1 KB · Views: 2,122
I spent the day working on the truck a little bit. Rotated the tires, lubed the driveshaft, cleaned the salt out of the engine bay and detailed the interior.

After the maintenance I did a quick little MOD, [MENTION=75328]DannyLlama[/MENTION] the psychic...

I added a pull-strap to the rear hatch. It was hard as hell pulling the hatch closed from inside the cargo area. Now it's easy!

I used some nylon strap and a plastic grommet to finish the hole in the panel.

There is a metal support bracket that holds the hatch ECU, and it has a handy slot already cut in it for the strap to feed through. I just needed to drill one little hole for the bolt. I used a stainless bolt/locknut with some washers to secure everything. Mounted like this the hatch cover can still be removed with no tools. Easy, fast and useful (for me at least!), and it's right next to my hatch-release button.


And the genius mods keep coming. I should've listened to your nutsert suggestion for the fire extinguisher, you've got these odd jobs down.
 
I guess newer models come with the pull-strap as my 13 SR5 has one from the factory. It's located closer to the passenger side, and mounts with a 10mm bolt.

Just detailed my baby inside and out, too! Sore as hell...

As you were :cool:
 
Mr. Man :)

I might attempt to do the pull strap mod, for the wife.
Can you grace us with the parts you used to make the strap.

Was it a hard mod to do, total time spent? If your amateur not in Ant time.

Very clean work btw.. my jealousy deepens.
 
Mr. Man :)

I might attempt to do the pull strap mod, for the wife.
Can you grace us with the parts you used to make the strap.

Was it a hard mod to do, total time spent? If your amateur not in Ant time.

Very clean work btw.. my jealousy deepens.

Parts for the strap? LOL- I cut up an old backpack and used the nylon strap! Just cut it and burn the edges so they don't unravel.

The grommet was in my parts pile, but you can get one at Home Depot or here..Standard Nylon Grommets

Then you just need a short (3/4") bolt with a locknut and 2 washers.

Really easy- took me 10 minutes, if that.
 
PS- IF you decide to do this, I'll measure the dimensions to the center of the hole for you to make it even easier!:zoom:
 
Antman,

What did you use to coat the garage floor? Looks like it holds up well to jack stands and jacks. We're building a new house, and want to coat the floor before we move in. If anybody else has floor covering suggestions, please let me know!

Thanks!
 
This looks amazing! Well done. Hope this isn't a stupid question. How much height do the airbags add?


Thanks!
They may add an inch or close to two when aired all the way up. I run them at about 7 psi normally and they do not add any height at all at that pressure. I only use them to level the back as needed.

Antman,

What did you use to coat the garage floor? Looks like it holds up well to jack stands and jacks. We're building a new house, and want to coat the floor before we move in. If anybody else has floor covering suggestions, please let me know!Thanks!

I used a Rustoleum kit from Home Depot- cheap at $100!

It has held up remarkably well. I have spun the tires on the floor pulling into the garage and it didn't effect the paint at all.

I spent 2 solid days cleaning the floor first. I literally painted all the edges with a brush wearing new white socks and they didn't have a speck of dirt on them when I was done. Prep is key.

Also for added gloss I use Zep floor wax- the kind they use in hospitals to make the floors look wet. I strip and reapply every few years. Any overspray, spills come up with the wax leaving my floor pristine underneath!
 
Last edited:
I used a Rustoleum kit from Home Depot- cheap at $100!

It has held up remarkably well. I have spun the tires on the floor pulling into the garage and it didn't effect the paint at all.

I spent 2 solid days cleaning the floor first. I literally painted all the edges with a brush wearing new white socks and they didn't have a speck of dirt on them when I was done. Prep is key.

Also for added gloss I use Zep floor wax- the kind they use in hospitals to make the floors look wet. I strip and reapply every few years. Any overspray, spills come up with the wax leaving my floor pristine underneath!


Good info, thanks! I was looking at the Rustoleum, and Behr brand. I think I'll stick with Rustoluem.

Does the Zep wax make the floor slippery?
 
Trail Edition Skid Plate Swap


Rear frame rail ( the bolt with the "8" on it is securing the rear tank strap to the frame):


Happy Modding gentleman!

Hey Jeff, so the the driver side part of the 2 extra bolts, bolts on the same mount/bolt as the gas tank strap? or next to it? Please tell me next to it, I just filled up and already took off the old skid.
 

Members online

Forum statistics

Threads
278,306
Messages
3,554,045
Members
248,016
Latest member
Advally Service

Trending content

Back
Top