Anyone Hardwire a Radar Detector yet?

4RunnerTrail

New member
I have a Valentine One from my last ride and will be installing on my 4 Runner. Not planning on driving to fast in this puppy but i have so may as well throw in there. Anyone have details? Please post instructions and or pics.
 
Register to hide this ad
I have a Valentine One from my last ride and will be installing on my 4 Runner. Not planning on driving to fast in this puppy but i have so may as well throw in there. Anyone have details? Please post instructions and or pics.

Fuse tap into the 12V accessory outlet in the fuse box, run the wire up the a-pillar, under the headliner and mount next to mirror for stealth operation.

Thats how I mounted my 9500ix>V1
 
Fuse tap into the 12V accessory outlet in the fuse box, run the wire up the a-pillar, under the headliner and mount next to mirror for stealth operation.

Thats how I mounted my 9500ix>V1

Did you remove the a pillar and just sneak under headliner?

My last car i ran from sunroof/homelink controls near rearview mirror. Would like to run from there. Just need to tap into a hot wire, but need to know how the stuff comes apart dont want to break any clips, etc.
 
Did you remove the a pillar and just sneak under headliner?

My last car i ran from sunroof/homelink controls near rearview mirror. Would like to run from there. Just need to tap into a hot wire, but need to know how the stuff comes apart dont want to break any clips, etc.

Yes the A-pillar cover slides out after removing the grab handle with 2 phillips screws.

You can wire it to the lights - I forgot about that. Just pull it down from the front back. Everything comes apart easily and is easily installed.

Dont be afraid to yank.
 
If you have an auto-dimming mirror, you can mount and "soft" wire the detector directly to the mirror. I say soft, because you just stick two metal pins in the mirror power connector clip inside the black channel running from the mirror to the roof. I just did it with my 2010 4Runner Limited. It looks great and there are no wires to route, splice, etc! The entire project took 10 minutes.

The BlendMount mount and Invisicord cable can both be bought at MGT Motorsports for either Beltronics/Escort detectors or Valentine detectors.

MGT Motorsports - MGT Motorsports.com
BlendMount - Welcome to BLENDMOUNT.COM | Innovative Mounting Solutions For Automotive Accessories
Invisicord - Invisicord Products Home Page
 
If you have an auto-dimming mirror, you can mount and "soft" wire the detector directly to the mirror. I say soft, because you just stick two metal pins in the mirror power connector clip inside the black channel running from the mirror to the roof. I just did it with my 2010 4Runner Limited. It looks great and there are no wires to route, splice, etc! The entire project took 10 minutes.

The BlendMount mount and Invisicord cable can both be bought at MGT Motorsports for either Beltronics/Escort detectors or Valentine detectors.

MGT Motorsports - MGT Motorsports.com
BlendMount - Welcome to BLENDMOUNT.COM | Innovative Mounting Solutions For Automotive Accessories
Invisicord - Invisicord Products Home Page

Wow ,Thanks and Welcome to the forum mpotter!:thumb3:
Great first post!
 
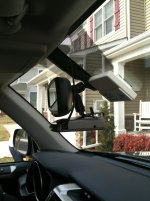
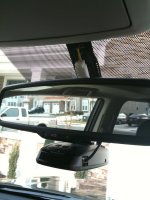
I had a PM asking for pics and instructions for the Blendmount/Invisicord install, so I figured I'd post it here for all to see.

If wiring to the rear-view mirror wiring, I highly recommend the Blendmount or a similar secure mount, NOT the suction cups as they tend to lose their grip over time, especially in seasonal temperature areas. The BlendMount is a very straightforward clamp-type mount that clamps on to the rod holding the rear-view mirror. There are various adjustments that can be made including height and angle.

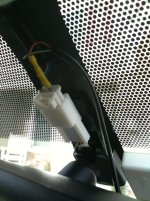
The Invisicord wires into the mirror power connector inside the black channel running from the mirror to the roof. The black channel covers just pop off. I wired the Invisicord to the connector coming down from the roof, not up from the mirror because the pins fit easier. For my install, the yellow pin (12V) connects to the blue wire. The black pin (ground) connects to the white wire. Check your wires with a voltmeter to make sure which is which. The pins can easily be removed later if you wish.

IMG_0589.jpg

IMG_0590.jpg

IMG_0591.jpg
 

Attachments

  • IMG_0589.jpg
    IMG_0589.jpg
    130.1 KB · Views: 9,880
  • IMG_0590.jpg
    IMG_0590.jpg
    133.3 KB · Views: 9,352
  • IMG_0591.jpg
    IMG_0591.jpg
    139.3 KB · Views: 9,085
I recieved and installed my Blendmount kit for my Valentine One radar detector today. Excellent quality and fast service.I had this Valentine on my BMW for years,hardwired ,but with the stock suction cups and had no idea they even made these.They are nice. :bravo:
Here are a few pics.;):

<a href="http://s420.photobucket.com/albums/pp282/gharper60/?action=view&current=Picture007.jpg" target="_blank"><img src="http://i420.photobucket.com/albums/pp282/gharper60/Picture007.jpg" border="0" alt="Photobucket"></a>

<a href="http://s420.photobucket.com/albums/pp282/gharper60/?action=view&current=Picture004-1.jpg" target="_blank"><img src="http://i420.photobucket.com/albums/pp282/gharper60/Picture004-1.jpg" border="0" alt="Photobucket"></a>

<a href="http://s420.photobucket.com/albums/pp282/gharper60/?action=view&current=Picture001-1.jpg" target="_blank"><img src="http://i420.photobucket.com/albums/pp282/gharper60/Picture001-1.jpg" border="0" alt="Photobucket"></a>
 
I had a PM asking for pics and instructions for the Blendmount/Invisicord install, so I figured I'd post it here for all to see.

If wiring to the rear-view mirror wiring, I highly recommend the Blendmount or a similar secure mount, NOT the suction cups as they tend to lose their grip over time, especially in seasonal temperature areas. The BlendMount is a very straightforward clamp-type mount that clamps on to the rod holding the rear-view mirror. There are various adjustments that can be made including height and angle.

The Invisicord wires into the mirror power connector inside the black channel running from the mirror to the roof. The black channel covers just pop off. I wired the Invisicord to the connector coming down from the roof, not up from the mirror because the pins fit easier. For my install, the yellow pin (12V) connects to the blue wire. The black pin (ground) connects to the white wire. Check your wires with a voltmeter to make sure which is which. The pins can easily be removed later if you wish.

View attachment 23960

View attachment 23961

View attachment 23962

Very cool - what length of Invisicord did you use?
 
Sorry for the delayed response. I've been without power for the past 4 days in the Mid-Atlantic blizzards . . . the 4Runner is making out great though!

I used the standard length (8" I believe) as sold through MGT Motorsports. I did just see that different lengths are available directly through Invisicord. I will say that for the Beltronics anyway (with the power port torwards the front), the 12" will give you a bit more wiggle room for routing the wire.
 
Which wire is which?

I've got a 2008 4Runner with the auto-dimming/compass mirror. I purchased the Blendmount and the Invisicord but can't determine which wire is the ground and which is power in the mirror harness.

There are only two wires; a yellow and a white w/black stripe.
Does anyone know for sure so I don't damage something?

Thx.
 
I've got a 2008 4Runner with the auto-dimming/compass mirror. I purchased the Blendmount and the Invisicord but can't determine which wire is the ground and which is power in the mirror harness.

There are only two wires; a yellow and a white w/black stripe.
Does anyone know for sure so I don't damage something?

Thx.
According to this 2003 wiring diagram which should be the same for 4th Gens..
Yellow is pos. and white/black is neg. See attachment below...
 

Attachments

That did it....

I plugged the yellow shrinkwrapped lead from the Invisicord into same pin as yellow wire, and the black lead into the pin for the white/black wire. All is working just fine!

On the seven pin mirror harness, pin one is the yellow wire (12V) and pin two is the white/black wire (ground).

Thank you!
 
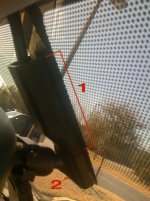
Can anyone let me know how to remove this plastic cover covering the connectors. I was able to remove the upper plastic piece no problem but not sure how the other comes off. I don't want to break it. I took a photo and labeled that piece 1. There is a screw bottom, 2. Does that have to be loosened ? I'm thinking not.


Thanks all.
 

Attachments

  • IMG_1069.jpg
    IMG_1069.jpg
    100.5 KB · Views: 3,220
The screw in Part 2 does not need to be removed unless you want to remove the entire mirror assembly from the windshield.

The lower sleeve (Part 1) can be removed just by gently wiggling the part upwards until it pops off.
 

Members online

Forum statistics

Threads
278,309
Messages
3,554,071
Members
248,016
Latest member
Advally Service

Trending content

Back
Top