Automatic headlights at night : possible mod?

Yeah, I'm pretty much the same as you - I'm sure I could do it, but I prefer to have some clear guidance rather than be the trailblazer who starts picking his new-ish truck's dash apart.

I found this post covering the same retrofit in a 4th Gen. I bet our install would be much the same. I wonder if our truck uses the same wiring harness? The thing I can't quite make out from the thread is what he is unplugging from behind the instrument cluster to plug in the light sensor harness.

That's exactly the kind of guide I'd need to feel comfortable taking this on. I really just don't want to mess anything up on my 4Runner. The wife would never let me live it down ;) It makes me wonder though just how similar the 5th gen is to the 4th.
 
That's exactly the kind of guide I'd need to feel comfortable taking this on. I really just don't want to mess anything up on my 4Runner. The wife would never let me live it down ;) It makes me wonder though just how similar the 5th gen is to the 4th.

Well, you gotta think that Toyota has only come up with so many ways to wire an ambient light sensor. Given the fact that every Toyota and/or Scion vehicle I've ever driven has had the exact same parts-bin switchgear (mirror controls, dash brightness wheel, heck, even the light sensor itself is used across Toyota's lineup), I'm inclined to believe that the internals can't be that different.

I may poke around my truck and see how easy it looks to get the cluster off. If it seems straightforward enough, I'll probably eventually do this, in which case I will definitely update this thread with pics and info.
 
Well, you gotta think that Toyota has only come up with so many ways to wire an ambient light sensor. Given the fact that every Toyota and/or Scion vehicle I've ever driven has had the exact same parts-bin switchgear (mirror controls, dash brightness wheel, heck, even the light sensor itself is used across Toyota's lineup), I'm inclined to believe that the internals can't be that different.

I may poke around my truck and see how easy it looks to get the cluster off. If it seems straightforward enough, I'll probably eventually do this, in which case I will definitely update this thread with pics and info.

Well good luck! I hope you figure it out so I can try it myself.
 
This got me thinking - we could probably just take parts from a 4th gen or other Toyota model with auto headlights. Might need to hit the pick n pull this weekend if I get a few hours.
 
This got me thinking - we could probably just take parts from a 4th gen or other Toyota model with auto headlights. Might need to hit the pick n pull this weekend if I get a few hours.

Would the wiring harness be the same though? I'm sure the light sensor hasn't really changed.
 
Would the wiring harness be the same though? I'm sure the light sensor hasn't really changed.

Not sure. But I think it's reasonably likely that the harness plug for the switch is the same for example, or for the light sensor. If you're using the same component in 50 models, no reason not to use the same pig-tail and plug. Maybe not - but it's pretty cheap to pull a few parts and check.
 
For those that have the auto headlights, does anyone know if there is a way to change the length of time the follow me home lights stay on? (when the lights stay on for a time after you park). Thanks.
 
Hi Bimmer-Bob,

I'm leaving this 5'th gen 4Runner 'limited' Headlight circuit diagram here on this thread; hoping that you (everyone) will accomplish your goal. I took a quick look at the diagram and marked the essentials needed to make it work, "see below":


It looks like you'll need only four parts as noted by the I.D. labels in pen e.g., the Headlight dimmer switch assm, Dimmer SW. harness, Automatic light control sensor, and the Light control sensor harness. The Main body ECU Network compu are ALL the same from 2010 to 2015, so no changes needed there.

Cheers!

Can anyone help me locate the live headlight wire? I want to tap into it so when I manually turn the headlights on it also turns on my inclinometer light. I want to run the wire and tie into the headlight wire inside the 4runner and just need to know where it is located and what color. I think the answer is in this diagram but I would like confirmation from someone before I tap into anything. I have a 2015 sr5.
 
Can anyone help me locate the live headlight wire? I want to tap into it so when I manually turn the headlights on it also turns on my inclinometer light. I want to run the wire and tie into the headlight wire inside the 4runner and just need to know where it is located and what color..."

Hi RedRunner,

"...I think the answer is in this diagram but I would like confirmation from someone before I tap into anything. I have a 2015 sr5..."

Some of the information that you need is on page (2 of 2) on the diagram below; but keep reading...

The problem that you would have tapping directly into the 'Secondary' (high current load/headlight) wiring is that this circuit is 'HOT AT ALL TIMES' and so, offers no platform for switching control. The Headlights are controlled on the Negative side of the circuit so when you turn them on, you're not supplying power to the lights, you're providing a ground to complete the circuit. This is known as: Negative-side switching circuitry; which most late model auto manufacturers have employed today. All of our lights/accessories are hot at all times... that's good to remember when working on the truck's electrical system because just turning an accessory off with the switch Does Not de-energize that device!

The Wire Of Interest: (Below) This will need to be on the 'Primary' or the control side of this circuit. It's a PINK wire and runs from the 'Main body ECU' (pg 1 left, see label), and then enters the diagram on pg 2 (below), wire number 2 at the left-side of the diagram; "See the BLUE arrows".
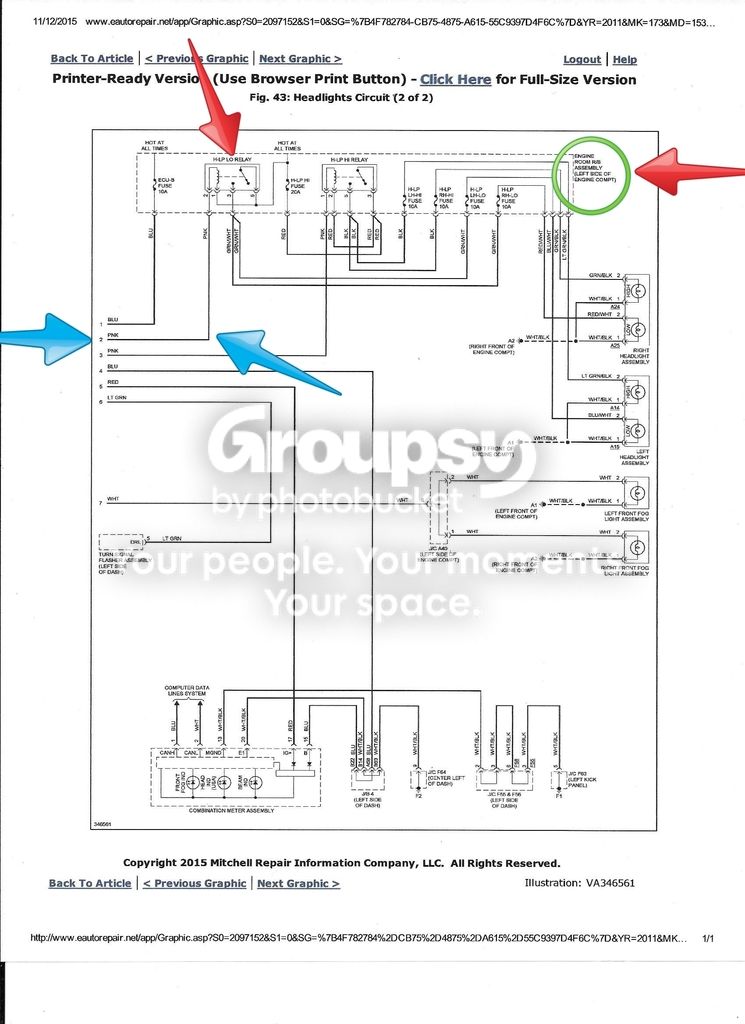


After having studied the two diagrams and trying to decided upon the best way to approach the issue of accessing the wire(s) needed to trigger your new 'Inclinometer' light, I don't think you'll be able to locate that pink wire in the Main relay/fusebox because there are many pink wires running through that main harness to the vehicle's interior. But... there may be a solution to this problem. You could (1)... Pull the Headlight relay (RED arrows, top of diag) from it's base, pick up another (short) relay harness with the same 'foot-print' and tap into the ground lug (Pin #2 on the relay) on that harness. Or (2)... you can go after the Dimmer switch harness and find the Lt Green wire that provides ground to the truck's low beam relay; "See below":
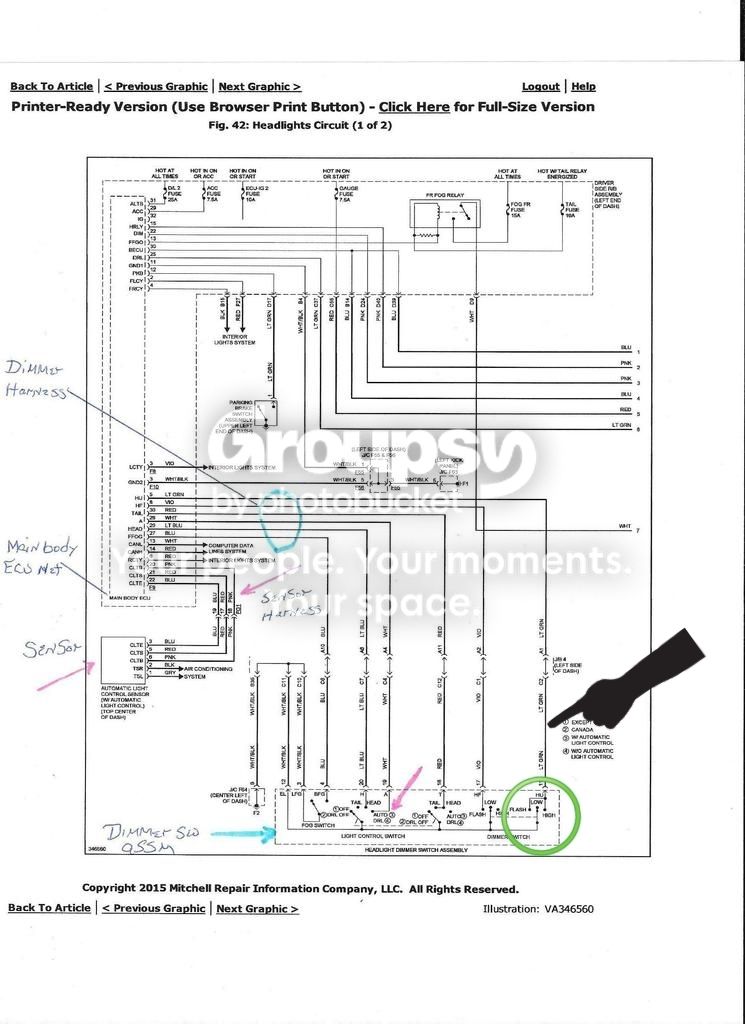


I've placed a green circle around the low beam dimmer switch contacts, and 'Pointed' at that Lt Green low beam ground wire to make it easier to find. It runs through the steering column's wire trough but I've never tried to access it so I can't tell you exactly how to approach it; I'm sure someone else here has done it. Let us know how you make out with this project, it'll be a great teaching tool for this forum, Rgds

...and cheers! (rigtec)

 
Last edited:
Hi RedRunner,


Some of the information that you need is on page (2 of 2) on the diagram below; but keep reading...

The problem that you would have tapping directly into the 'Secondary' (high current load/headlight) wiring is that this circuit is 'HOT AT ALL TIMES' and so, offers no platform for switching control. The Headlights are controlled on the Negative side of the circuit so when you turn them on, you're not supplying power to the lights, you're providing a ground to complete the circuit. This is known as: Negative-side switching circuitry; which most late model auto manufacturers have employed today. All of our lights/accessories are hot at all times... that's good to remember when working on the truck's electrical system because just turning an accessory off with the switch Does Not de-energize that device!

The Wire Of Interest: (Below) This will need to be on the 'Primary' or the control side of this circuit. It's a PINK wire and runs from the 'Main body ECU' (pg 1 left, see label), and then enters the diagram on pg 2 (below), wire number 2 at the left-side of the diagram; "See the BLUE arrows".


After having studied the two diagrams and trying to decided upon the best way to approach the issue of accessing the wire(s) needed to trigger your new 'Inclinometer' light, I don't think you'll be able to locate that pink wire in the Main relay/fusebox because there are many pink wires running through that main harness to the vehicle's interior. But... there may be a solution to this problem. You could (1)... Pull the Headlight relay (RED arrows, top of diag) from it's base, pick up another (short) relay harness with the same 'foot-print' and tap into the ground lug (Pin #2 on the relay) on that harness. Or (2)... you can go after the Dimmer switch harness and find the Lt Green wire that provides ground to the truck's low beam relay; "See below":


I've placed a green circle around the low beam dimmer switch contacts, and 'Pointed' at that Lt Green low beam ground wire to make it easier to find. It runs through the steering column's wire trough but I've never tried to access it so I can't tell you exactly how to approach it; I'm sure someone else here has done it. Let us know how you make out with this project, it'll be a great teaching tool for this forum, Rgds

...and cheers! (rigtec)
Rigtec, this is great information and probably more than I am equip to handle. I will take some time to review your breakdown and see if this more work for the simple convenience of having the light turn on with the headlight switch compared to adding a new switch and wiring it accordingly. I think the new switch is more up my alley, but this is still something I want to think through. Appreciate the rundown down.
 
I think you could buy headlight bulbs that have a warranty on how long they will last, and then just leave your headlights on all the time. That's what I do.:)

Cheers,
Matt
 
"Rigtec, this is great information and probably more than I am equip to handle. I will take some time to review your breakdown and see if this more work for the simple convenience of having the light turn on with the headlight switch compared to adding a new switch and wiring it accordingly..."

Hi RR,

I've taken a another hard look at the Headlight Circuit to see exactly what would need to be done to trigger a relay harness by the headlight 'Dimmer switch' and it's simple (can't understand just why I overlooked this 'infantile solution' to this puzzle)... All you need to do is wire your new relay coil across the HOT (+) and GND (-) wires to a headlight bulb so when you activate your headlight circuit (High or Lowbeams, your choice), the relay contacts will close, ...BANG!

NOTICE:..."rigtec has recently undergone his fifty(something)'th birthday and now suffers from 'Acute 4getalot syndrome' accompanied by chronic bouts of 'Scrambled noodle'oid chromious-domious' on the kranious-brainy-less frontal lobocus... updates on this condition... PERHAPS! :nono:

lol cheers
 
Last edited:
Hi RedRunner2015,

Here's a way to implement your relay 'trigger' from the headlight wiring source w/o cutting into the oem headlight harness. Cutting directly into the oem headlight wiring harness may cause damage, or compromise the small gauge (H-11) leads in that exterior lighting loom. Using an aftermarket 'pigtail' extension will prevent the risk of that from ever happening. Here's a link to the part: H11 Extension Wiring Harness Socket Headlight Connector Adapter for Car - Walmart.com Rgds

k2-_2c12c4a9-303a-4d5b-b839-e4ceac8901f8.v1.jpg
 
Any developments on this?

Interested if there has been any further developments on this. Surprised the 'premium' doesn't come with this as standard. Didn't really think about it til we got home!
 
just leave the lights on the on switch

Think this has been mentioned previously but I just leave the lights on and then when I lock the car using the fob after a couple of minutes the lights go off. Suspect there is a timer somewhere in the circuit that disconnects when locked. I think earlier in the thread there was mention of two touches of the lock key on the fob but not sure if that hastens this or not..


Interested if there has been any further developments on this. Surprised the 'premium' doesn't come with this as standard. Didn't really think about it til we got home!
 
Click twice for lights out

Just click the lock button twice and the lights go out immediately. Not sure if I like running them on all the time though. Still 'Toy'ing with it.
 
"By on all the time" - I assume concern over battery drain? I suspect a simple timer circuit is in play here and takes care of that? Anyone checked the implementation of the light circuit?

Just click the lock button twice and the lights go out immediately. Not sure if I like running them on all the time though. Still 'Toy'ing with it.
 
"By on all the time" - I assume concern over battery drain? I suspect a simple timer circuit is in play here and takes care of that? Anyone checked the implementation of the light circuit?

I just meant leaving the switch in the on position all the time and thereby having headlights on during daylight hours since there is no photocell that turns them off during the day like regular 'auto' headlights.
 

Members online

Forum statistics

Threads
278,310
Messages
3,554,078
Members
248,016
Latest member
Advally Service

Trending content

Back
Top