Backup Camera Reverse signal wire

Smstnsn

Junior Member
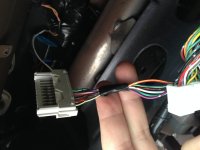
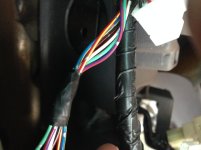
Hello everyone! I recently purchased a 2000 limited 4runner and one of the first things i did was to swap out the stock headunit for my pioneer avh-x5500bhs and install my backup camera with it. There are some write ups on installing backup cameras however the one thing that is commonly left out is the reverse signal wire used to give the headunit a signal to display the camera. The only other suggestion I found was to run a wire all the way from the reverse light itself or to splice into the switch directly on the transmission. However after some experimenting I decided to use the signal wire behind the dash panel that activates the drive indicator light. If you can disassemble the dash using another guide then you can splice into this signal wire and drop the new wire right behind the dash to the back of your headunit. The attatched pictures so the wire you want. Its attatched to one of the plugs on the left side of the instrument cluster and is red with a yellow stripe. Hope this helps anyone with their backup camera install!

 

Attachments

  • securedownload.jpg
    securedownload.jpg
    122.8 KB · Views: 21,643
  • securedownload-1.jpg
    securedownload-1.jpg
    132.3 KB · Views: 15,100
Register to hide this ad
Thanks

:thanks: #Smstnsn for posting this info. I am planning to replace my head unit with reverse cam. This gave me heads-up. I am still trying to understand what is going on with these wires...
 
I did the same. I ran a 18 or 20 GA wire from the head unit to the reverse light. You are going to be running the AV cable back there anyway which is actually a LOT larger gauge than the "trigger" wire so you might as well. You could run it to the "R" light on the dashboard too if you want to dig in there. I actually found it easier to run the wire in the door trim all the way to the back.
 
Hmm just wired mine last week down pass side while I was installing my head unit but would have preferred your spot even though I was doing RCA cables and video wire at same time. I got a cheapie license plate mount cam (yet to finish this job up)- where did you guys go through the rear hatch at?
 
I went through on the left side looking from the outside. You will have to remove the wiring harness where the wires run from the body to the gate and fish a coat hanger through to pull the wires. The interior panel and the metal panel underneath will have to be removed to access the wire. MY logic for not running a wire directly from the lights was that i had already ran the RCA cable down the door trim and i would have had to remove the entire panel in the rear cargo area and just didn't feel like going through the process again.
 
also when running the wire from the camera itself i removed one of the small taglights and above them to the side is a piece of foam leading to the interior of the hatch. I just forced my wires through this foam in order to access them from the inner panel.
 
No Display for Rear view Camera

Yesterday, I have installed Panasonic AVH-X1500DVD. Everything works as far as system itself is concerned but today, I tried to install rear view camera...

I bought camera form amazon. Amazon.com : Waterproof Car Rear Vehicle Backup View Camera High-definition Cmos 170 Degree Viewing Angle E363 : Electronics

Later decided to buy video cable with detection wire. 5M RCA Car Reverse Rear View Parking Camera Video Cable with Detection Wire | eBay

For Stereo, signal wire (Violet/white) was attached to detection wire(yellow) and video was attached to video in on back of stereo.

At camera end; got power from reverse tail light. The Yellow detection wire was attached to red wire.

Question: My setup is correct or not? if yes! Do I have to change any setting on Stereo? I am keeping camera to Auto mode in setting.

Thanks for help in advance.
 
Yes when ever I reset my head unit I have to change my settings on my head unit. I was so mad the first time I wires it all up because it didn't work.
Try changing the settings
 
It's working....

Yes when ever I reset my head unit I have to change my settings on my head unit. I was so mad the first time I wires it all up because it didn't work.
Try changing the settings

Thanks man for your reply.

I decided to read the stereo manual once again. As mentioned in my last post, I connected video cable to Video In...:redbrick: , there is rca input for back view camera. So, after correcting my mistake, back-view camera is working perfectly.:zoom:
 
How do you get the wire from the tailgate to the license plate?

There's a decent post here. I am not fully sure on the write up but the pics are good. You remove that chrome cover and the back plastic panel on the tailgate. Then follow up through the trimmings to the rubber housing on top. Use a wire hanger to wring it through. The RCA cable connectors are really big. I drilled a small hole to wriggle my RCA connectors through. U read that you can cut the RCA wires and just solder them back together too since they are wrapped individually inside and you can shrink wrap them back.

I have no idea what Salman above was referring to about the camera end though: At camera end; got power from reverse tail light. The Yellow detection wire was attached to red wire.
-There should be a black, red, and yellow RCA with red wire attached. I saw a video where the red wire from the yellow RCA was spliced to the black ground wire and attached to one of those plug connectors and grounded to the vehicle body. The red wire (power) was then routed back to the headlight or horn fuse with an add a circuit.
 
Last edited:
There's a decent post here. I am not fully sure on the write up but the pics are good. You remove that chrome cover and the back plastic panel on the tailgate. Then follow up through the trimmings to the rubber housing on top. Use a wire hanger to wring it through. The RCA cable connectors are really big. I drilled a small hole to wriggle my RCA connectors through. U read that you can cut the RCA wires and just solder them back together too since they are wrapped individually inside and you can shrink wrap them back.

I have no idea what Salman above was referring to about the camera end though: At camera end; got power from reverse tail light. The Yellow detection wire was attached to red wire.
-There should be a black, red, and yellow RCA with red wire attached. I saw a video where the red wire from the yellow RCA was spliced to the black ground wire and attached to one of those plug connectors and grounded to the vehicle body. The red wire (power) was then routed back to the headlight or horn fuse with an add a circuit.

Thanks - great info
I will search for that other post as well
 
Is the option op used or this option better/easier?
You're looking for pin 1 or 4 on the back of plug 1D of the lower drivers side junction box/fuse panel. From the back it's the lowest left plug, or if your looking at it from the front the lowest right plug. Pins 1 and 4 are the top and bottom ones closest to the tab on the plug. Run a tab into that for the reverse in wire on the radio to trigger the head unit to switch to the camera.

Wiring diagram:
oNvwPzN.jpg


Driver's side JB/Fuse panel:
nWPXhXh.jpg


Red wire with yellow stripe upper right pin location:
jBlnB8u.jpg

Can anyone confirm if the wire/spot is the same in my 98? Could not find a similar page in my service manual.

Or is extending the wires to go to reverse light like most do the easiest/best option?
 
Is the option op used or this option better/easier?


Can anyone confirm if the wire/spot is the same in my 98? Could not find a similar page in my service manual.

Or is extending the wires to go to reverse light like most do the easiest/best option?

I haven't done either one, but I'd bet the underdash fuse box is easier than all the way from the back-up lights.


On a '98, location and plug number 1D are the same. Pin numbers (9, 4 and 3) and wire color (red-yellow) are different:
 

Attachments

Last edited:
I haven't done either one, but I'd bet the underdash fuse box is easier than all the way from the back-up lights.


On a '98, location and plug number 1D are the same. Pin numbers (9, 4 and 3) and wire color (red-yellow) are different:

You can look up the pin-out for Plug 1D below on page 22. That red-yellow next to the tab in your pic is Pin 3.
 

Attachments

Members online

Forum statistics

Threads
278,309
Messages
3,554,066
Members
248,016
Latest member
Advally Service

Trending content

Back
Top