Bandit Runner's Build Thread

I got the phone holder finished and installed. I put a couple coats of gray paint on it. Then used double sided automotive trim tape to mount it.

Without the phone:
IMG_0407_zpsbo2zdoki.jpg~original


IMG_0406_zpsa0casqa8.jpg~original


And with the phone in place:
IMG_6956_zpsgnh0yeiy.jpg~original


IMG_6955_zpsx3emhgnn.jpg~original


It works great! The phone is held securely in place, yet snaps in and out easily.

Wait wait wait. is that the position the 4wd shifter is supposed to be in while in 2wd? I have an 01 and I'm pretty sure mine isn't in that position. Is that some sort of mod? hahah

Edit: never mind mine is the same I must have been remembering the xterra I used to have. :D
 
Last edited:
I’ve been wanting to clean up my battery wiring for a while now. With all my lights and accessories, my positive battery terminal looks like a real rat’s nest. I currently have about a dozen individual wires with inline fuses going to the terminal. One of the reasons I want to clean this up is because soon I will be wiring up my 2000 watt inverter, and those cables are huge, so I need more room.

The problem:
v9kgQ0Z.jpg


I bought two 6 position Jegs fuse boxes. They have indicator lights that light up when a fuse is blown, which is pretty slick.
Tv9IzEW.jpg


Then I cleared off an area on the driver’s side inner fender to make room for them:
NX34AEb.jpg


I bent up a piece of scrap aluminum into a bracket to mount them to:
Kz9TMaC.jpg


The fuse boxes mounted to the bracket:
8LmMVFi.jpg


Everything mounted to the inner fender. I used a 4 gauge wire going from the battery to each fuse box.
ELflECP.jpg


Another view from the top. I used a label maker to label each circuit’s fuse, but you can’t see them very well in the pics.
SIbxB2z.jpg


In doing this, I replaced 10 small wires with 2 large wires coming from the positive terminal. While this was definitely an improvement, I still have several large cables that need to be connected to the battery terminals:
- OEM Cables
- (2) Fuse Box Cables
- ARB Air Compressor Cables
- Inverter Cables (coming soon)
- Winch Cables (future)

There is no way I can get those all connected to the stock terminals. I have an idea for a project that will make connecting all these large cables to the battery very easy and clean looking. More coming on this in the near future…
 
Last edited:
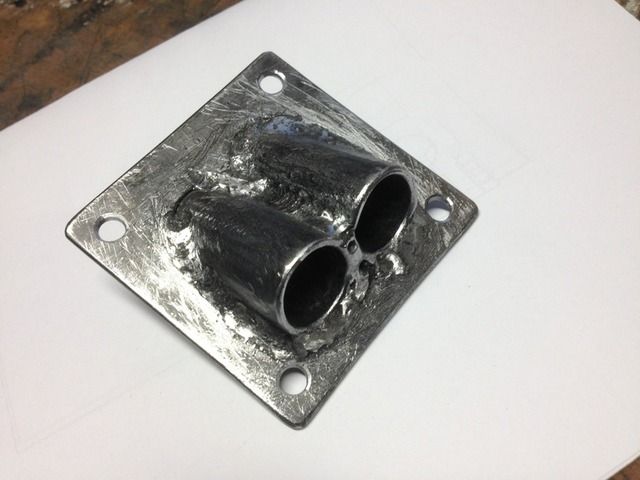
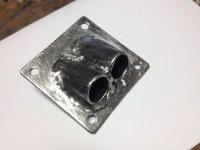
Got a little work done on the inverter install. The inverter will be located under the driver’s seat, but the power cables are too large to run through the firewall and hide under the carpet. So I’ll be running the power cables from the battery down under the truck, and up through the floor of the truck. I needed something to protect the power cables as they came through the floor, and also seal around the cables so no water could enter the truck. So I came up with this:
zpjJeOx.jpg


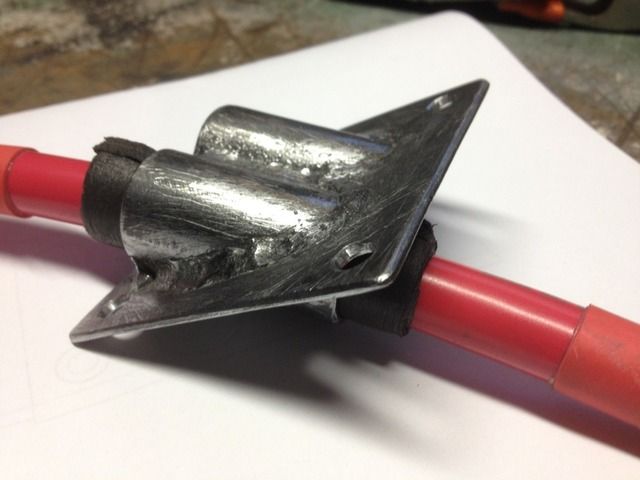
Basically a plate with 2 tubes passing through at an angle. The plate will bolt to the underside of the floor with a foam gasket to seal it. The cables will have a foam gasket wrapped around them and will be forced into the 2 tubes for a tight, leak proof fit. Here’s an example of a cable passing through one of the tubes:
l7PNiRy.jpg


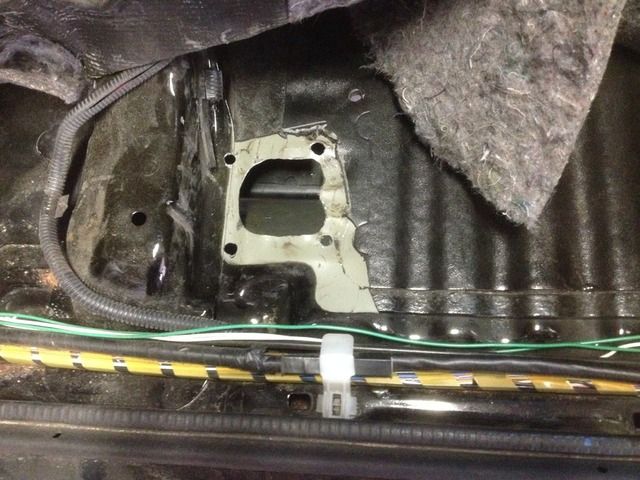
So once I had that figured out, I needed to cut a big hole in the floor of the 4Runner. I cut it just behind the front seat mount, right next to where the inverter will be mounted.
dogc4ov.jpg


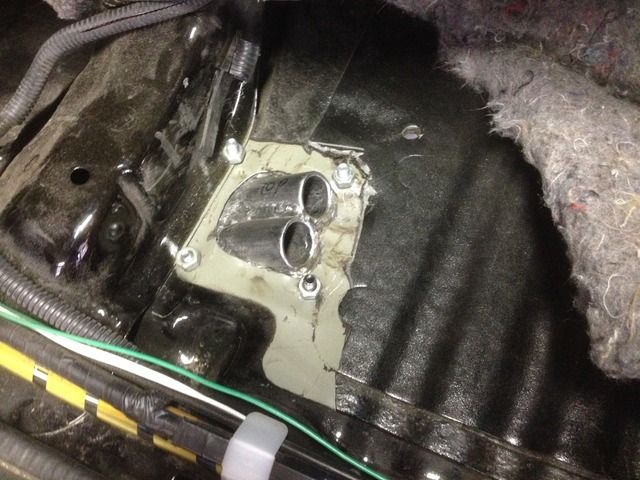
Here’s a pic of the plate mounted to the floor from underneath:
77uomim.jpg


That’s as far as I got, for now.
 
Last edited:
How much did those jegs fuse blocks run you? I may use those in my trailer box if they are cheaper than blue sea systems.
 
How much did those jegs fuse blocks run you? I may use those in my trailer box if they are cheaper than blue sea systems.

The 6-pole version is only like $20. They have 4-pole and 10-pole versions too. That's the reason I went with these versus the BlueSea stuff, less expensive.

They are on the Jegs website:
JEGS Performance Products 10427, JEGS LED Indicator Fuse Blocks | JEGS Performance Products

They seem to be of pretty good quality. I haven't had any issues with them yet.
 
I’ve been wanting to clean up my battery wiring for a while now. With all my lights and accessories, my positive battery terminal looks like a real rat’s nest. I currently have about a dozen individual wires with inline fuses going to the terminal. One of the reasons I want to clean this up is because soon I will be wiring up my 2000 watt inverter, and those cables are huge, so I need more room.

The problem:


I bought two 6 position Jegs fuse boxes. They have indicator lights that light up when a fuse is blown, which is pretty slick.


Then I cleared off an area on the driver’s side inner fender to make room for them:


I bent up a piece of scrap aluminum into a bracket to mount them to:


The fuse boxes mounted to the bracket:


Everything mounted to the inner fender. I used a 4 gauge wire going from the battery to each fuse box.

Another view from the top. I used a label maker to label each circuit’s fuse, but you can’t see them very well in the pics.


In doing this, I replaced 10 small wires with 2 large wires coming from the positive terminal. While this was definitely an improvement, I still have several large cables that need to be connected to the battery terminals:
- OEM Cables
- (2) Fuse Box Cables
- ARB Air Compressor Cables
- Inverter Cables (coming soon)
- Winch Cables (future)

There is no way I can get those all connected to the stock terminals. I have an idea for a project that will make connecting all these large cables to the battery very easy and clean looking. More coming on this in the near future…

I would take some of that 00 Wire and make a power distribution block out of a piece of copper plate mounted in a plastic case. Drill 6 holes on one side of the plate for load lugs and cut out the lid accordingly. That probably doesn't make as much sense as it does in my head.

by the way AWESOME rig and Build post.
 
I would take some of that 00 Wire and make a power distribution block out of a piece of copper plate mounted in a plastic case. Drill 6 holes on one side of the plate for load lugs and cut out the lid accordingly. That probably doesn't make as much sense as it does in my head.

by the way AWESOME rig and Build post.

Thanks. I know what you are saying, and that is very similar to what I am thinking of doing. Hopefully I'll get some work done on it this weekend.
 
A few more small inverter updates. Painted the cable floor plate doohickey:
4s7HIYW.jpg


Made some sheetmetal guards to prevent mud/snow/dirt from getting kicked onto the inverter:
1e5DYT1.jpg


Ordered and received my 300 amp ANL fuses and fuse holder:
SbMlNm1.jpg
 
Last edited:
As for the battery terminal issue, I saw another member use these:
TCr5p1q.jpg


These would provide plenty of places to attach large cables. Here is the link for them:
https://www.droppinhzcaraudio.com/content/toolmaker-5-spot-lug-style-battery-terminal

They look simple enough, so I figured I would try and make my own, to save myself $45 because I'm cheap. A scrap piece of 1/2" thick aluminum, an angle grinder, a drill press, a couple thread taps, and a few hours and I had these. It was actually pretty easy, and they turned out really well:
3obC1T2.jpg


I need to get some stainless steel bolts and I'm going to paint the "+" red and the "-" black yet before I install them. Then I want to figure out some sort of plastic cover for them too.
 
Last edited:
When you have tried the battery lugs please post about how well they work and if there are issues.

Looks like a great idea.
 
Congrats on the Monthly Win - Well deserved

Our engineering department is always looking for some talented and highly skilled engineers. We have one from MIT and another from Stanford where you could teach them a thing or two I'm sure. Your use of CAD is exceptional from concept to finished product. I really enjoy reading and "seeing" what you're thinking as you go through the inception stages. Congratulations to you [MENTION=55891]Bandit Runner[/MENTION] for the award and thanks for giving back to this community of T4R addicts. :trophy:
 
Got a little work done on the inverter install. The inverter will be located under the driver’s seat, but the power cables are too large to run through the firewall and hide under the carpet. So I’ll be running the power cables from the battery down under the truck, and up through the floor of the truck. I needed something to protect the power cables as they came through the floor, and also seal around the cables so no water could enter the truck. So I came up with this:
IMG_0417_zpsun9uatj4.jpg~original


Basically a plate with 2 tubes passing through at an angle. The plate will bolt to the underside of the floor with a foam gasket to seal it. The cables will have a foam gasket wrapped around them and will be forced into the 2 tubes for a tight, leak proof fit. Here’s an example of a cable passing through one of the tubes:
IMG_0418_zpsufzi5rty.jpg~original


So once I had that figured out, I needed to cut a big hole in the floor of the 4Runner. I cut it just behind the front seat mount, right next to where the inverter will be mounted.
IMG_0420_zpsutg3wuhc.jpg~original


Here’s a pic of the plate mounted to the floor from underneath:
IMG_0421_zpsi46jd0q0.jpg~original


That’s as far as I got, for now.

I already said it, but I wanted to in this thread, Congrats on T4ROTM! Well deserved and long time coming.

Now on this inverter pass through, I really like it! I just got mine done and ran the wires under the center console then out and under the driver seat. It is not my ideal setup, so I may borrow this one from your book too.
 
Our engineering department is always looking for some talented and highly skilled engineers. We have one from MIT and another from Stanford where you could teach them a thing or two I'm sure. Your use of CAD is exceptional from concept to finished product. I really enjoy reading and "seeing" what you're thinking as you go through the inception stages. Congratulations to you [MENTION=55891]Bandit Runner[/MENTION] for the award and thanks for giving back to this community of T4R addicts. :trophy:

Wow, Definitely one of the nicest comments I have gotten. Thanks so much!

As you can probably tell, I really enjoy the design process and the challenges of overcoming engineering problems with creative and innovative solutions. Its all about making things user friendly, functional, aesthetically pleasing, and fitting them into predefined space constraints.

I already said it, but I wanted to in this thread, Congrats on T4ROTM! Well deserved and long time coming.

Now on this inverter pass through, I really like it! I just got mine done and ran the wires under the center console then out and under the driver seat. It is not my ideal setup, so I may borrow this one from your book too.

Thanks Ripcord! I actually would have preferred to run the cables through the firewall and under the carpet, but they are just too darn big - over 5/8" diameter. That's why I went with this alternate route of running them under the truck instead, and having them pass through the floor right next to the inverter.
 
Did a test fit of the inverter today. The purpose was to check clearance with the seat, and figure out where to route all the wires.
Ifg0caX.jpg


pyW0ozD.jpg


This is a large inverter, so I had to position it just right to clear the seat when it was being adjusted forward/backward. It just barely fit. Then I looked at wiring. There are 3 wires coming out the far side of the inverter. The first, is the heavy 12 gauge 10’ extension cord. This will run under the carpet past the back seats and all the way to the rear of the truck. There will be an AC outlet at the very back of the cargo area. This will be used to run heavier power tools etc. The second wire is a shorter 18 gauge extension cord with 2 AC outlets on the other end. This will run under the center console to where the 2 outlets will be mounted near the shifter. These will be used to run smaller items like cell phone chargers, etc. The third wire is the small diameter one shown. This is to attach the inverter remote control. This wire will run along the center console to where the remote will be mounted in the center dash. I still need to do some trimming to get the remote to fit in the dash.


[MENTION=99874]7echo[/MENTION]
I also finished up my battery terminals. They work awesome, and I have room for many large cables. Terminals mounted and before connecting wires:
Wwiaqt9.jpg


With the wires connected (plenty of room for inverter, winch, etc):
MHiJwwE.jpg


I’m really happy with how these turned out, but I still want to make some sort of plastic cover for at least the positive terminal.
 
Last edited:
This is fantastic. I can't help but think that this is one awesome, rolling self-generating/reliant powerhouse... Go all kinds of places, run all kinds of things, and be comfortable. Oh, and it looks amazing too boot (winning at both form AND function). As always, I enjoy checking in! :)
 
I have been trying to figure out how run 00 gauge into the cab for an inverter. Would you consider making another one for $$?
 

Attachments

  • image.jpg
    image.jpg
    65.7 KB · Views: 1,145
I've been crawling the interweb looking for this type of solution forever!

IMG_0428_zpsb0shvq78.jpg~original


looks awesome Bandit! do you have any plans of how to go about making a plastic terminal cover yet? i'd love to see what you come with man!

:banana:
 
This is fantastic. I can't help but think that this is one awesome, rolling self-generating/reliant powerhouse... Go all kinds of places, run all kinds of things, and be comfortable. Oh, and it looks amazing too boot (winning at both form AND function). As always, I enjoy checking in! :)

Thanks! You hit the nail on the head with what I am trying to accomplish with this build.

I have been trying to figure out how run 00 gauge into the cab for an inverter. Would you consider making another one for $$?

PM sent.

I've been crawling the interweb looking for this type of solution forever!

looks awesome Bandit! do you have any plans of how to go about making a plastic terminal cover yet? i'd love to see what you come with man!

:banana:

Yup, You can buy them here:
Toolmaker SAE Top Post Lug Style Battery Terminals - Droppin Hz Car Audio

Or build your own like I did. I have not put much thought into the plastic covers yet, but I will.
 
i'm thinking about using Kydex, it's usually used for holster or knife sheaths, look forward to seeing what you come with man!
 

Members online

No members online now.

Forum statistics

Threads
278,309
Messages
3,554,071
Members
248,016
Latest member
Advally Service

Trending content

Back
Top