Bilstein TRD Pro suspension kit on sale PTR13-35140

All the washers/retainers are there properly. It just seems like the shock is actually bigger than the space so the nut sits a bit higher than the top hat. Wanted to see if others put extra bushings or anything just to fill the gap.


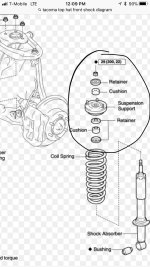
That’s odd.... your 6112s /top hat should be assembled exactly like in this diagram. The retaining washers and cushions below and above the top hat should take up all the “gap” you have. The bottom retaining washers/cushions prevent the shock piston from going too high into the top hat. There is a raised “seat” on the piston that the bottom retaining washer sits on top of. The cushions will compress on both sides of the top hat as you tighten the top nut on the shock piston.
 

Attachments

  • 01A0E2F2-F546-484B-B519-DA55905F578C.jpg
    01A0E2F2-F546-484B-B519-DA55905F578C.jpg
    126.4 KB · Views: 782
Just finished my install on the front. 2017 TRD off road premium with KDSS. Took about two hours start to finish using the no compressor method. The only thing that was a pain in the ass was the KDSS. You have to support the piston (i wrapped a motorcycle tie down around it and tighten the ^&#$% out of it) I also couldn't get the sway bar reconnected while the truck was on jack stands. Once I let it sit on it's own weight I was able to get the passenger side back in.

I used the upper circlip position on both sides and after driving it for 15 minutes hitting every bump I could find, it leveled out right at 36 1/4 ground to fender on both sides.

On a side note, be careful using an impact on the lugnuts. I broke one of the wheel studs (most likely over torqued, I had the impact set at the lowest setting which I thought was 75 ft/lbs but it turns out it's 100). Now I'm not sure if I can trust the rest of them. Probably going to replace all 12 and just use my torque wrench to put them on. :crybaby:
 
On a side note, be careful using an impact on the lugnuts. I broke one of the wheel studs (most likely over torqued, I had the impact set at the lowest setting which I thought was 75 ft/lbs but it turns out it's 100). Now I'm not sure if I can trust the rest of them. Probably going to replace all 12 and just use my torque wrench to put them on. :crybaby:

lol that sucks
 
On a side note, be careful using an impact on the lugnuts. I broke one of the wheel studs (most likely over torqued, I had the impact set at the lowest setting which I thought was 75 ft/lbs but it turns out it's 100). Now I'm not sure if I can trust the rest of them. Probably going to replace all 12 and just use my torque wrench to put them on. :crybaby:

I use a pneumatic impact to take them off. When putting the lugnuts back on, I tend to get them started by hand (nothing like cross-threading with power!) and use an 18V impact to drive them on. I stop as soon as they hit the bottom and finish it off with the torque wrench.
 
You're telling me. I'm about to spend a bunch of time replacing 12 studs :der:

Chances are they are probably fine. Just inspect the others when you replace the one. Obviously, I would back off the pressure on the other side and set them at the proper torque.
 
More feedback from other KDSS owners please! Are we getting less lean with passenger side on top clip? I was planning to have passenger side on top clip, driver on lower clip with dobinsons kdss rear springs. But Stevee seems to be okay with both fronts on same clip

Sent from my SM-G955U using Tapatalk

If you check your factory struts you will see that they are both the same so put both clips in the same spot.

I didn't and regret it because I can visually tell that my passenger side is lower. One of these days I'll pull them apart and put the passenger side on the top.
 
Can you post the list and pictures so folks can verify that they received all the parts?


Here you go. It’s 8 separate pictures so I’ll refrain from posting all but happy to text or PM of someone would like them.


Front Shock Absorber and Boot X2
Front Shock Absorber Spring Seat and Nut X2
Front Springs X2
Rear Install Kit Bag
Rear Install Kit Contents
Rear Reservoir Install Kit Bag X2
Rear Reservoir Install Kit Contents X2
Rear Shock Absorber With Nut X2


Sent from my iPhone using Tapatalk
 
av5MfKj.jpg


Here's after the install. Added a 1" toyotech spacer in the front, and 1.5 inch Dobinsons springs in the rear.

EDIT: Apparently I got a 2" top spacer.
 
Last edited:
Just purchased this kit and would like to pull my fronts out and save them.

What parts are needed to build out the fronts and rear so I don't have to reuse any parts?

TIA
 
You are a good man, CowboyTaco. I would almost drive from Massachusetts for that offer. Just the fact you are offering, you are a winner in my book! :hatsoff:

I would join in the install fun if you made it down here. I think I have done enough front suspensions on these Toyota that I have got it down to about 8 minutes to remove the front coil. That is timed from the truck being on the ground.
 
Can someone confirm for me/send me a pic, is there a rubber bushing attached to the top of the dust boot that ultimately sits against the washer and the bottom of the top hat.


Sent from my iPhone using Tapatalk
 
Can someone confirm for me/send me a pic, is there a rubber bushing attached to the top of the dust boot that ultimately sits against the washer and the bottom of the top hat.


Sent from my iPhone using Tapatalk

THe bushing and washer either comes off your old shocks or you get a new set with the top hat. There’s a diagram a few pages back of how these need to be assembled and if you don’t install the bushing you get from the old shocks or with a kit it causes your issue.
 
THe bushing and washer either comes off your old shocks or you get a new set with the top hat. There’s a diagram a few pages back of how these need to be assembled and if you don’t install the bushing you get from the old shocks or with a kit it causes your issue.


I have looked at that diagram, but that’s from a taco. The 4Runner diagram is actually a bit different. My stock ORP setup did NOT have a rubber bushing under the top hat. Just one above, which is still being used. There was a metal retainer under the top hat that I have confirmed is being used still.


Sent from my iPhone using Tapatalk
 
I REALLY want to jump on this kit but I’ve got it in my head that I want a 2-2.5” lift. I’m right in assuming that’s not possible with this kit without adding a spacer? What are the ride quality changes that come with a spacer?


Sent from my iPhone using Tapatalk
 
Last edited:
I REALLY want to jump on this kit but I’ve got it in my head that I want a 2-2.5” lift. I’m right in assuming that’s not possible with this kit without adding a spacer? What are the ride quality changes that come with a spacer?


Sent from my iPhone using Tapatalk


Having one small issue with mine with a missing part, but very happy with the ride, I have the bottom spacer from toytec and wheeler rear springs. Looks like you’re in Dallas. Shoot me a PM and you can come take a look, go for a ride with me.


Sent from my iPhone using Tapatalk
 
I REALLY want to jump on this kit but I’ve got it in my head that I want a 2-2.5” lift. I’m right in assuming that’s not possible with this kit without adding a spacer? What are the ride quality changes that come with a spacer?


Sent from my iPhone using Tapatalk

No different than preloading a 6112 or 5100.

I am installing the Wheelers Daystar coil isolater on mine, should come out at 2.25”. I’ll do pics and review when I get it installed.
 
I have looked at that diagram, but that’s from a taco. The 4Runner diagram is actually a bit different. My stock ORP setup did NOT have a rubber bushing under the top hat. Just one above, which is still being used. There was a metal retainer under the top hat that I have confirmed is being used still.


Sent from my iPhone using Tapatalk

The Tacoma and T4R shock/top hat bushings/retainers assemble identically. Retainer-bushing-retainer under top hat...bushing-retainer on top of top hat. Exactly how I installed my 5100s on my T4R. FJ kit 6112s assembly should be identical.

Link to pic.....http://www.toyota-4runner.org/5th-g...unner-suspension-options-lots-choices-41.html

Here’s another link discussing bushing retainer placement...
http://www.toyota-4runner.org/3rd-g...u-shock-bushing-placement-not-like-stock.html
 

Attachments

  • 589DDCD2-8C71-4F08-9819-71039BB3BD19.jpg
    589DDCD2-8C71-4F08-9819-71039BB3BD19.jpg
    140.1 KB · Views: 899

Members online

No members online now.

Forum statistics

Threads
278,315
Messages
3,554,125
Members
248,016
Latest member
Advally Service

Trending content

Back
Top