Blacking Out the Runner's Chrome

Well worth it.

Link:

00016 89016 Genuine Toyota 2010 2016 4Runner Black Out Overlay Kit | eBay

Product No. 00016-89016

--

I had my doubts about sticking an overlay on the trim, regardless of what adhesive it came with. On prior cars I've gone through the arduous process of taping/debadging/rebadging post-dip-or-paint - a true pain in the ass - and it was something I desperately wanted to avoid with the new car. That being said, of course, $90 isn't the cheapest option either. But I did it anyway. Vendor got the package to me two days before it was expected, so it was quite a welcome surprise. They got in last night and just before dusk, I grabbed a bottle of CVS 70% ethyl alcohol, latex gloves, and a microfibre towel.

Literally, its as easy as:

- Clean the trim
- Let the residual alcohol evaporate
- Peel the red tabs off (see pictures of trim earlier in the thread) and apply.
- Bask in the glory of a tremendously simple "mod."

--

I had my doubts about the strength of the tape; when you look at it after removing the red tabs, it looks quite shoddy. So about two hours ago I went to the carwash down the street (Three Cees in Herndon for any NoVA T4Rs!) and figured that if the trim could withstand a notoriously "thorough" wash, then they were well-worth the purchase. Much to my surprise, they stayed on - not one bit of "peeling" or "give."


Note:

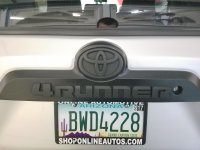
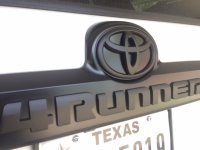
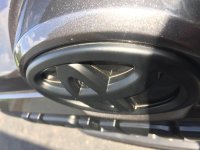
- Remember that because its an overlay you're going to have a VERY small amount of "hang," where the overlay does not lie plush with the car; this is an "issue" only with the individual letters as the Toyota emblems are more "sunken-in." I have yet to see any chrome trim peeping out from beneath. See pictures attached.


Bottom line:

- I couldn't be happier with the overlays.
- Easy installation - very, very, very easy installation
- Parts are OEM, so you get an OEM look - simple.
- Do it.


Pasha


Ps. Sorry for the long post; here's a potato:
 

Attachments

  • Overlay - Rear Emblem.jpg
    Overlay - Rear Emblem.jpg
    128.6 KB · Views: 3,814
  • Overlay - Rear Badging.jpg
    Overlay - Rear Badging.jpg
    114 KB · Views: 3,648
  • Overlay - SR5 Emblem.jpg
    Overlay - SR5 Emblem.jpg
    120.2 KB · Views: 3,702
  • Potato.jpg
    Potato.jpg
    132.3 KB · Views: 3,638
I personally found it easy and cheap to heat up the rear emblems with a blow dryer, take some fishing line to remove them, clean up the area of old residue, scuff/clean the emblems then spray them with satin black paint, use 3M tape and stick them back on. Done is about 90mins(with drying time) and $4.99 for a can of paint. It's smooth and looks OEM.
 

Attachments

  • 13708329_690179206171_3317262348792387612_o.jpg
    13708329_690179206171_3317262348792387612_o.jpg
    130.7 KB · Views: 6,424
I went nuts with Black out

So as for my blacking out of the shiny bits this week, my choice was 80 grit automotive sandpaper, blue tape and masking roller, drop cloths and 9 cans of Rustoleum Bedliner. So far I'm very happy with the results. I had previously put this material on the nose and leading edge of hood but hadn't been aggressive with the sanding so it lifted. I also use the professional cans vs the standard and it's way to thick and very inconsistent, the regular self levels much better. You must use at minimum 3 coats to areas you expect rocks, or bushes or shopping carts to bang it. Lightning sucks in this pic which is not the full Monty, more to follow as we head off on our road trip.
2scHMnTfJo3CVRSM9
 
Question:
I am getting the slimline bumper and wanted to paint the toyota symbol and the trim below it that has factor color paint on it. Was wondering is it the same process. Just plastic matte spray paint, and matte clear coat? or does the factor painted trim need special tools? Attached is a photo of what i would like to do.
 

Attachments

  • painted front emblem and trim.jpg
    painted front emblem and trim.jpg
    135.3 KB · Views: 3,685
Interesting to see some of you guys dipping or spraying Krylon over your factor chrome. That's generally considered a huge no-no in the 4th gen world due to lack of durability (even if the chrome is sanded first).

For you guys that covered your stock chrome handles, I wonder how it's held up.
 
Interesting to see some of you guys dipping or spraying Krylon over your factor chrome. That's generally considered a huge no-no in the 4th gen world due to lack of durability (even if the chrome is sanded first).


For you guys that covered your stock chrome handles, I wonder how it's held up.


If you dip it and it peels in a year, you peel it off in one big sheet and spray it again. The chrome underneath will be untouched good as new... 1 can of PlastDip costs $6. Don't think it's that big of a deal. PlastiDip can usually hand 3+ years of applied correctly and thick enough. And it is 100% removable


Sent from my iPhone using Tapatalk
 
I have a large Toyota emblem and 2 x SR5 covers from the blackout kit that I will gladly give to a member. Just pay postage. IM me if interested. They are gone.
 
Last edited:

Looks great! Anyway you could post a shot a little further back of the whole truck from the front? I'm trying to see a shot with the stock trail rims to see the contrast with MGM. Still undecided but leaning towards trying it out. Thanks
 
Last edited:
I plastidipped the front and back Toyota logos and the 4runner chrome. Pretty happy with the results, we'll see how it holds up. I'm wanting to do the front and back bumper covers on my TEP black also but not sure if plastidip or a vinyl wrap is the way to go?
 
Last edited:
I plastidipped the front and back Toyota logos and the 4runner chrome. Pretty happy with the results, we'll see how it holds up. I'm wanting to do the front and back bumper covers on my TEP black also but not sure if plastidip or a vinyl wrap is the way to go?
37ab5abe0c4202b4c0b886ed4e1b3648.jpg
50de0eacd8bc61ae77284f19c45d8491.jpg
The plastidip on my valances has held up better the it has on the emblems.
 
Looks great! Anyway you could post a shot a little further back of the whole truck from the front? I'm trying to see a shot with the stock trail rims to see the contrast with MGM. Still undecided but leaning towards trying it out. Thanks


Do these help? The ones with the front bumper are better pictures (wheels are clean) but I realize you probably don't have that bumper, and it greatly affects the aesthetic you're trying to evaluate.

f0c13ff0173a52711f9762e02482f11b.jpg
079535d81b4162f2af1916261baa3449.jpg
0c491106938d3164f67ba19919036bb0.jpg
0f64855cec5edda9749ea7bca20cefdd.jpg


Sent from my iPhone using Tapatalk
 
Looking to do this same thing up front, thanks for the info


Sent from my iPhone using Tapatalk
 
Last edited:
Do these help? The ones with the front bumper are better pictures (wheels are clean) but I realize you probably don't have that bumper, and it greatly affects the aesthetic you're trying to evaluate.

f0c13ff0173a52711f9762e02482f11b.jpg
079535d81b4162f2af1916261baa3449.jpg
0c491106938d3164f67ba19919036bb0.jpg
0f64855cec5edda9749ea7bca20cefdd.jpg


Sent from my iPhone using Tapatalk


thank you very much! This is exactly what I needed to evaluate. I still have the front silver valance and plan to keep it that way.
 
Good Ol' Paint

So aside from the roof rails (which I painted matte black a while back) the only chrome bits on my TRD Pro were the rear emblem & lettering. It really did start to drive me crazy that these weren't blacked out form the factory (not so much as the roof rails did though)....so I had to scratch them off the list. Thanks to all those on this forum that provided insight on the removal process.

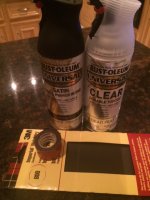
Not a fan of plasti-dip...and I certainly didn't want to bend over for the overlay kit, so I just went the spray-paint route. I've found many times that with good materials, proper preparation and patience, you will yield good results. I spent $28 on a can of Rustoleum Satin Black Paint/Primer, a can of Rustoleum Flat Clear Topcoat, 1" 3M double sided tape, and 800 grit sandpaper.

1.JPG

My process:
First - tape off the lettering on top/bottom and wherever else might be helpful. I also took a thin sharpie and marked where the edge of each letter was (on the tape) to ensure proper realignment. I used fishing line to remove the emblems. Really not difficult at all. My only tip here is to wear gloves, and be careful when removing the large Toyota emblem, as there are two dowel pins that locate the piece that are easily broken off. The letters don't have these, so no worries there. I then removed as much of the old adhesive off the back of the letters as possible, and applied the new double sided tape. Tip - use a break-away blade so you can keep a sharp tip, and cut inward, at an angle so nothing will show around the edges. After wetsanding (lightly) all the pieces, I applied 6 light coats of the black (5 minutes in between each coat), and then 2 coats of the clear. I set them up on small spacers (used for tiling) to make sure they didn't get stuck and to ensure 100% coverage. I found it easiest to peal/roll the old residue off the rear garnish while it was cold (not heated up), and used Goo-Be-Gone to finish it off (no discoloring, which I was slightly worried about). Easy Peasy. Great Results.

4.JPG
 

Attachments

  • 1.JPG
    1.JPG
    117.5 KB · Views: 2,969
  • 4.JPG
    4.JPG
    64.1 KB · Views: 2,930

Members online

Forum statistics

Threads
278,309
Messages
3,554,074
Members
248,016
Latest member
Advally Service

Trending content

Back
Top