BrianSD_42 Photo Journal Build Maintenance Thread

team euro trash is such a good team to be on

Well I hope that is an approving comment. I don't think of it as EuroTrash but hey to each their own.

There are really a very limited number of quality rear wheel drive full sized sports cars out there and I think the 3-series one of the best for the money.

This one handles great due to its stock "sport" suspension is actually quite zippy.
 
i am a member of team eurotrash, its no 330i but it gets the job done

291765_2076426307960_1164039520_31902728_381240_n.jpg
 
Nice!

Despite my anti-VW post, I think Audi are pretty cool. Definitely getting better each year.

Hey, this is a Toyota 4Runner forum. Let's keep the euro rides outta here.


:jk: Both are sweet and super clean. Dig your 3-series. I like the looks of it de-badged. Gives it a real clean look.
 
Update ...

I picked up my Savage Offroad rear bumper today in Riverside. The owner was very nice, installed it for free and I was glad to see that it fit perfectly. Now it only needs to be painted.

Gas mileage back from Riverside on Cruise Control @ 70 MPH = 19.4 MPG!


Time to paint it

I setup my garage for painting (this actually took a few hours) by tarping the floor and walls. Then I put on the first two coats of primer on the bottom side.

I bought 3 cans of Home Depot metal primer and 3 cans of Satin black.

I will also be buying 3 cans of SEM Trim Paint - Satin Black tomorrow, assuming TCP Paints is open in on the Holiday.

My plan is to finish primer coat on the top side tomorrow morning; then put on a coat of the cheap satin Black; let it dry; lightly rough up the surface; followed by coats of the(much more expensive) TRIM Satin Black; let it sit overnight to dry before installing after work on Monday.

Pics to follow.....


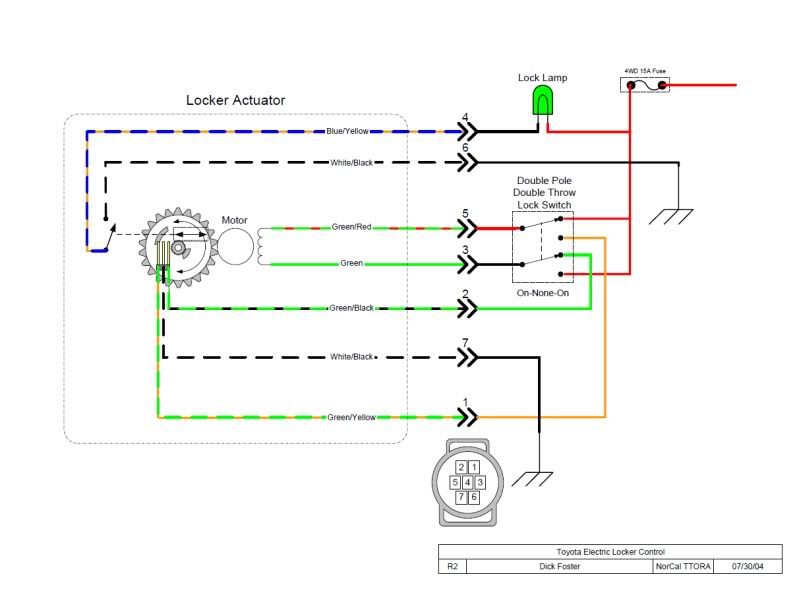
Note to self ... I need to troubleshoot my e-locker ..


Regarding your E-Locker, I would bypass the ECU and test the motor/actuator first before removing it from the diff. If you can apply power directly to the motor and get it to work, then you can narrow the problem down to the E-locker ECU. If you give it direct power and it still doesn't work, you know the problem is the motor/actuator itself.

There should be a harness that connects the E-locker to the chassis. One end plugs into the E-locker motor, the other plugs into the next section of the harness on the chassis roughly 2 feet up the line. I'd disconnect the plug that connects that short ~2 foot section on the Chassis side, and position it so you have access to the terminals in the plug.

Make yourself three 3-foot sections of wire. On the first, attach female blade connectors on both ends. On the next two attach a female blade connector on one end, and strip back a half inch of sheathing on the other end.

To LOCK the diff manually:

1. using the wire w/two female blade connectors, create a jumper between the plug terminals corresponding to the GREEN wire and the GREEN/BLACK wire.

2. Using one of the other two wires, attach the female blade connector to the terminal on the plug that corresponds to the GREEN/RED wire

3. Using the last wire, attach the female blade connector to the terminal on the plug that corresponds to the WHITE/BLACK wire. Since there are two, in the diagram below, I am referring to the one labled #7. If you can't tell which of the two WHITE/BLACK wires corresponds to #7 (which may be tough because the 4Runner plug is rectangular, not round) just try them both. One is a ground for the E-locker motor, the other is a ground for the locked position switch.

4. Once you've made connections 1-3 above, connect the wire off the terminal corresponding to the BLACK/WHITE wire to 12V battery (-), then connect the wire off the terminal corresponding to the GREEN/RED wire to to 12V battery (+).

If the motor is working properly you should hear it lock the diff.

To UNLOCK the diff manually:

1. using the wire w/two female blade connectors, create a jumper between the plug terminals corresponding to the GREEN/RED wire and the GREEN/YELLOW wire.

2. Using one of the other two wires, attach the female blade connector to the terminal on the plug that corresponds to the GREEN wire

3. Using the last wire, attach the female blade connector to the terminal on the plug that corresponds to the WHITE/BLACK wire. (See addt'l steps above in step 3 to LOCK)

4. Once you've made connections 1-3 above, connect the wire off the terminal corresponding to the BLACK/WHITE wire to 12V battery (-), then connect the wire off the terminal corresponding to the GREEN wire to to 12V battery (+).

If the motor is working properly you should hear it unlock the diff.

(NOTE: I might have mixed up which procedure is lock vs. unlock above. Since your diff is currently unlocked, try the LOCK prodedure first. If it does nothing, I may have mixed them up, so try the UNLOCK prodedure. If neither procedure gives you a result, your E-locker motor is dead. The limit switches will prevent you from damaging anything if for instance you run the UNLOCK procedure on a diff that is already unlocked, or vice versa)

If you test it this way and the motor works as it should, then the problem lies with your ECU or chassis wiring.

9b9c0a30.jpg~original


There's lots of info on the web RE rebuilding the E-locker motor... Here are a few I've found:

gear install

Toyota Tacoma Elocker Actuator Repair

UltimateYota.com - E Locker motor repair

Rewind your E Locker Electric Motor!

 
Last edited:
I like how you quoted that little tidbit for posterity there... After I posted that in Rickashay's thread I thought to myself, "that's like a mini write-up, I should probably copy that to my e-locker post." I'll have to do that.

So I'm a little disappointed though... You can't say you got the bumper installed, then NOT post pictures.

WTF? :nono:
 
So I'm a little disappointed though... You can't say you got the bumper installed, then NOT post pictures.

WTF?


LoL ... I was waiting for them to come through my gmail. I took the pics on my iPhone since it is just a simple update...


Thanks for the eLocker advise btw! I need to do that. Mine stopped working about 6 months ago I haven't given it much thought.

:thanks:
 
I see pictures, and I am happy now. Looks great so far man, I'm looking forward to seeing some overall shots once it's fully painted & installed. I've always liked that bumper.

No prob on the E-locker stuff. I hope your fix goes as easy as Rickashay's.
 
Thanks.

I also would like to "chop up" the ARB to look like Brian2Sun's. I don't have any cutting tools so I would probably have to see what a FAB shop would charge.

I am getting my Bud Built cloned in 3/16 Aluminum (vs Steel); this should cut down on the weight significantly (45 lbs vs 90 lbs). I am supposed to get back the new one within two weeks. I already have a buyer for the PowderCoated Red BudBuilt.

I won't be driving around town with a spare (thats what AAA is for). Luckily I can put back into the factory spot for trips.

I don't have a SC so I'm keeping the weight down and sticking with my ~31.4" tires (265x75x16 BFGs). I don't have a roof rack. All of this + my small performance mods has made my truck "quick enough" and able to get 17-20 MPG.

:hatsoff:
 
Nope. I just hope it looks good. I didnt want a plate for the rear because they all cost over $800, and that is with no swing out.

I am sure there are others who won't like it. You guys can use my rig as a sample of what to do or not to do.

If I really hate it, I am sure i can sell it.
 
Nope. I just hope it looks good. I didnt want a plate for the rear because they all cost over $800, and that is with no swing out.

I am sure there are others who won't like it. You guys can use my rig as a sample of what to do or not to do.

If I really hate it, I am sure i can sell it.

well i'm curious of how it will turn out. I know for a fact I will like the tube bumper look..even more if it had a swing out. u can always sell the arb and get the AoR bumper for not to much more! awaiting final pics though
 
Nice moves Brian. Good luck on the E-Locker fix when you get around to it.... with the help from this forum you should be able to fix it no problem.

Nice work on the bumper! I've been waiting for this specific post after I heard you were going with the savage. I was close to going this route as well, I really like the tube and simplicity of that rear bumper. I think it will look good in combo with the ARB.While your doing the lower ARB chop, maybe do some custom/crazy light hoops and hack the old ones off just to incorporate the tube design? I dunno..... just spit balling.
 
What no Squid Sticker??? Anywhere??


Sweet ride!!

Hope all are having a great Hoilday

Prayers to all on this day

Semper Fi
 
Last edited:

Members online

Forum statistics

Threads
278,316
Messages
3,554,120
Members
248,016
Latest member
Advally Service

Trending content

Back
Top