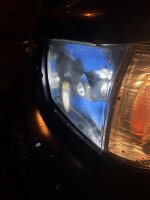
Finally done!
Well I finally completed my very own HID retrofit. I used Brian's thread here as well as octanejunkie's (http://www.toyota-4runner.org/3rd-gen-t4rs/224604-my-3rd-gen-retrofit-projector-project.html). I also got some help from both these guys answering a few stupid questions.
I purchased everything needed (except headlights) from DDM Tuning. D2S V2 bi-xenon kit with range rover shrouds, Ultra HID kit 35w with D2S bulbs 5500k and their H4 high-low harness. I got the headlights from ebay. They're TYC brand with the clear glass, driver side is 20-5652-00 and passenger 20-5651-00 for those interested.
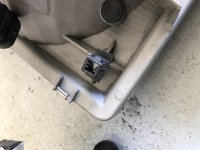
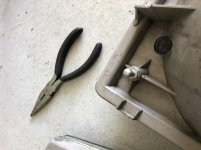
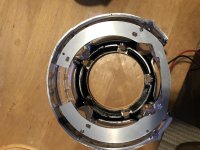
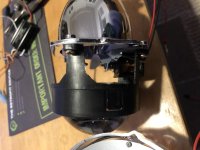
Again, I followed the first post in this thread pretty much 100%. I used all TYC components but per Brian's recommendation I did apply jbweld to the adjusting screws (white part that spins and black part that holds the white part are glued together) and the other "pin" as shown in post 4 of this thread.
I decided to paint my shrouds body color and I did matte black on the housings. I think it looks pretty good but will look even better once I start doing some more mods (satoshi grille, nice bumper and some clear/smoked corners).
Just a few notes for those doing this for the first time...
PLAN everything out. Planning is what made this job easy for me and rushing some things is what made it slow down. Doing it in your home garage (access to tools AND an oven) is much easier as I had to do all the painting and assembling off/on the car at my shop, but baking to disassemble/reassemble at my home. Make sure shrouds fit and you trim the rear of the housing (for the lock nut to fit easier on H4 lock ring) before painting.
Lastly, the one thing I wasn't clear on was aiming and making sure the projectors were level before reassembling lights. What I did was as Brian explained here but on my car... tighten everything really well (once EVERYTHING is done except putting the glass back on) and put the headlight assemblies on the car. Then I rotated the projector (holding the shroud) to make sure it was level. While still installed in the car (didn't want to risk removing them and projectors moving) I applied some JB weld to lock in the H4 adapter ring to the housing and the projector threads. At this point I had my bulbs in as well as the bulb lock ring, so it was easy to see how much jbweld I can put and still have enough thread to lock in the bulb. After letting this set for about 15-20 minutes, I removed the headlights and then applied jbweld liberally around the entire lock ring etc.
Finally, here are some photos...
<a data-flickr-embed="true" href="https://www.flickr.com/photos/130074049@N07/39176410104/in/album-72157692614974285/" title="4RunnerHIDRetrofit (1)"><img src="https://farm5.staticflickr.com/4724/39176410104_f3beb53bd3_b.jpg" width="1024" height="683" alt="4RunnerHIDRetrofit (1)"></a><script async src="//embedr.flickr.com/assets/client-code.js" charset="utf-8"></script>
<a data-flickr-embed="true" href="https://www.flickr.com/photos/130074049@N07/28106317939/in/album-72157692614974285/" title="4RunnerHIDRetrofit (2)"><img src="https://farm5.staticflickr.com/4617/28106317939_45c08e3286_b.jpg" width="1024" height="683" alt="4RunnerHIDRetrofit (2)"></a><script async src="//embedr.flickr.com/assets/client-code.js" charset="utf-8"></script>
<a data-flickr-embed="true" href="https://www.flickr.com/photos/130074049@N07/39176414654/in/album-72157692614974285/" title="4RunnerHIDRetrofit (3)"><img src="https://farm5.staticflickr.com/4654/39176414654_a7bca9b0c4_b.jpg" width="1024" height="683" alt="4RunnerHIDRetrofit (3)"></a><script async src="//embedr.flickr.com/assets/client-code.js" charset="utf-8"></script>
<a data-flickr-embed="true" href="https://www.flickr.com/photos/130074049@N07/39176414424/in/album-72157692614974285/" title="4RunnerHIDRetrofit (4)"><img src="https://farm5.staticflickr.com/4741/39176414424_72c52d8785_b.jpg" width="1024" height="683" alt="4RunnerHIDRetrofit (4)"></a><script async src="//embedr.flickr.com/assets/client-code.js" charset="utf-8"></script>
<a data-flickr-embed="true" href="https://www.flickr.com/photos/130074049@N07/28106317849/in/album-72157692614974285/" title="4RunnerHIDRetrofit (5)"><img src="https://farm5.staticflickr.com/4655/28106317849_b5194c5351_b.jpg" width="1024" height="683" alt="4RunnerHIDRetrofit (5)"></a><script async src="//embedr.flickr.com/assets/client-code.js" charset="utf-8"></script>
<a data-flickr-embed="true" href="https://www.flickr.com/photos/130074049@N07/28106317529/in/album-72157692614974285/" title="4RunnerHIDRetrofit (6)"><img src="https://farm5.staticflickr.com/4744/28106317529_1d2da51d3c_b.jpg" width="1024" height="683" alt="4RunnerHIDRetrofit (6)"></a><script async src="//embedr.flickr.com/assets/client-code.js" charset="utf-8"></script>
<a data-flickr-embed="true" href="https://www.flickr.com/photos/130074049@N07/39176414554/in/album-72157692614974285/" title="4RunnerHIDRetrofit (7)"><img src="https://farm5.staticflickr.com/4604/39176414554_cdd60d9fdc_b.jpg" width="1024" height="683" alt="4RunnerHIDRetrofit (7)"></a><script async src="//embedr.flickr.com/assets/client-code.js" charset="utf-8"></script>
<a data-flickr-embed="true" href="https://www.flickr.com/photos/130074049@N07/28106317709/in/album-72157692614974285/" title="4RunnerHIDRetrofit (8)"><img src="https://farm5.staticflickr.com/4697/28106317709_e472d5793a_b.jpg" width="1024" height="683" alt="4RunnerHIDRetrofit (8)"></a><script async src="//embedr.flickr.com/assets/client-code.js" charset="utf-8"></script>
<a data-flickr-embed="true" href="https://www.flickr.com/photos/130074049@N07/39176414274/in/album-72157692614974285/" title="4RunnerHIDRetrofit (9)"><img src="https://farm5.staticflickr.com/4608/39176414274_e24e4772b9_b.jpg" width="1024" height="683" alt="4RunnerHIDRetrofit (9)"></a><script async src="//embedr.flickr.com/assets/client-code.js" charset="utf-8"></script>
<a data-flickr-embed="true" href="https://www.flickr.com/photos/130074049@N07/39176290014/in/album-72157692614974285/" title="4RunnerOEMLow"><img src="https://farm5.staticflickr.com/4619/39176290014_4f315074db_b.jpg" width="1024" height="683" alt="4RunnerOEMLow"></a><script async src="//embedr.flickr.com/assets/client-code.js" charset="utf-8"></script>
<a data-flickr-embed="true" href="https://www.flickr.com/photos/130074049@N07/28106236659/in/album-72157692614974285/" title="4RunnerHIDLow"><img src="https://farm5.staticflickr.com/4632/28106236659_5231b9e388_b.jpg" width="1024" height="683" alt="4RunnerHIDLow"></a><script async src="//embedr.flickr.com/assets/client-code.js" charset="utf-8"></script>
<a data-flickr-embed="true" href="https://www.flickr.com/photos/130074049@N07/28106236739/in/album-72157692614974285/" title="4RunnerOEMHigh"><img src="https://farm5.staticflickr.com/4769/28106236739_3bc8c7db34_b.jpg" width="1024" height="683" alt="4RunnerOEMHigh"></a><script async src="//embedr.flickr.com/assets/client-code.js" charset="utf-8"></script>
<a data-flickr-embed="true" href="https://www.flickr.com/photos/130074049@N07/28106236709/in/album-72157692614974285/" title="4RunnerHIDHigh"><img src="https://farm5.staticflickr.com/4659/28106236709_c4cd44032a_b.jpg" width="1024" height="683" alt="4RunnerHIDHigh"></a><script async src="//embedr.flickr.com/assets/client-code.js" charset="utf-8"></script>
Well I finally completed my very own HID retrofit. I used Brian's thread here as well as octanejunkie's (http://www.toyota-4runner.org/3rd-gen-t4rs/224604-my-3rd-gen-retrofit-projector-project.html). I also got some help from both these guys answering a few stupid questions.
I purchased everything needed (except headlights) from DDM Tuning. D2S V2 bi-xenon kit with range rover shrouds, Ultra HID kit 35w with D2S bulbs 5500k and their H4 high-low harness. I got the headlights from ebay. They're TYC brand with the clear glass, driver side is 20-5652-00 and passenger 20-5651-00 for those interested.
Again, I followed the first post in this thread pretty much 100%. I used all TYC components but per Brian's recommendation I did apply jbweld to the adjusting screws (white part that spins and black part that holds the white part are glued together) and the other "pin" as shown in post 4 of this thread.
I decided to paint my shrouds body color and I did matte black on the housings. I think it looks pretty good but will look even better once I start doing some more mods (satoshi grille, nice bumper and some clear/smoked corners).
Just a few notes for those doing this for the first time...
PLAN everything out. Planning is what made this job easy for me and rushing some things is what made it slow down. Doing it in your home garage (access to tools AND an oven) is much easier as I had to do all the painting and assembling off/on the car at my shop, but baking to disassemble/reassemble at my home. Make sure shrouds fit and you trim the rear of the housing (for the lock nut to fit easier on H4 lock ring) before painting.
Lastly, the one thing I wasn't clear on was aiming and making sure the projectors were level before reassembling lights. What I did was as Brian explained here but on my car... tighten everything really well (once EVERYTHING is done except putting the glass back on) and put the headlight assemblies on the car. Then I rotated the projector (holding the shroud) to make sure it was level. While still installed in the car (didn't want to risk removing them and projectors moving) I applied some JB weld to lock in the H4 adapter ring to the housing and the projector threads. At this point I had my bulbs in as well as the bulb lock ring, so it was easy to see how much jbweld I can put and still have enough thread to lock in the bulb. After letting this set for about 15-20 minutes, I removed the headlights and then applied jbweld liberally around the entire lock ring etc.
Finally, here are some photos...
<a data-flickr-embed="true" href="https://www.flickr.com/photos/130074049@N07/39176410104/in/album-72157692614974285/" title="4RunnerHIDRetrofit (1)"><img src="https://farm5.staticflickr.com/4724/39176410104_f3beb53bd3_b.jpg" width="1024" height="683" alt="4RunnerHIDRetrofit (1)"></a><script async src="//embedr.flickr.com/assets/client-code.js" charset="utf-8"></script>
<a data-flickr-embed="true" href="https://www.flickr.com/photos/130074049@N07/28106317939/in/album-72157692614974285/" title="4RunnerHIDRetrofit (2)"><img src="https://farm5.staticflickr.com/4617/28106317939_45c08e3286_b.jpg" width="1024" height="683" alt="4RunnerHIDRetrofit (2)"></a><script async src="//embedr.flickr.com/assets/client-code.js" charset="utf-8"></script>
<a data-flickr-embed="true" href="https://www.flickr.com/photos/130074049@N07/39176414654/in/album-72157692614974285/" title="4RunnerHIDRetrofit (3)"><img src="https://farm5.staticflickr.com/4654/39176414654_a7bca9b0c4_b.jpg" width="1024" height="683" alt="4RunnerHIDRetrofit (3)"></a><script async src="//embedr.flickr.com/assets/client-code.js" charset="utf-8"></script>
<a data-flickr-embed="true" href="https://www.flickr.com/photos/130074049@N07/39176414424/in/album-72157692614974285/" title="4RunnerHIDRetrofit (4)"><img src="https://farm5.staticflickr.com/4741/39176414424_72c52d8785_b.jpg" width="1024" height="683" alt="4RunnerHIDRetrofit (4)"></a><script async src="//embedr.flickr.com/assets/client-code.js" charset="utf-8"></script>
<a data-flickr-embed="true" href="https://www.flickr.com/photos/130074049@N07/28106317849/in/album-72157692614974285/" title="4RunnerHIDRetrofit (5)"><img src="https://farm5.staticflickr.com/4655/28106317849_b5194c5351_b.jpg" width="1024" height="683" alt="4RunnerHIDRetrofit (5)"></a><script async src="//embedr.flickr.com/assets/client-code.js" charset="utf-8"></script>
<a data-flickr-embed="true" href="https://www.flickr.com/photos/130074049@N07/28106317529/in/album-72157692614974285/" title="4RunnerHIDRetrofit (6)"><img src="https://farm5.staticflickr.com/4744/28106317529_1d2da51d3c_b.jpg" width="1024" height="683" alt="4RunnerHIDRetrofit (6)"></a><script async src="//embedr.flickr.com/assets/client-code.js" charset="utf-8"></script>
<a data-flickr-embed="true" href="https://www.flickr.com/photos/130074049@N07/39176414554/in/album-72157692614974285/" title="4RunnerHIDRetrofit (7)"><img src="https://farm5.staticflickr.com/4604/39176414554_cdd60d9fdc_b.jpg" width="1024" height="683" alt="4RunnerHIDRetrofit (7)"></a><script async src="//embedr.flickr.com/assets/client-code.js" charset="utf-8"></script>
<a data-flickr-embed="true" href="https://www.flickr.com/photos/130074049@N07/28106317709/in/album-72157692614974285/" title="4RunnerHIDRetrofit (8)"><img src="https://farm5.staticflickr.com/4697/28106317709_e472d5793a_b.jpg" width="1024" height="683" alt="4RunnerHIDRetrofit (8)"></a><script async src="//embedr.flickr.com/assets/client-code.js" charset="utf-8"></script>
<a data-flickr-embed="true" href="https://www.flickr.com/photos/130074049@N07/39176414274/in/album-72157692614974285/" title="4RunnerHIDRetrofit (9)"><img src="https://farm5.staticflickr.com/4608/39176414274_e24e4772b9_b.jpg" width="1024" height="683" alt="4RunnerHIDRetrofit (9)"></a><script async src="//embedr.flickr.com/assets/client-code.js" charset="utf-8"></script>
<a data-flickr-embed="true" href="https://www.flickr.com/photos/130074049@N07/39176290014/in/album-72157692614974285/" title="4RunnerOEMLow"><img src="https://farm5.staticflickr.com/4619/39176290014_4f315074db_b.jpg" width="1024" height="683" alt="4RunnerOEMLow"></a><script async src="//embedr.flickr.com/assets/client-code.js" charset="utf-8"></script>
<a data-flickr-embed="true" href="https://www.flickr.com/photos/130074049@N07/28106236659/in/album-72157692614974285/" title="4RunnerHIDLow"><img src="https://farm5.staticflickr.com/4632/28106236659_5231b9e388_b.jpg" width="1024" height="683" alt="4RunnerHIDLow"></a><script async src="//embedr.flickr.com/assets/client-code.js" charset="utf-8"></script>
<a data-flickr-embed="true" href="https://www.flickr.com/photos/130074049@N07/28106236739/in/album-72157692614974285/" title="4RunnerOEMHigh"><img src="https://farm5.staticflickr.com/4769/28106236739_3bc8c7db34_b.jpg" width="1024" height="683" alt="4RunnerOEMHigh"></a><script async src="//embedr.flickr.com/assets/client-code.js" charset="utf-8"></script>
<a data-flickr-embed="true" href="https://www.flickr.com/photos/130074049@N07/28106236709/in/album-72157692614974285/" title="4RunnerHIDHigh"><img src="https://farm5.staticflickr.com/4659/28106236709_c4cd44032a_b.jpg" width="1024" height="683" alt="4RunnerHIDHigh"></a><script async src="//embedr.flickr.com/assets/client-code.js" charset="utf-8"></script>
Last edited:


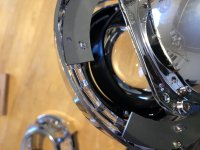




 Here's a couple photos of the