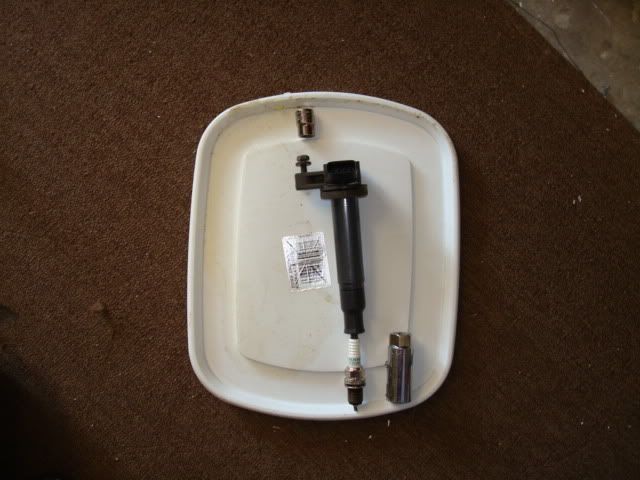
Changed the plugs..Very easy

In order to change the plugs I just took the plastic engine cover off. After removing the bracket, the last two plugs should be easy. The bracket should not be too difficult to take off. It does require a little bit of flexibility, because your reaching into the engine bay.

It does take a little bit of effort to snake the rear drivers side plug out of the engine. Take your time and remove the ignition coils slowly around the vacume/harnesses in that area.
 
Thanks guys. I actually changed them yesterday and it wasn't as bad as I thought. I took off the pastic engine cover and also disconnected a few hoses to make it easier to get to the driver's side plugs. One hose in particular made it tough to disconnect the rearmost plug harness. It took me a little over an hour but it'll go much quicker next time now that I know what I'm doing. At least I won't have to mess with it for another 30K miles.
 
RkyMtHgh said:
Thanks guys. I actually changed them yesterday and it wasn't as bad as I thought...

Did you happen to apply some thermal paste to the threads on the new spark plugs? This helps when you remove the plugs in another 30K miles.
 
kimboy said:
Did you happen to apply some thermal paste to the threads on the new spark plugs? This helps when you remove the plugs in another 30K miles.
Huh ?
Is'nt thermal paste a heat sink compound for electronics ? You want anti seize lube for spark plug and bolt threads right ?
 
Sorry, here's a correction from the DIY web site.

Apply a small amount of anti-seize lubricant to make removing the plug easier the next time around. Partially tighten the new plug by hand so not to cross threads, then tighten the rest of the way with a torque wrench (figure D) according to the specifications.

This is like using teflon tape for pips... it makes future removal easier...

Finally, apply some dielectric grease to the end of the terminal wire to ensure a good contact, and replace the wire onto the plug. Repeat the process, one at a time, until all the old plugs have been replaced.

I like using dielectric grease to ensure that my electronics are kept from contaminants... It's cheap insurance, and one $4 tube will probably last many years.

DIY website link
 
Since I haven't seen any pics yet, what is underneath the coil going to the plug? I didn't quite understand from above.
Is the coil connected to the plug? Is there a short plug wire under the coil? Is there a rigid tube of somekind? I just need a mental pic here, want to go easy the first time.

Any other notes to detaching and/or attaching the plug boot/whatever?

Thx
Mark
 
I have never liked the idea of placing anti-seize compound on plugs since the threads are parallel and not the sealing mechanism. The crush-ring is the only sealing device and I worry about the hot gases getting into the threads and dissolving or blasting the anti-seize away. Having said that, I am concerned about leaving the V8 plugs in for scheduled 100 k miles.
 
mnormand said:
Since I haven't seen any pics yet, what is underneath the coil going to the plug? I didn't quite understand from above.
Is the coil connected to the plug? Is there a short plug wire under the coil? Is there a rigid tube of somekind? I just need a mental pic here, want to go easy the first time.

Any other notes to detaching and/or attaching the plug boot/whatever?

Thx
Mark

Yes there is a plastic tube with a rubber type boot at the end. The end of the tube attaches to the top of the sparkplug. Just unhook the coil pack from the wiring harness and unbolt it. Gently pull up and you will see. Also on page 1658 of the 2003 4Runner parts catalog, found on this site, you will see on the lower right of the page the ignition for the engines. Number 1 is the coil pack.

This is for a 3.4L engine but you get the idea.

pliers_disconnect.jpg~original
 
Last edited:
greasefingers said:
I have never liked the idea of placing anti-seize compound on plugs since the threads are parallel and not the sealing mechanism. The crush-ring is the only sealing device and I worry about the hot gases getting into the threads and dissolving or blasting the anti-seize away. Having said that, I am concerned about leaving the V8 plugs in for scheduled 100 k miles.

While you are correct that the crush seal is the sealing device on the plug, I prefer using anti-sieze on the plugs simply because your are bolting two diffent types of metals together in a high heat enviroment. Remember that the head is aluminium and very expensive and hard to repair. Also the v8 plugs are iridium, the will last a long time, maybe not 100k but you can periodically check them.
 
Yea I have a serious problem with the 100 to 120 K mile replacement schedule on the iridium plugs. I have 53 k miles on her now. I think at 60 k I will remove all of them for inspection and lube of some sort. I do not like the idea of simply letting them sit there for years. It could be fine and then again they could be a bear to remove. If at 60 k, they seem at all difficult to remove then I will replace them with standard NKGs copper plugs, like the Tundra
 
Last edited:
Use a little anti-seize compound on the threads, it has nothing to do with sealing. It will make it real easy to remove the plugs after many years. It makes a BIG difference. You would also want to use it on all aftermarket exhaust flange and clamp bolts/nuts.

Koz
 
Update... did the 2004 V6 plug change last night, took about an hour total for everything. Plugs came out easily.

Took off the big plastic engine cover thing. Right bank (from drivers position) went fine and fast. Left bank, rear two plugs were tight, removed that hose in the way, no probs, done deal.

For the mechanically challenged who are considering, go for it. Gap plugs & get all tools ready the night before. I'm fair with tools, etc, but much better at pre-prep, reading this thread, etc LOL.
:D

Next on the 30k list, diff & xcase fluid changes. Whoohoo, more money saved for gas instead of dealer!
 
It's Official - anyone can do it

Thank you all who took the time to post tips. I am not mechanically inclined and normally hate dong it, but spending $200 at the stealer when the plugs are only $35 or so just was beyond me.

I did it. It took less than 60 minutes. I did not break anything. Not even a 4 letter word was uttered.

Anyone can do it!
 
In case anybody is looking for some more tips from a different perspective

I just did my wife's 2005 V6 last night.. I waited until 42k miles because I just assumed they were 100k mile plugs until I read otherwise on this board!

They still looked OK to me but definitely not pretty.

I got NKG Laser Platinum plus... should be good for 100k miles or more.

Part number was PLFR6A-11. They're $14/each at NAPA or $13/each on Amazon. Yes $80 is pricey but what are you going to pay if you get 30k mile plugs? $30+ right? So in terms of price per mileage the platinum plugs are actually a bit better and that's before attributing any value to your time and effort in changing them.

And on that note I have to say that this job took me more like 3 hours but that's because I read this thread after getting started and didn't realize I didn't have some parts I'd need. Now that I have the right parts and have a better developed feel for the clips on the coil packs, I think I could do it in an hour flat start to finish if I was pushing it.


-You don't need a flexible ratchet extension for any of the plugs though the front most driver's side plug almost needed one.

-I found no reason for the fuel line to thread the plugs... I was able to just put the plug in the plug socket, stick that on the extension without the ratchet itself and just hand tighten the plug... it was plenty obvious if it was misthreaded and I was at no risk of damaging anything when I was only using my hands to tighten... once the plug could no longer be hand tightened I turned them for about 1/2 to 2/3rds of a turn or about 14 ft-lb.

-You DO need a ratchet extension for your spark plug socket that will lock, otherwise good luck pulling your spark plug socket out once you've got the plug inserted. Then again maybe my plug socket was just much grabbier than most but I had no chance of getting it back out without the locking extension I had to go and buy. For some reason this wasn't an issue on my wife's old 99 Accord 4-cyl. Different sized plugs maybe?

-Parts to remove or move out of the way include the airbox from the filter back, the black metal bracket on the driver's side between the middle and rear plug (I was able to remove the top 12mm bolt and leave in the bottom one loosened and just move it out of the way. Also go ahead and just remove the engine cover, it's just two 10mm caps. Also pull the PCV hose on the driver's side out of the way... it's the black rubber black insulated hose with a metal clip that's near the fuel lines that goes from a cast black plastic outlet up low into the block down low. These two things makes clearance on driver's side about 10x more comfortable and will take you an extra 1-2 minutes total to remove and put back.


Issues I had:
Those coil pack plug clips were a PAIN to get off in some cases... especially on the driver's side front-most plug. The best method I figured out was using a very small screw driver to hold the clip retainer up and prying the clip out with a larger screw driver, then once I got the clip back just an 1/8th of an inch or so pull it the rest of the way back with my hand. I was really nervous I was going to crack the plastic with one of the screw drivers though, but I didn't. I wish Toyota had made the coil pack wires attach with something more straightforward, like a screw.

I dropped one of the coil pack 10mm bolts accidentally and wouldn't you know it, it managed to bounce INSIDE the frame cross member running under the motor. I had to remove the mid front skid plate and fish around with one of those magnet wands to find it. Man that was frustrating.

I also forgot to get anti-seize, so I really hope that's not going to be an issue at 140k miles.

 
Last edited:
I just did mine on Saturday. I have a 99 Limited and it was very easy. Took about an hour because I dropped a socket and had to dig it out.

I used to own a Mitsubishi Montero Sport and a spark plug change was crazy in that. I had to take the top half of the engine apart to do it. It would take about 5-6 hours to do and 35ish bolts that had to come off. :bash:

I also read here that only three wires come when changing the spark plug wires. So I wasn't freaked out when I paid $50 for just three wires. Plugs were $25. Engine runs smoother too.
 
Just wanted to update you guys... I talked to NGK's tech support line and they specifically recommend AGAINST using anti-seize of any sort on their plugs (or, at least on the laser platinum plugs and I think on any of the other ones too... might want to double check with them).

They use a special metal coating which will not bond with aluminum and they say using anti-seize is not only unnecessary but can make the bolt threads too slick and cause you to actually over-torque the plug when applying the correct amount of pressure.

This is just a follow up since I forgot to use anti-seize and wanted to be sure that I needed to before pulling them back out.

Turns out I'm in the clear, but I wanted to give you guys a heads up.
 
FYI, the plug torque is 13 ft-lb, and the coil bolt and engine cover bolt torque is 66 in-lb. Also, a drop of synthetic engine oil is recommended instead of anti-seize - my Corvette manual mandates this with aluminum heads.
 

Members online

Forum statistics

Threads
278,312
Messages
3,554,085
Members
248,016
Latest member
Advally Service

Trending content

Back
Top